The weather final cooperated, and Tim was able to make his long anticipated – and often delayed – trip to the Pine Cone Lodge.
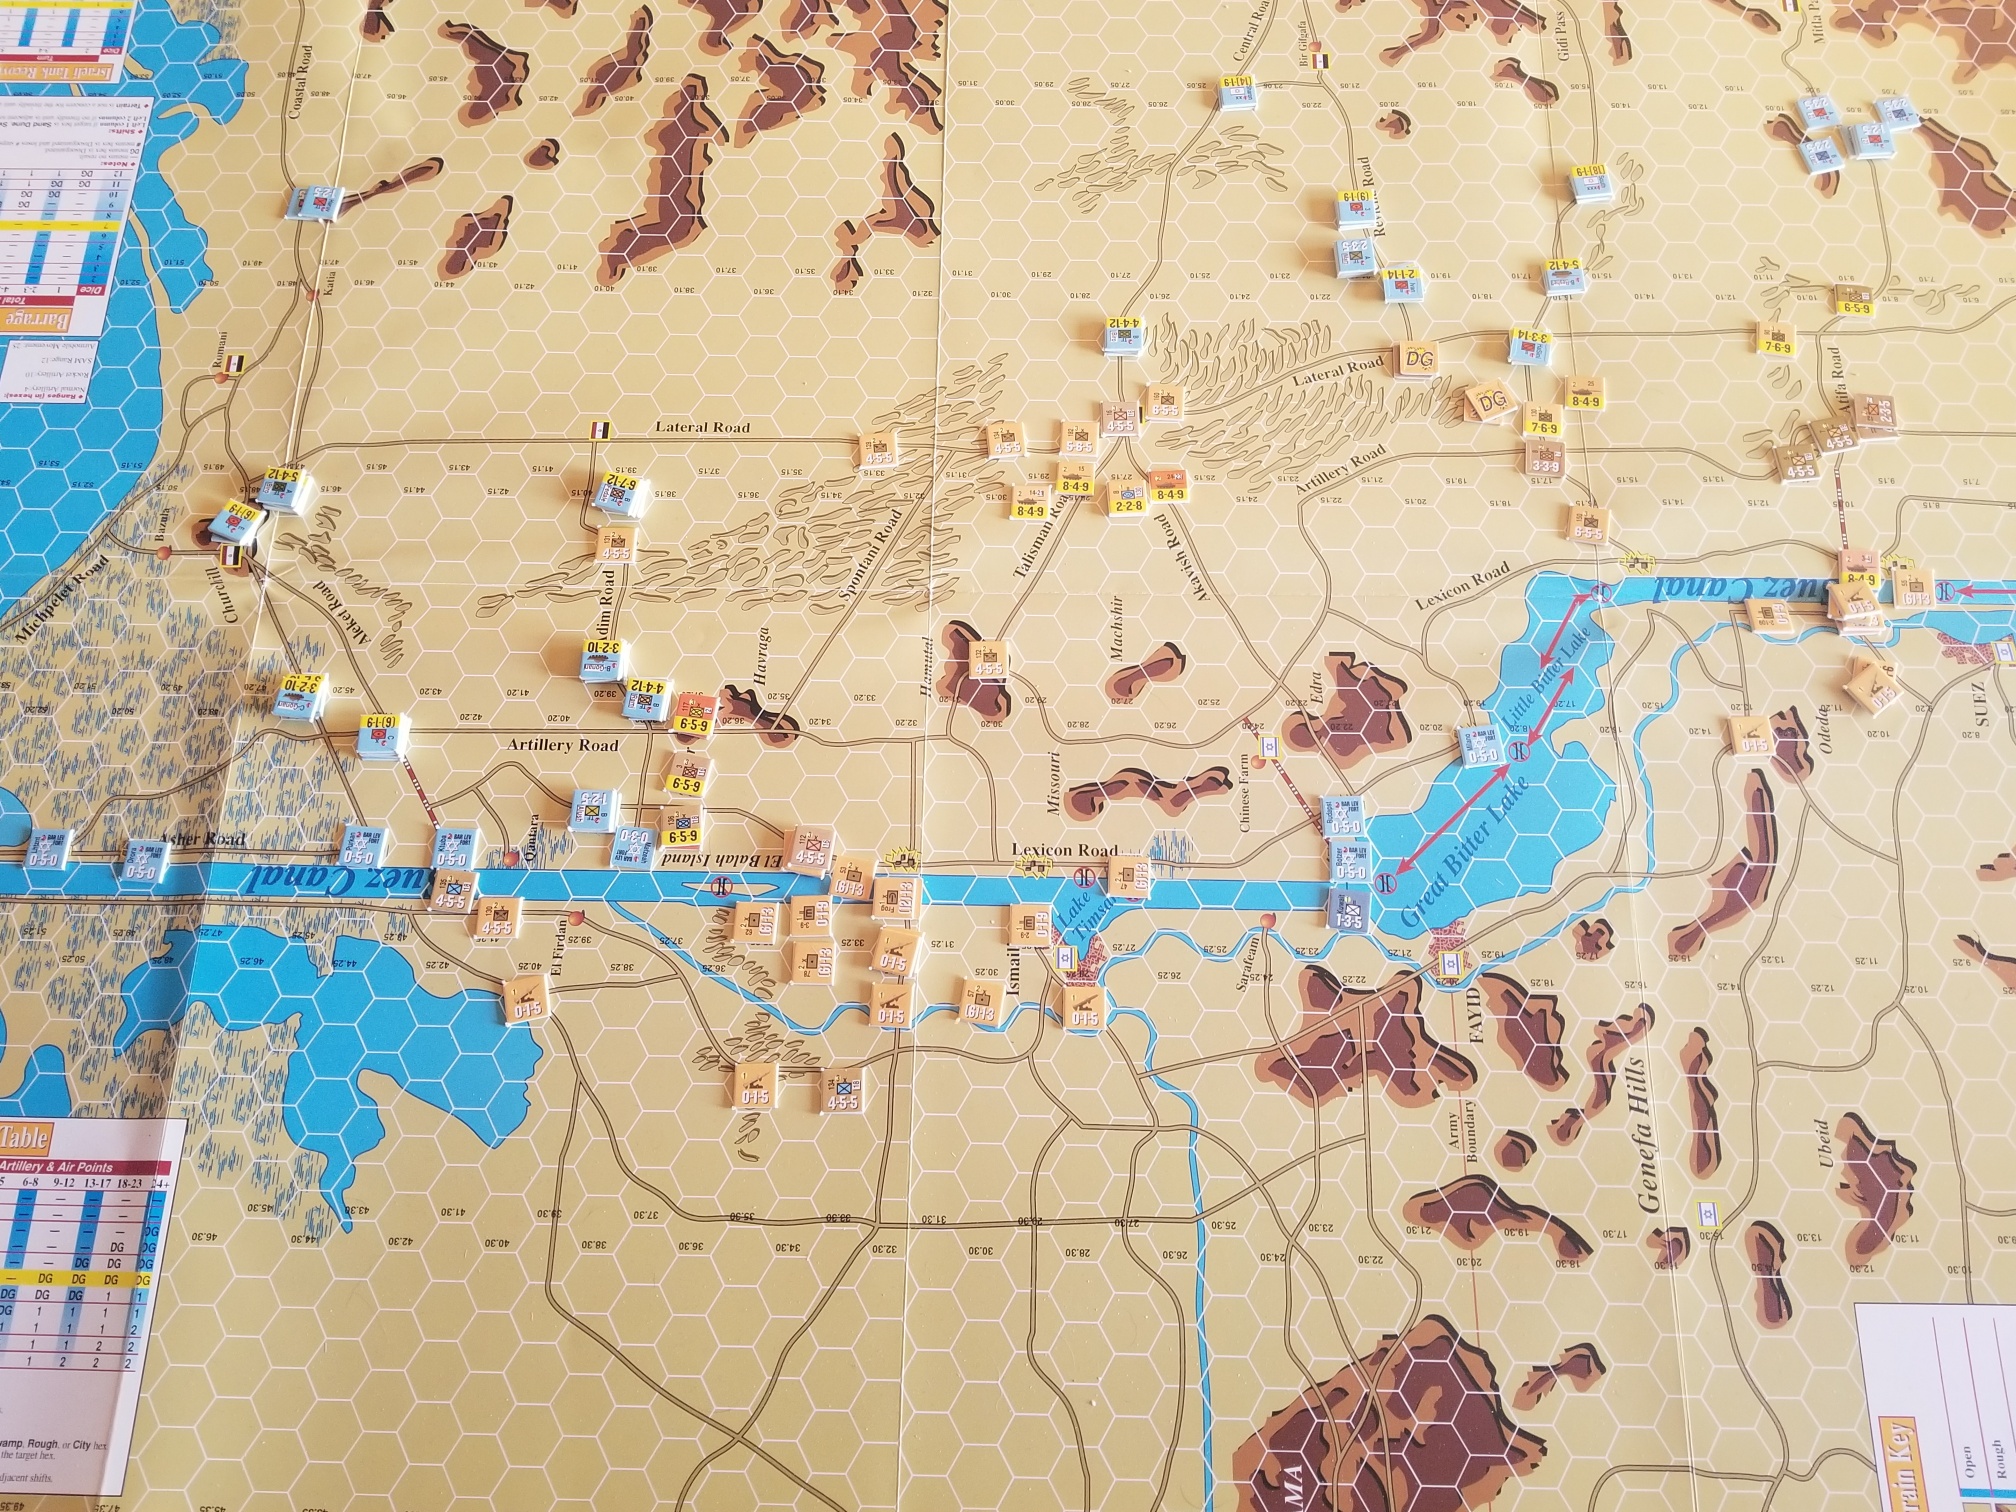
He is a fan of the Standard Combat Series now published by Multiman. I had purchased two of the games some time ago. We decided to play Yom Kippur. The game covers the initial Egyptian assault across the Suez in the October War.
We started and reset about three time. The first was due to a rules knowledge breakdown (shocking!), the second due to Tim’s die rolling breakdown, and the third for “let’s try it again”.
We never made to Turn Four, but had a lot of fun working through several operational approaches.
I also gained an appreciation of why so many like this system and how it has stood the test of time.
The basic concepts are straight-forward for an experienced gamer. The only real adjustment is that you always “round up” for die rolls and an eligible unit cannot move in the Exploitation Phase if it is in an enemy zone of control (ZOC). Each game has its own specific rules, but I found these easy to work with.
Plenty of comments and insights into the system and game at the links posted above.
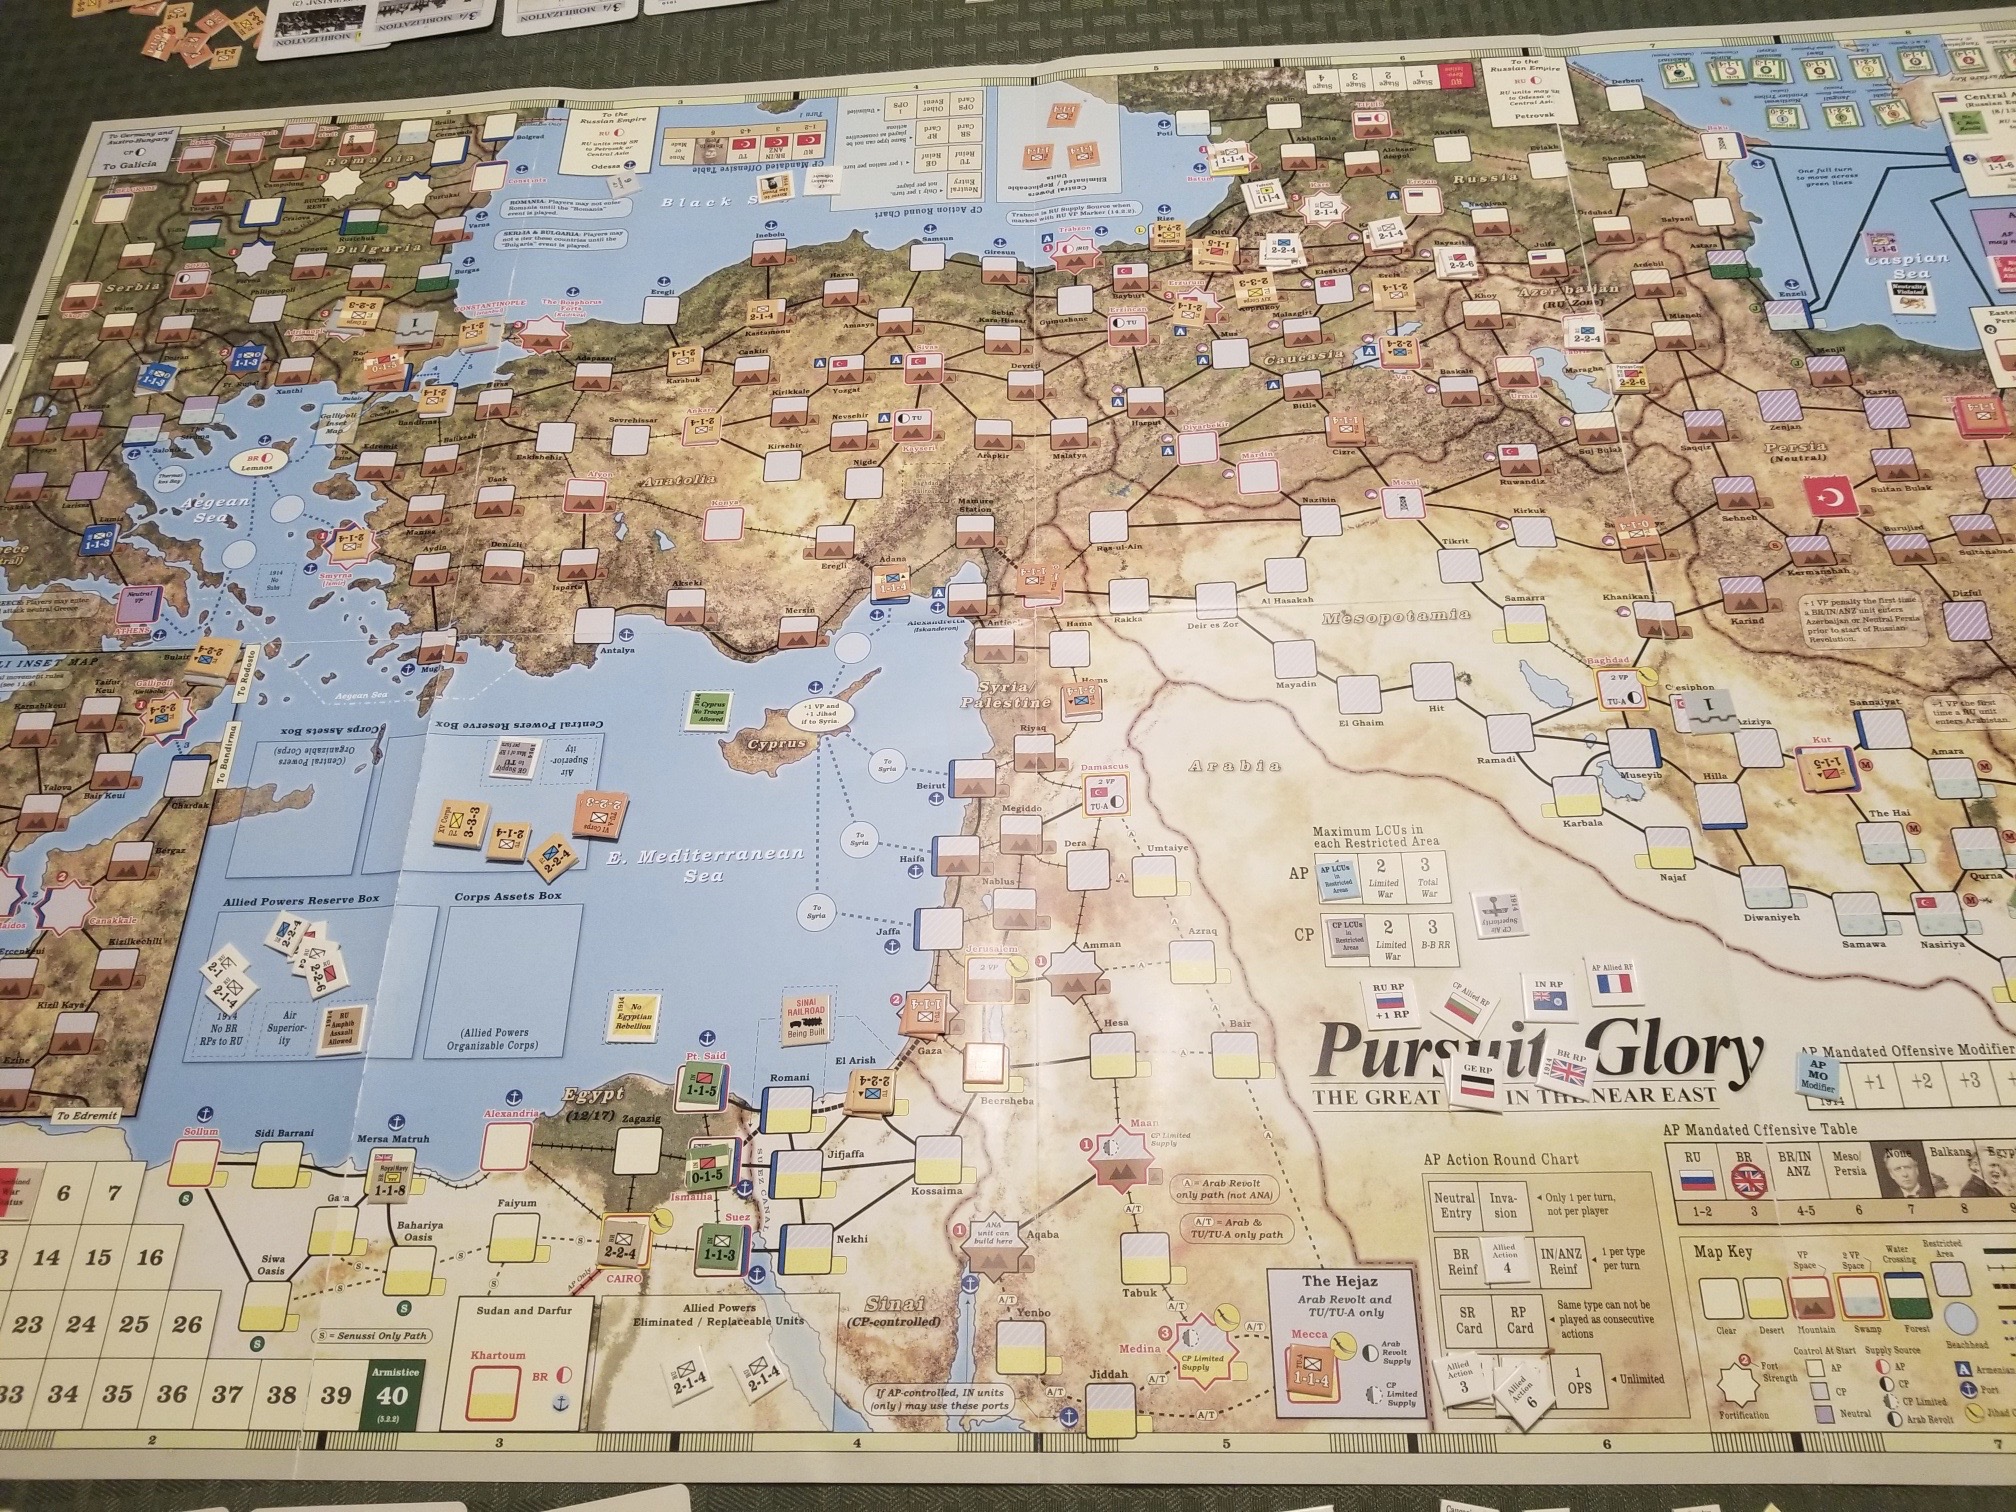
One thing, though. The map……….BTW that’s the situation at the end of last play-thru. Israelis are Blue. Map is oriented to the East.
Set up another DIY scenario for Heroes of Normandie (HoN).
A meeting engagement between two reconnaissance forces attempting to secure a crossroads.
Both sides had a mix of reconnaissance sections, along with infantry support in two halftracks. The Germans had a motorcycle/sidecar/machine gun , and panzerschreck section. The US had a Greyhound armored car and Jeep with .50 caliber machine gun.
The scenario length was 8 turns, with turn initiative alternating between sides. Each side entered on opposite sides (east and west) of the map. I used event cards, but did not remove any inappropriate ones from the draw decks. This was a conscious attempt to incorporate them in gameplay, but reduce their possible impact.
It was quite the slugfest both times I played.
If I had set this scenario up in Advanced Squad Leader, my play would be far more constrained, with concerns about doctrine and realism. Not with HoN. The cartoonishness that is off-putting for some, seems liberating to me. I feel encouraged to take more chances; that is within tactical reason. Maybe it’s the straightforward vehicle rules…….
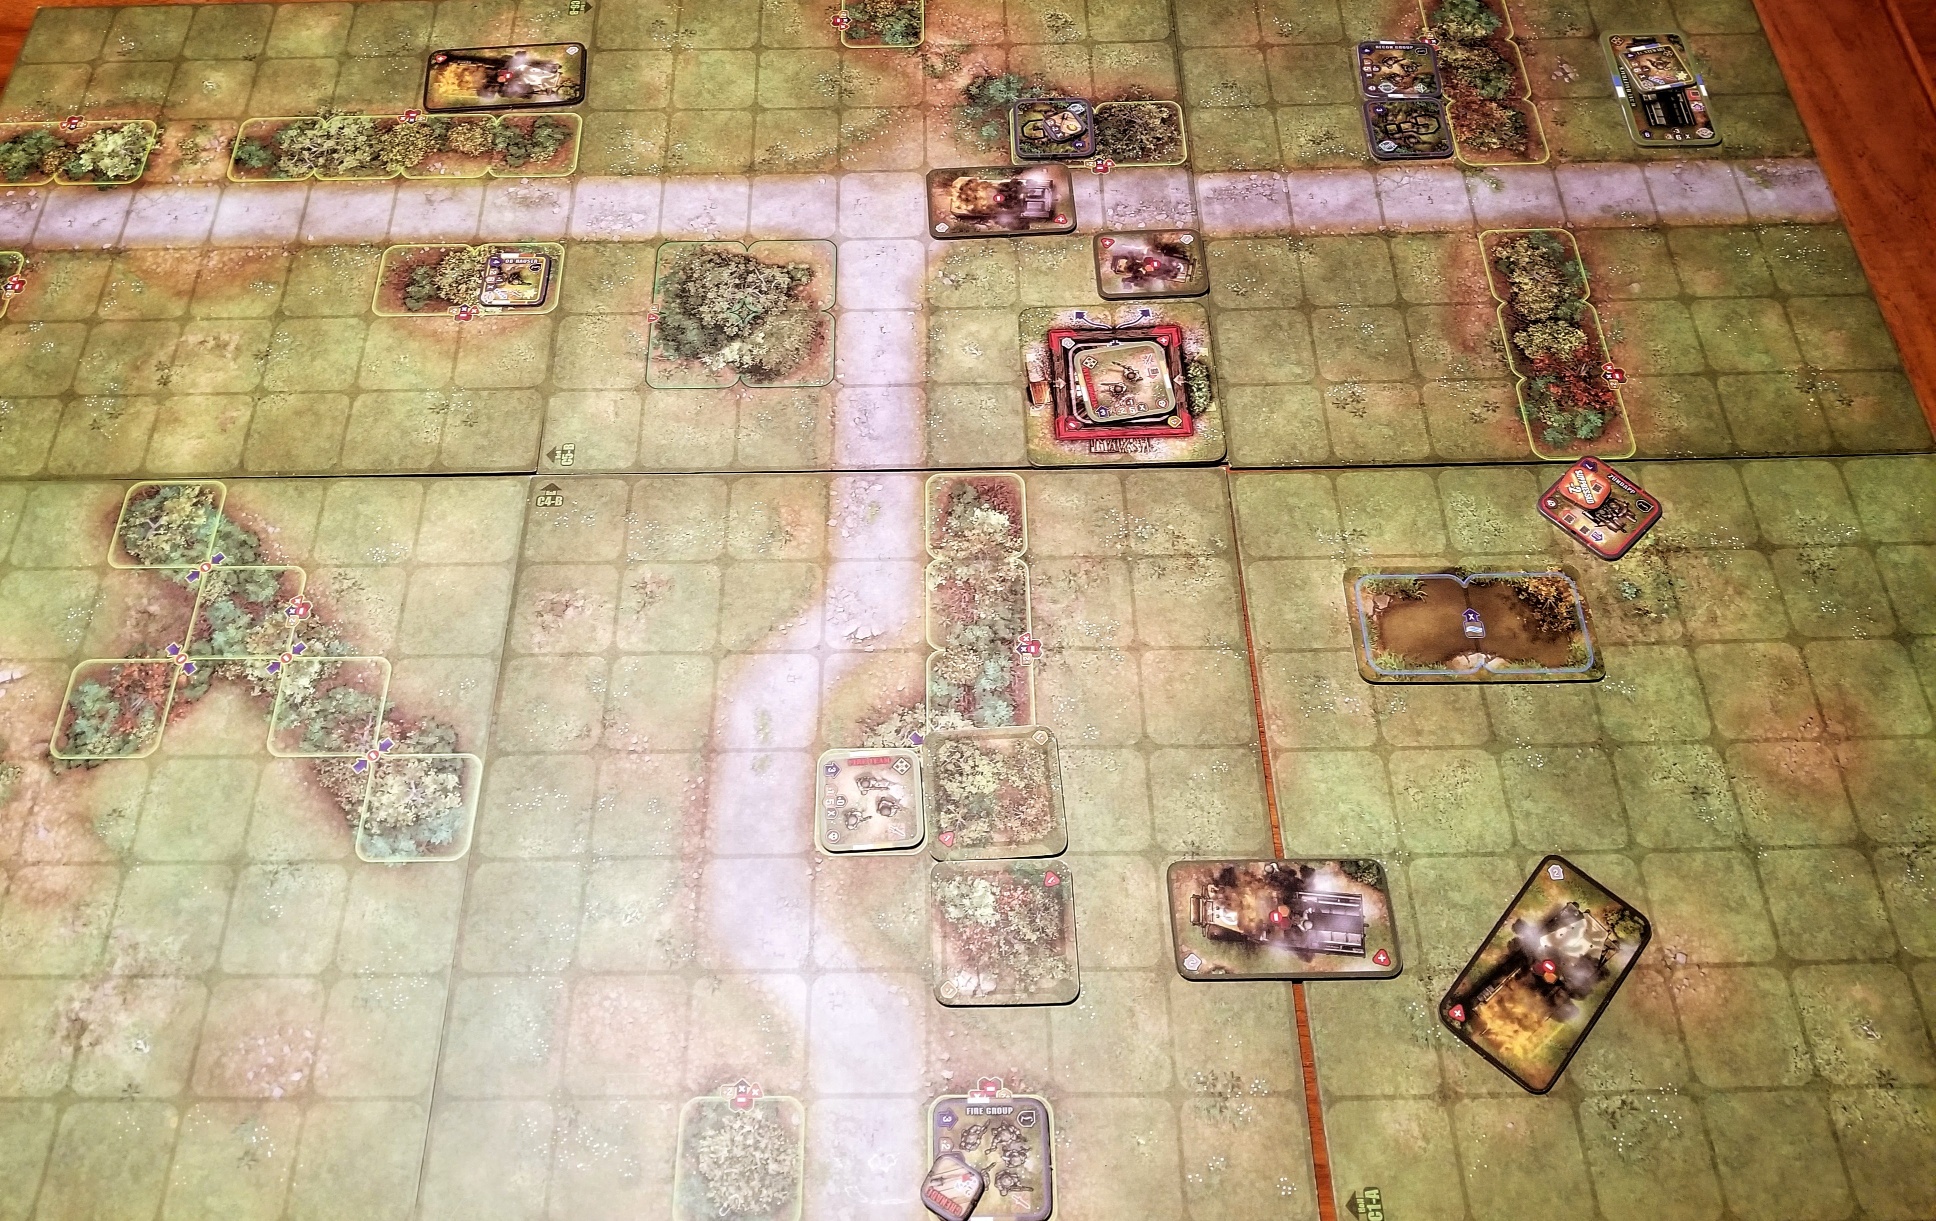
Here’s a photo of what was left after eight turns. Most of the vehicles are wrecks, with units huddled in the hedgerows, or in the house at the crossroads. North at top of photo.
Still having lots of fun with Heroes of Normandie (HoN).
Set up a quick scenario the other night. Simple objective for the Americans; Get your armor across two boards. Six turns, but Germans already in ambush positions. Same basic forces for both sides, except each now has a tank.
Played it through a few times. It all boiled down to the last turn or two. That’s when the German Pz IV and panzerschreck each get a shot at the US M4 Sherman. However, the US advance sequence during the preceding turns is critical in order to get infantry in position to support. To make things even more difficult, I ran a scenario where the US had to also get an infantry unit off-board.
Did not use cards. Drew them, though. What wild outcomes they could have produced! Need to reconcile my need for order with even more possible fun and confusion. I’m not in a hurry to resolve this psychological conundrum. I think a reading of the solitaire rules published on Boardgamegeek may be in order.
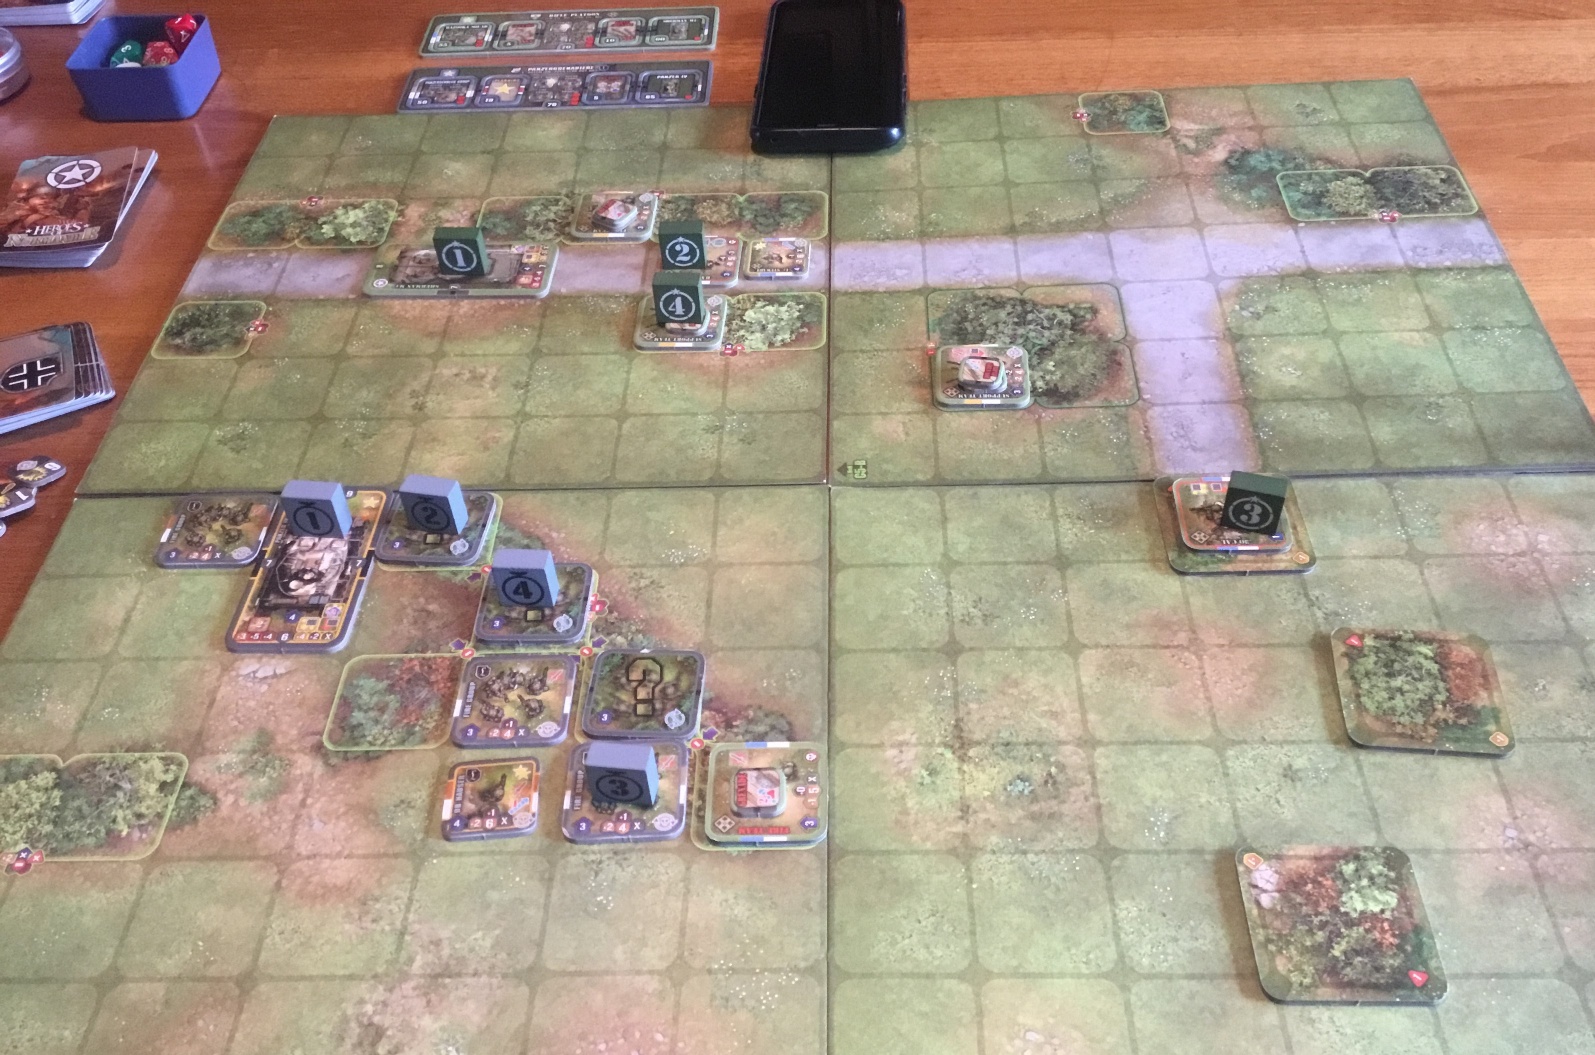
Simple, but interesting and fun. Here’s a bad pic taken before the final game turn, with the Germans having initiative and Americans hoping to get to their turn with the tank still operational. Cell phone is holding down a non-compliant map corner.
Back from a fun 2+ week trip to (and recovery from) Joshua Tree NP and Organ Pipe NM. Weather could have been better.
Have started playing Heroes of Normandie (HON)again. I like this game, and I stress the word “game”. Not a simulation, but still a challenge. Beautiful components. Just follow the Tag for my earlier impressions.
I realized during this latest play iteration that understanding the game’s rules and flow was all about the symbols. In a typical hex and counter game, counter symbols are sparse, and aside from attack/defense/movement, provide little information concerning the connection with the rules. In HON, the unit counter is loaded with symbols involving literally every action that unit can take. Understand the symbols, and you just play. Very similar to Kriegsspiel, and makes for a far different learning curve.
I’m using the updated, and cleaned up, rules found in the HON Compendium, as well as the Action Cards. Need to read up on the solitaire guidance concerning the cards as how to handle them has been a little problematic.
Going to enjoy this for another week and then probably shift over to WW2 coastal naval combat.
Quick Comment: This game was played using the First Edition, not the recently published Second Edition which, from what I gather, contains some significant rules modifications.
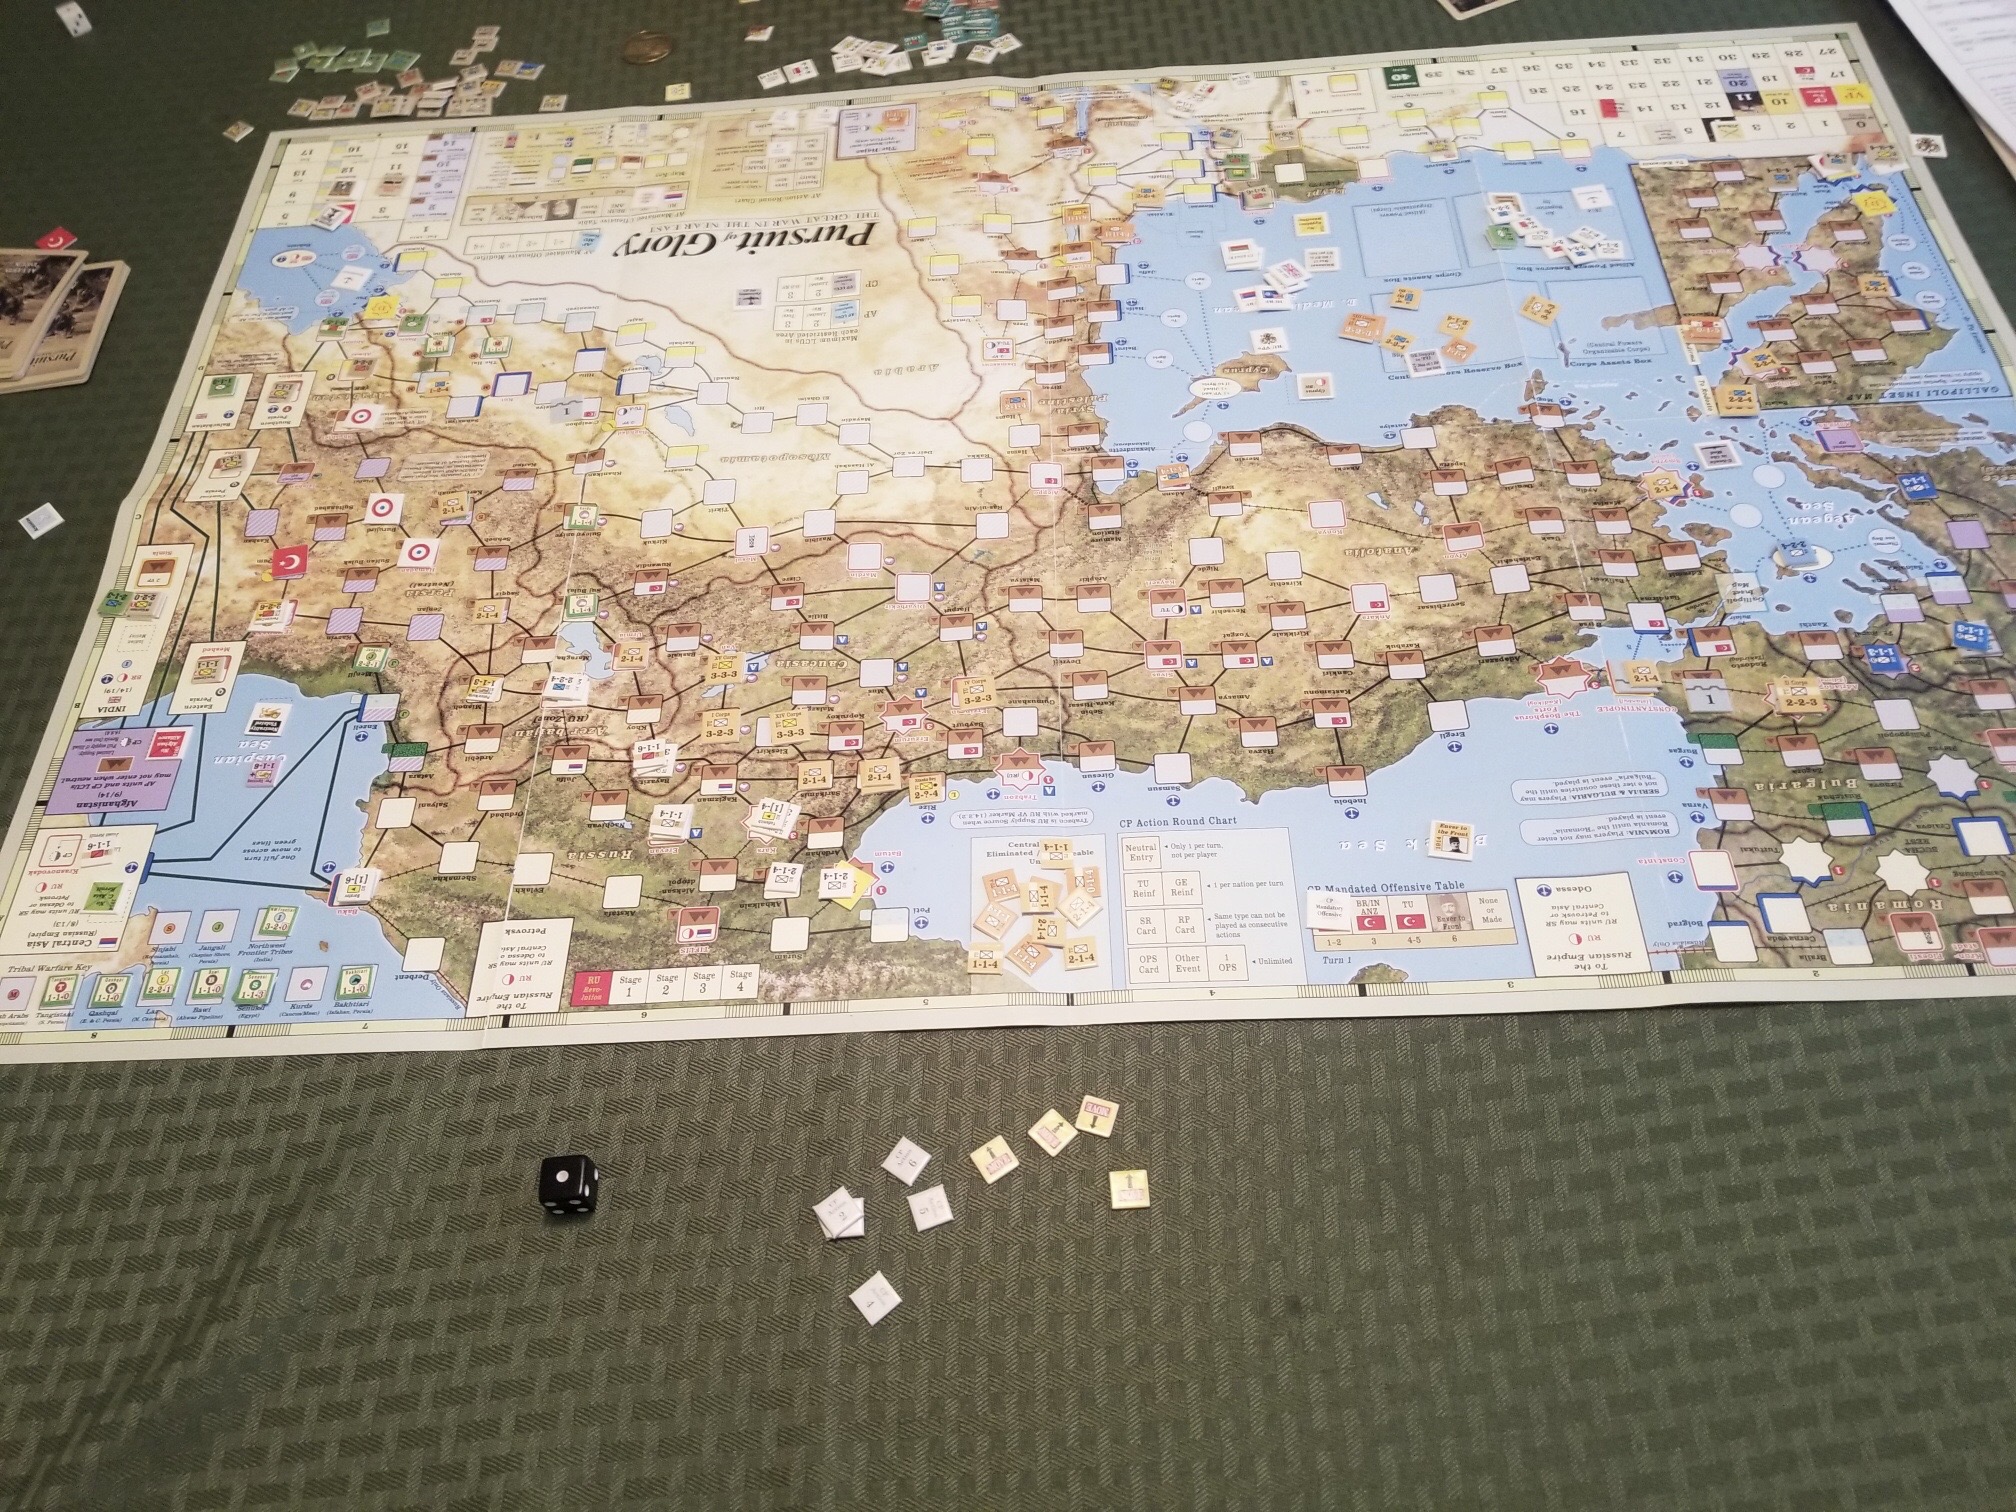
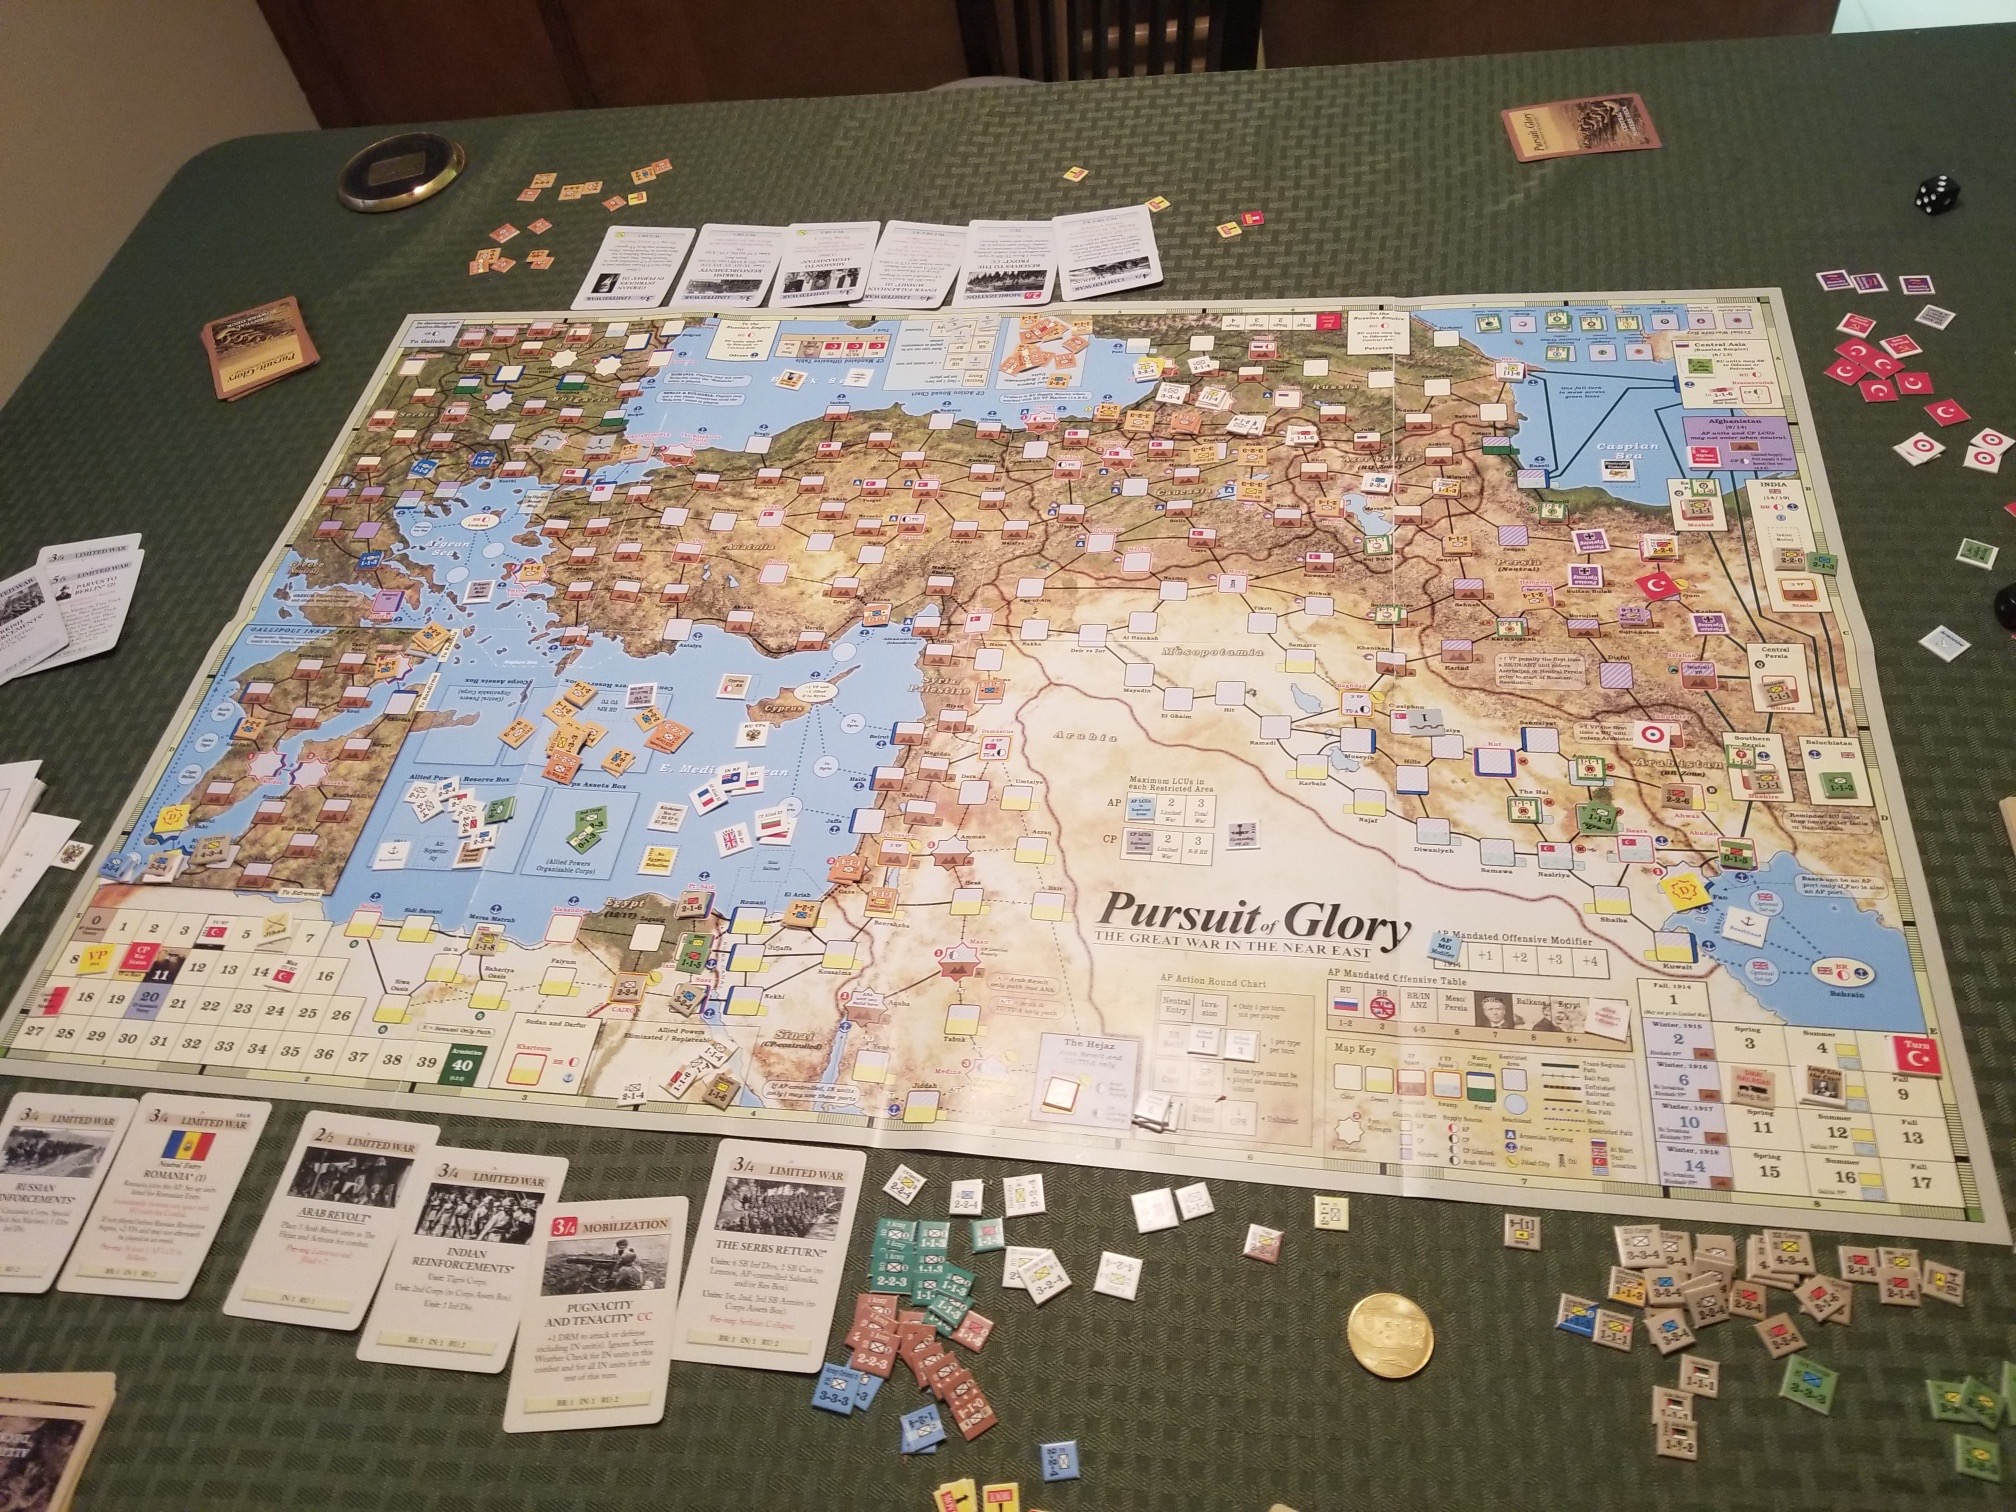
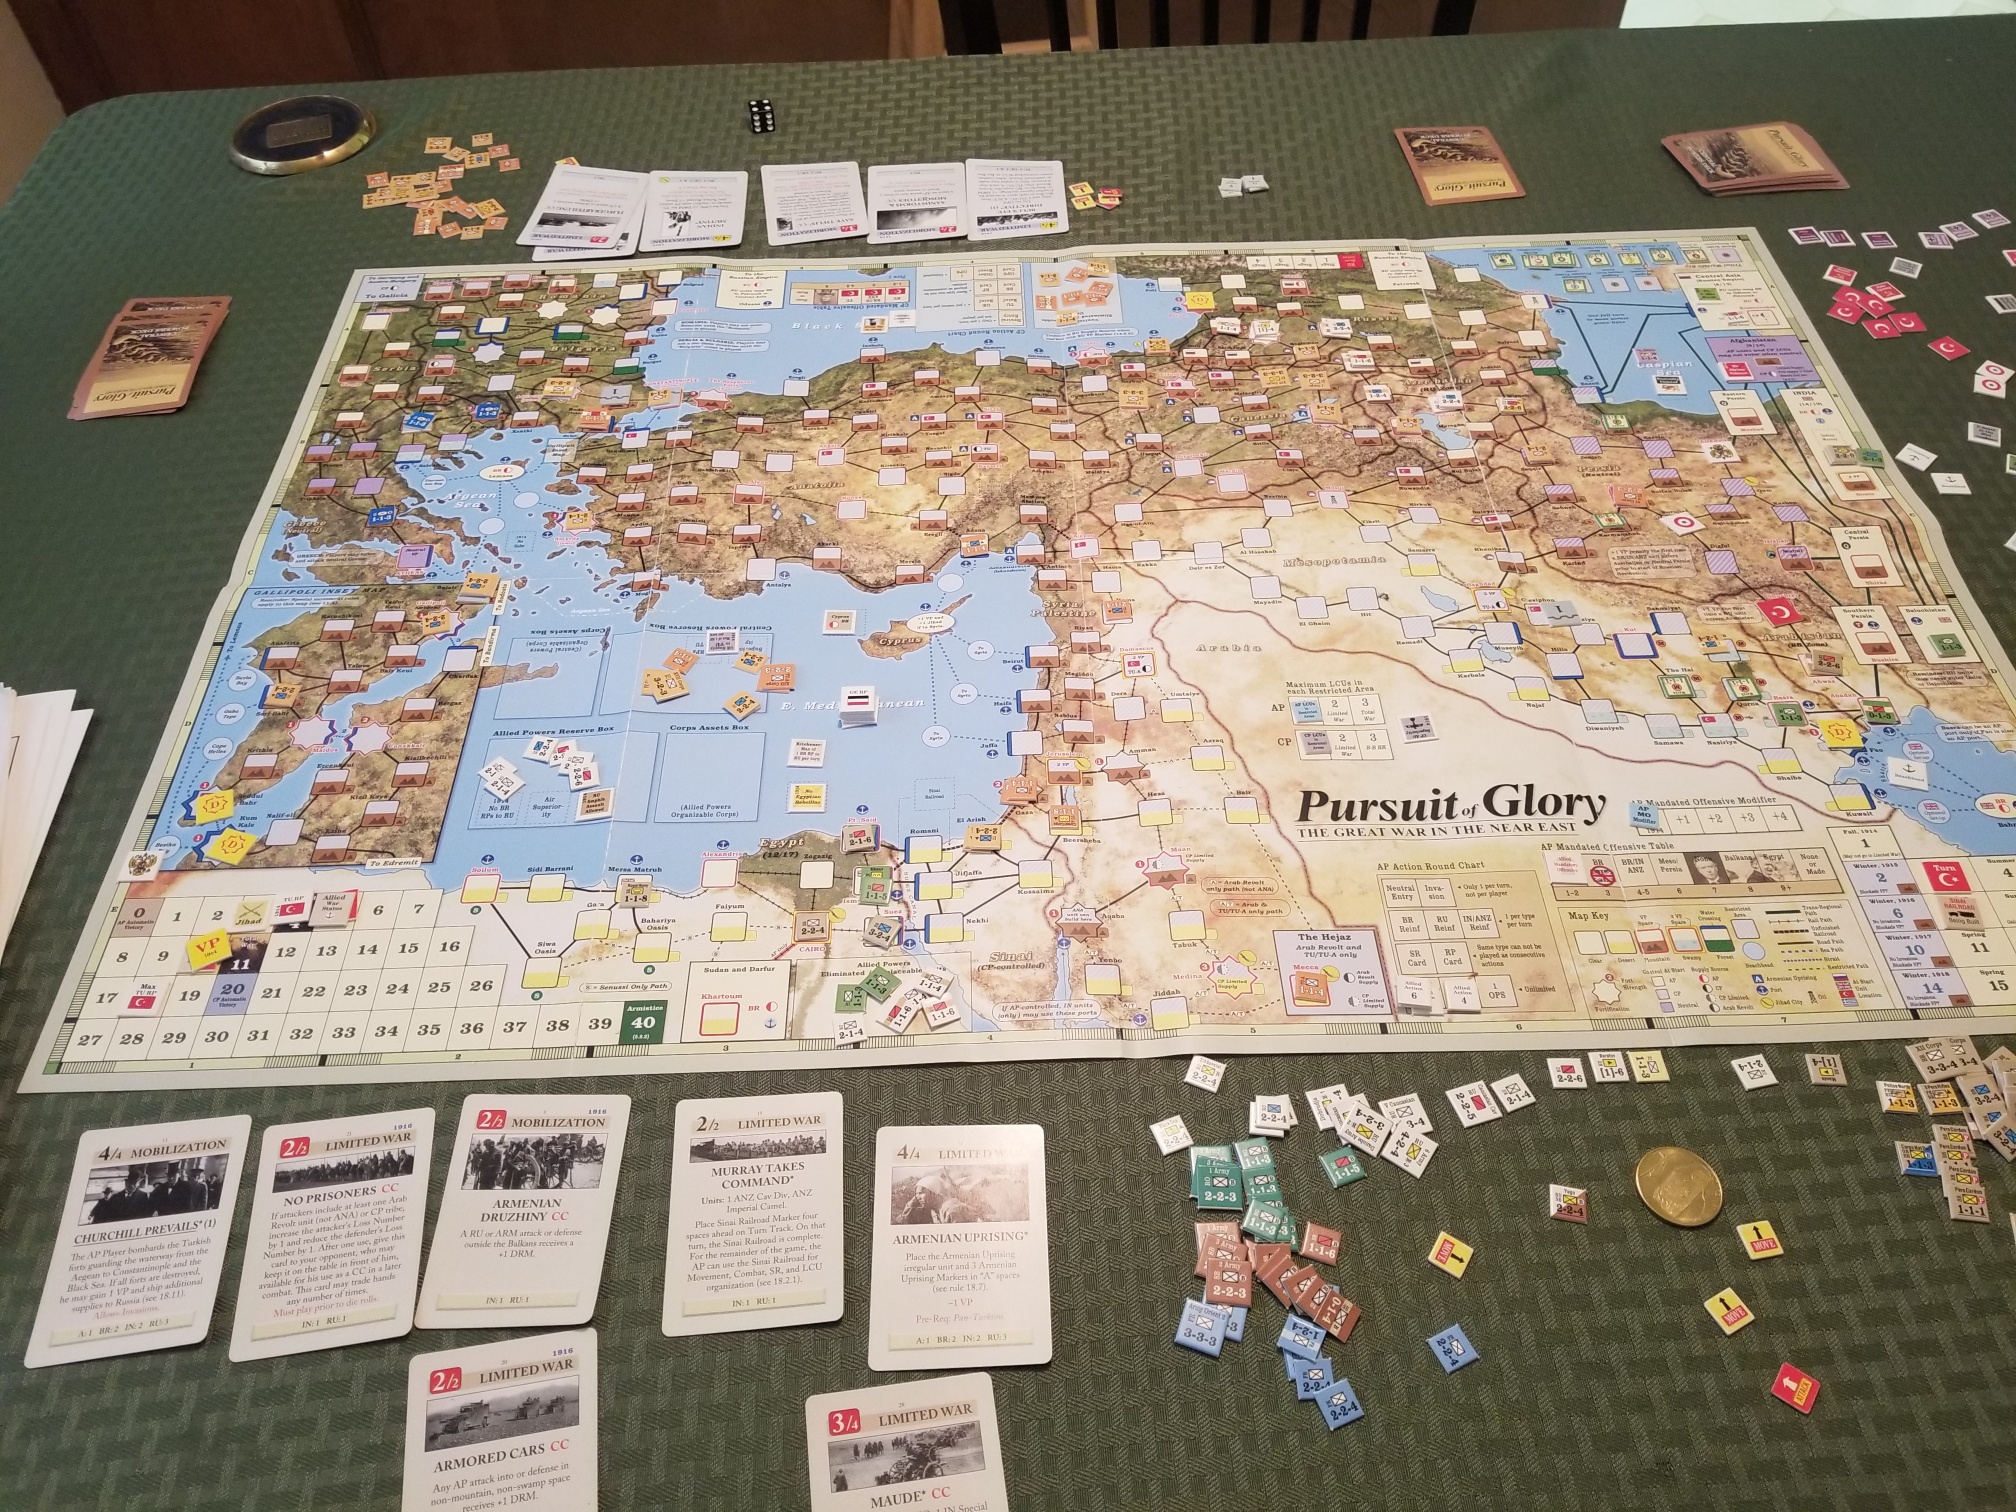
And now….Wargame Forensics. Why? I forgot to include the cards played in my map photo. So, here’s a stab at what happened during the Summer 1915.
The major development was the Allied invasion at Gallipoli and accompanying Central Powers response. It was business as usual in Caucasia – with more attrition – and a lack of activity on other fronts. At this point, the Ottoman replacement pool is dangerously shallow.
During the Fall 1915 turn, the Allies shifted focus to Mesopotamia, eyeing an undefended Baghdad. The Marsh Arabs tribe frustrated the Allied advance, buying time for the Central Powers to deploy forces to the threatened city.
The Romania Enters The War card was played in error. Tim noticed that the pre-conditions had not been met (Allies in Salonika), so the forces involved were taken off the table and Tim used the card for operations.
The Central Powers were in reaction mode, trying to cobble defenses together in Mesopotamia and Caucasia, attempting to build up the replacement pool, as well as maintaining some momentum in their effort to “Set The East Ablaze” using dissident tribes.
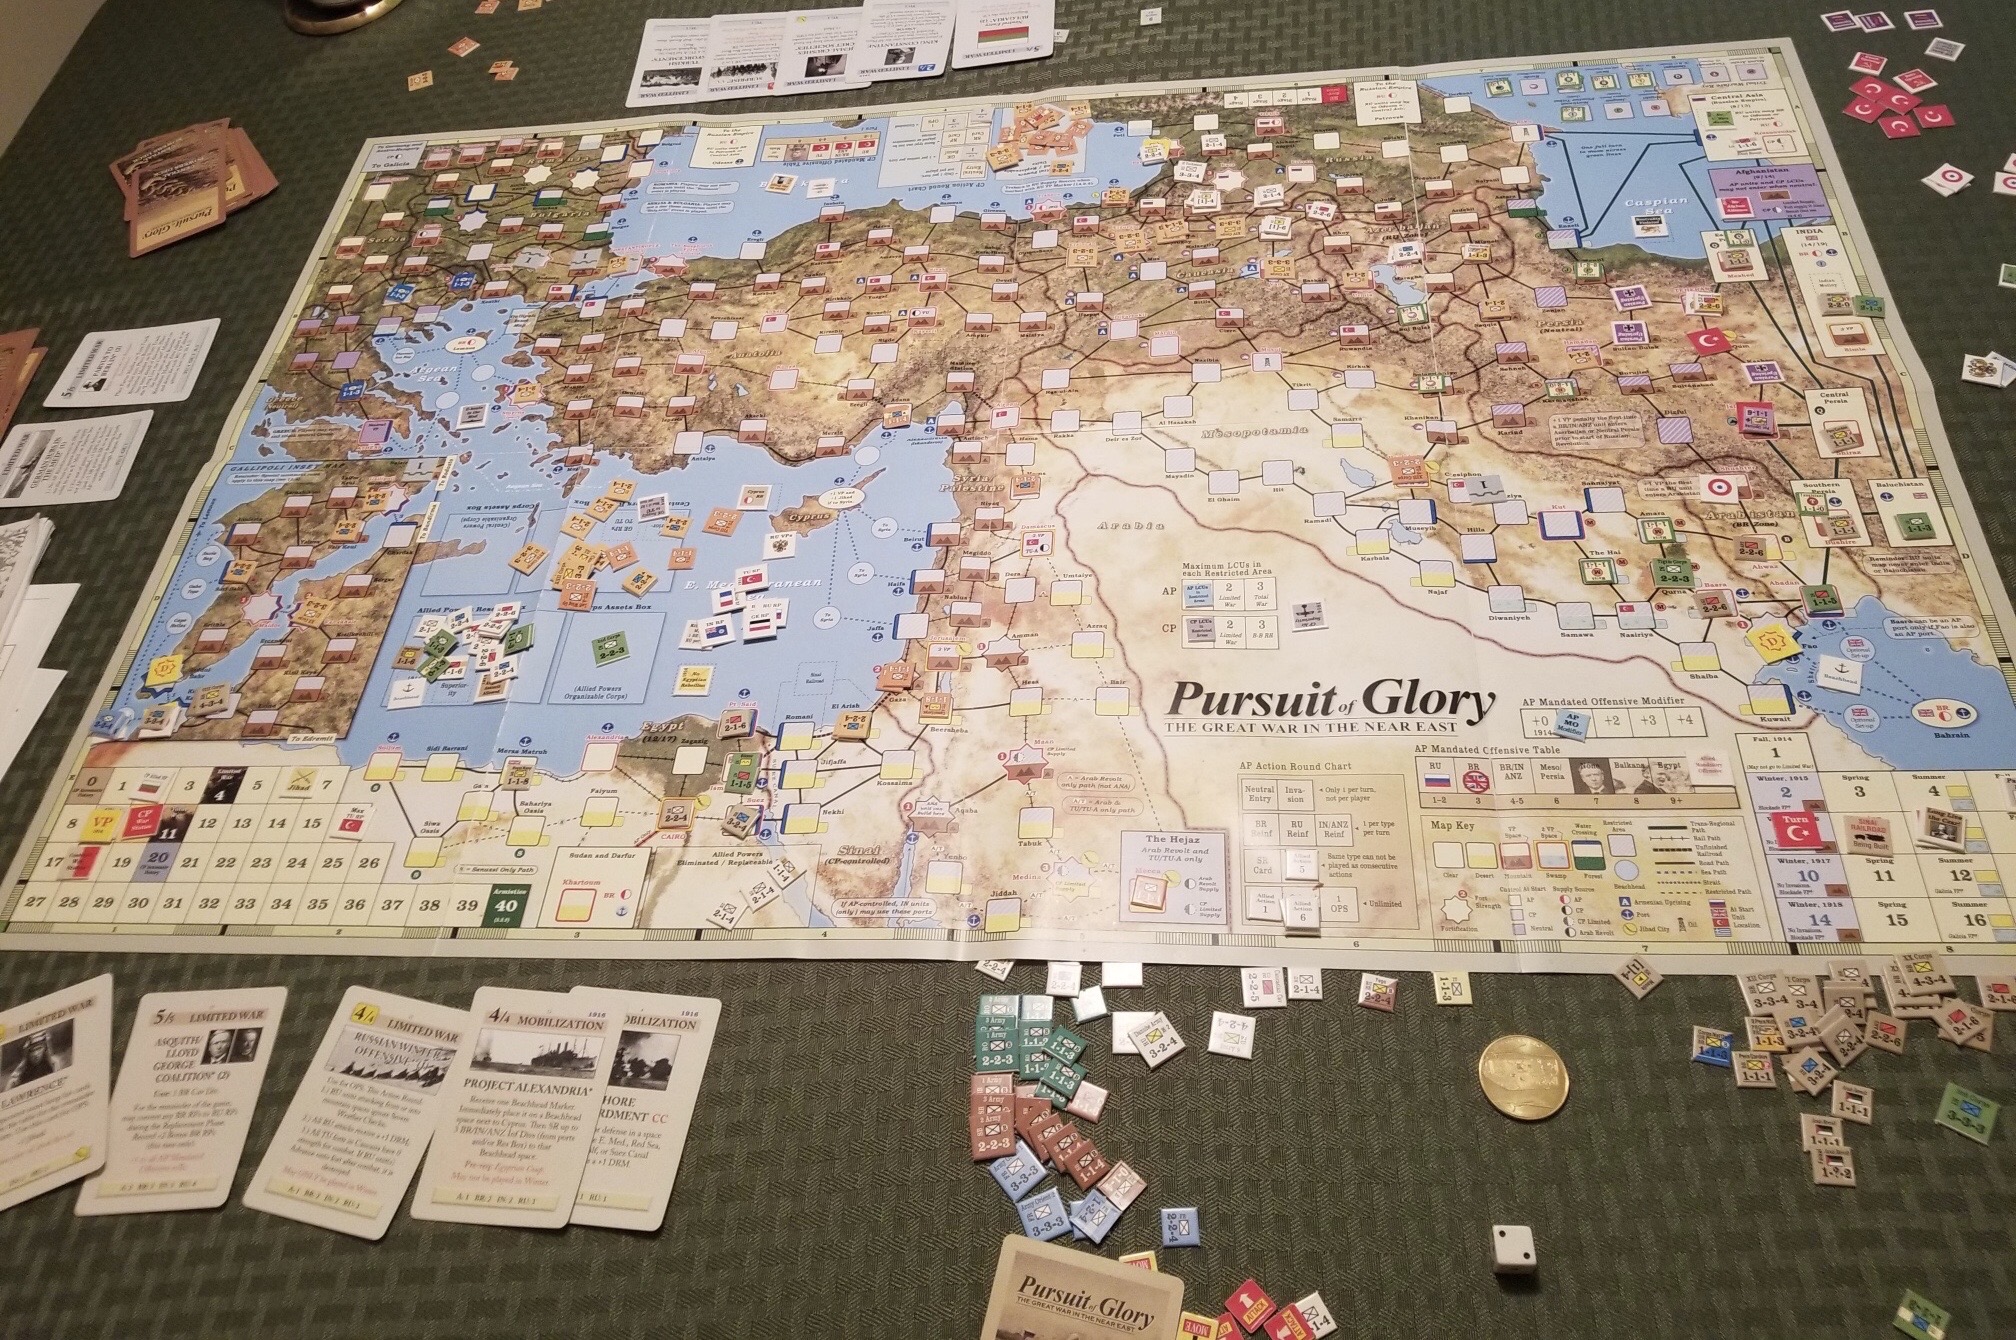
Our final turn was Winter 1916.
The Allies played the Russian Winter Offensive card, reducing the negative effects on winter attacks, and so maintaining the momentum of their push towards Anatolia. The Asquith-Lloyd George card allowed an increase in British aid to Russia in the form of replacement points. These positive developments would help Russia delay the beginning of the revolution.
The Central powers gained Bulgaria as an ally (forces cannot be set up until the end of the turn), and the Ottomans were able to stabilize both the Mesopotamian and Caucasian fronts. For how long is anybody’s guess.
As usual, just when things were getting good, or dicey depending on one’s perspective, it was time to pack it up.
One overarching observation is how both of us shied away from any significant effort(s) outside of the Caucasian front. Yes, Tim did invade both Mesopotamia and Gallipoli, but with limited assets. Neither of us showed any interest in the Sinai or Egypt. The historical Allied invasion at Salonika did not occur in this game.
My other impressions from the Central Powers’ perspective are:
Is it worth pursuing a peripheral strategy focusing on Jihad and tribal actions?
How quickly Ottoman forces are reduced.
Given this attrition, is there a more defensible series of positions in Caucasia that will not provide the Russian player with the ability to further delay the revolution?
Outside of Bulgaria (and perhaps the peripheral strategy) what are the opportunities for the Central Powers to be pro-active?
My head is starting to throb. Time to play something less taxing.
The first rule of Blogging an After Action Report (AAR) is to blog right after the game. The second rule of Blogging an AAR is to……you know the rest
I’ve let two weeks pass since Tim and I sat down for a session with the game that gives both of us headaches. So many situations, so many theaters, and so few cards
We managed to get through the Winter 1916 turn, and left it with Bulgaria entering the game. Tim had a definite advantage at that point, as my Ottomans were badly attrited, and barely hanging on in Caucasia. But, that situation had stabilized to some degree and his Commonwealth forces had bogged down in Gallipoli. On the other hand, my situation in Mesopotamia was not the best, with only a corps between him and Baghdad. Still, I now had the Plucky Bulgarians along with their powerful German friends ready to go.
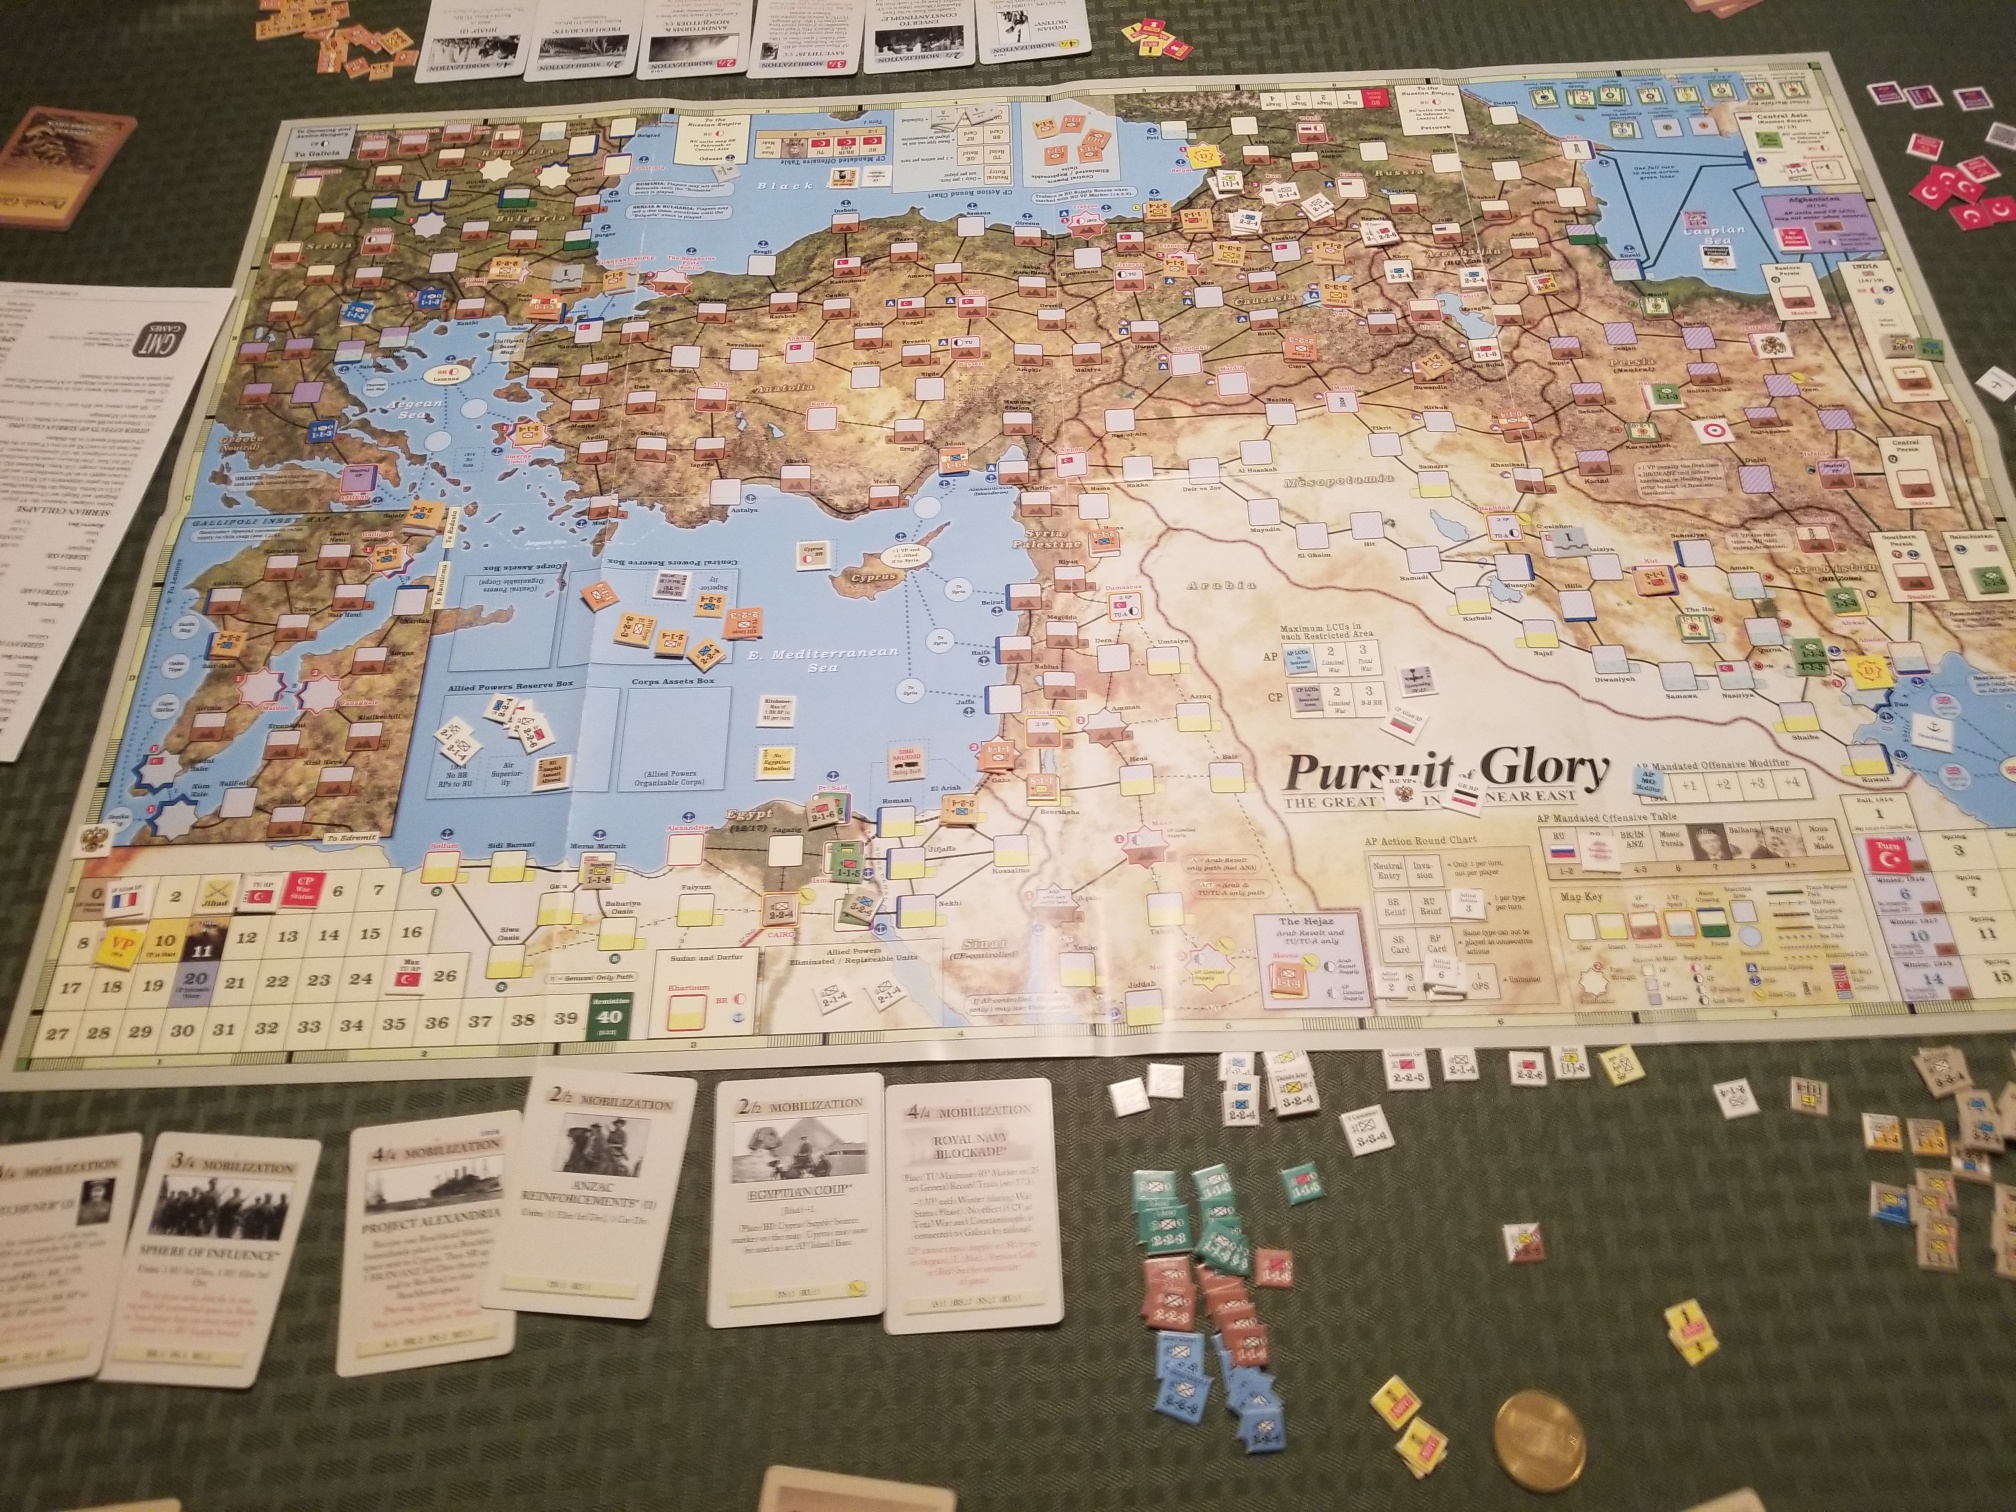
Here’s a shot of the situation at the end of the (first) Fall 1914 Turn. Plot Spoiler: These photos are up to my usual (sub) standard.
I failed to capture the cards played in this photo and, as you will see, it happened again in the Summer 1915 turn. Lack of attention to detail.
My strategy from the outset was to increase the Jihad level as quickly as possible by playing event cards and capturing Jihad cities. Of course, starting the time track towards the Russian Revolution was a priority. I needed the “Parvus To Berlin” card on the table as quickly as possible. From an operational standpoint, I wanted to actively defend my victory point cities in Caucasia. Any loses would delay the revolution. I kept a relatively strong force in Western Anatolia to act as a reserve, especially to counter an Allied amphibious invasion of Gallipoli. One challenge for the Ottomans if reserves are kept there is their rudimentary rail system, limiting their ability to shift troops from one theater to another.
I’ll ask Tim to provide some comments on his strategy and operational intent. From my perspective, he was aggressive in Caucasia, and did an excellent job of wearing down the Ottomans. This is important as the Turks have limited and dwindling replacement opportunities as the game wears on.
During the turn I played the “Goeben”, “Persian Push” and “Pan-Turkism” cards. I was able to destroy the fort at Batum, and the latter two cards started jacking up the Jihad level, and my ability to place dissident tribal units on the map. These tribes can take isolated victory point cities and delay/defend Allied moves in Persia and Mesopotamia.
Tim enjoyed playing the “Enver Goes East” card, forcing me to undertake mandatory attacks at time I wasn’t quite ready for them. He also opened up the Mesopotamia theater by playing the “Russo-British Assault” event. Surprisingly, he played the “Churchill Prevails” (more on this later) event for replacements.
Here’s the situation at the end of the Winter 1915 turn.
The Allies began the turn by playing the “Kitchener” card. This allows the British player to provide the Russians with replacement points. The “Project Alexandria” initiated a build-up of forces in the Aegean. And, it got worse for the Central Powers. The “Royal Naval Blockade” event was played. It “caps” the Ottoman replacement pool at 25 points, with each point taken reducing those available and with a -1 Victory Point (VP) adjustment each winter.
The Central Powers used their cards for operation points to undertake less than successful mandatory offensives and taking advantage of victory point opportunities in Persia.
The situation at the end of the Spring 1915 turn is shown below:
During this turn the Allies played the “Churchill Prevails” card, bombarding forts guarding the entry to the Bosphorus. Fortunately, for me, only two forts were destroyed. The “Murray Takes Command” card was also played. This card initiates the construction of the Sinai Railway, required for an Allied corps size unit to participate in any regional offense/defense.
Again, the Central Powers concentrated on operations in Caucasia and Persia, launching a corps eastward into Persia, while playing the “Enver To Constantinople” to reduce the havoc that rascal plays on operational planning.
I’ll leave this fragmented account for now, with a follow-up post later this week.
Finally set this up after some 40 years of procrastination. And then, procrastinated another two months before I sat down to actually do more than stare. Plenty of rules reading during the interim – isn’t that a good substitute for action? – but no pushing of cardboard.
I would characterize the game as operational, but a far, far more granular approach then, let’s say, The Third World War. So, Grand Tactical?
This thread at BGG does a great job of describing the game’s characteristics, warts (with that emphasized) and all. Each of the perspectives is valid.
The thought that really resonated with me is Jason Cawley’s comments about “Analysis Paralysis”.
On a macro level, my entire involvement with this game reflects this. I intended to use the updated and comprehensive rules. Too much of a slog. My compromise was to use the rules as updated after the publication of BAOR. Too much of slog, especially given my manic habit of having about three games set up at any one time (yes, any vacant horizontal space is at risk at The Pine Cone Lodge). Finally decided “Just use the original rules and play the damn game. It’s a helluva lot easier to flip through five pages of rules than thirty.”
Sage Self Advice.
After getting on it, I discovered I couldn’t manage all of the map and so focused on one section and its units. This reduced scope allowed me to play out the initial turn and grasp the rules.
Yes, the friction points mechanic is a bitch. Yes, the Combat Results Table (CRT) is a bitch. Yes, the stacking limits and pesky NATO “Ants” are a bitch.
The turns do seem endless. There are any number of courses of action for the Soviets.
But that’s all part of the system’s charm.
After all, beauty is in the eye of the beholder.
But, it isn’t love and I don’t know if I will finish the game much less play the other ones in the series. Who knows, maybe I’ll put them up for sale, or consign them to even more time in Box Purgatory.
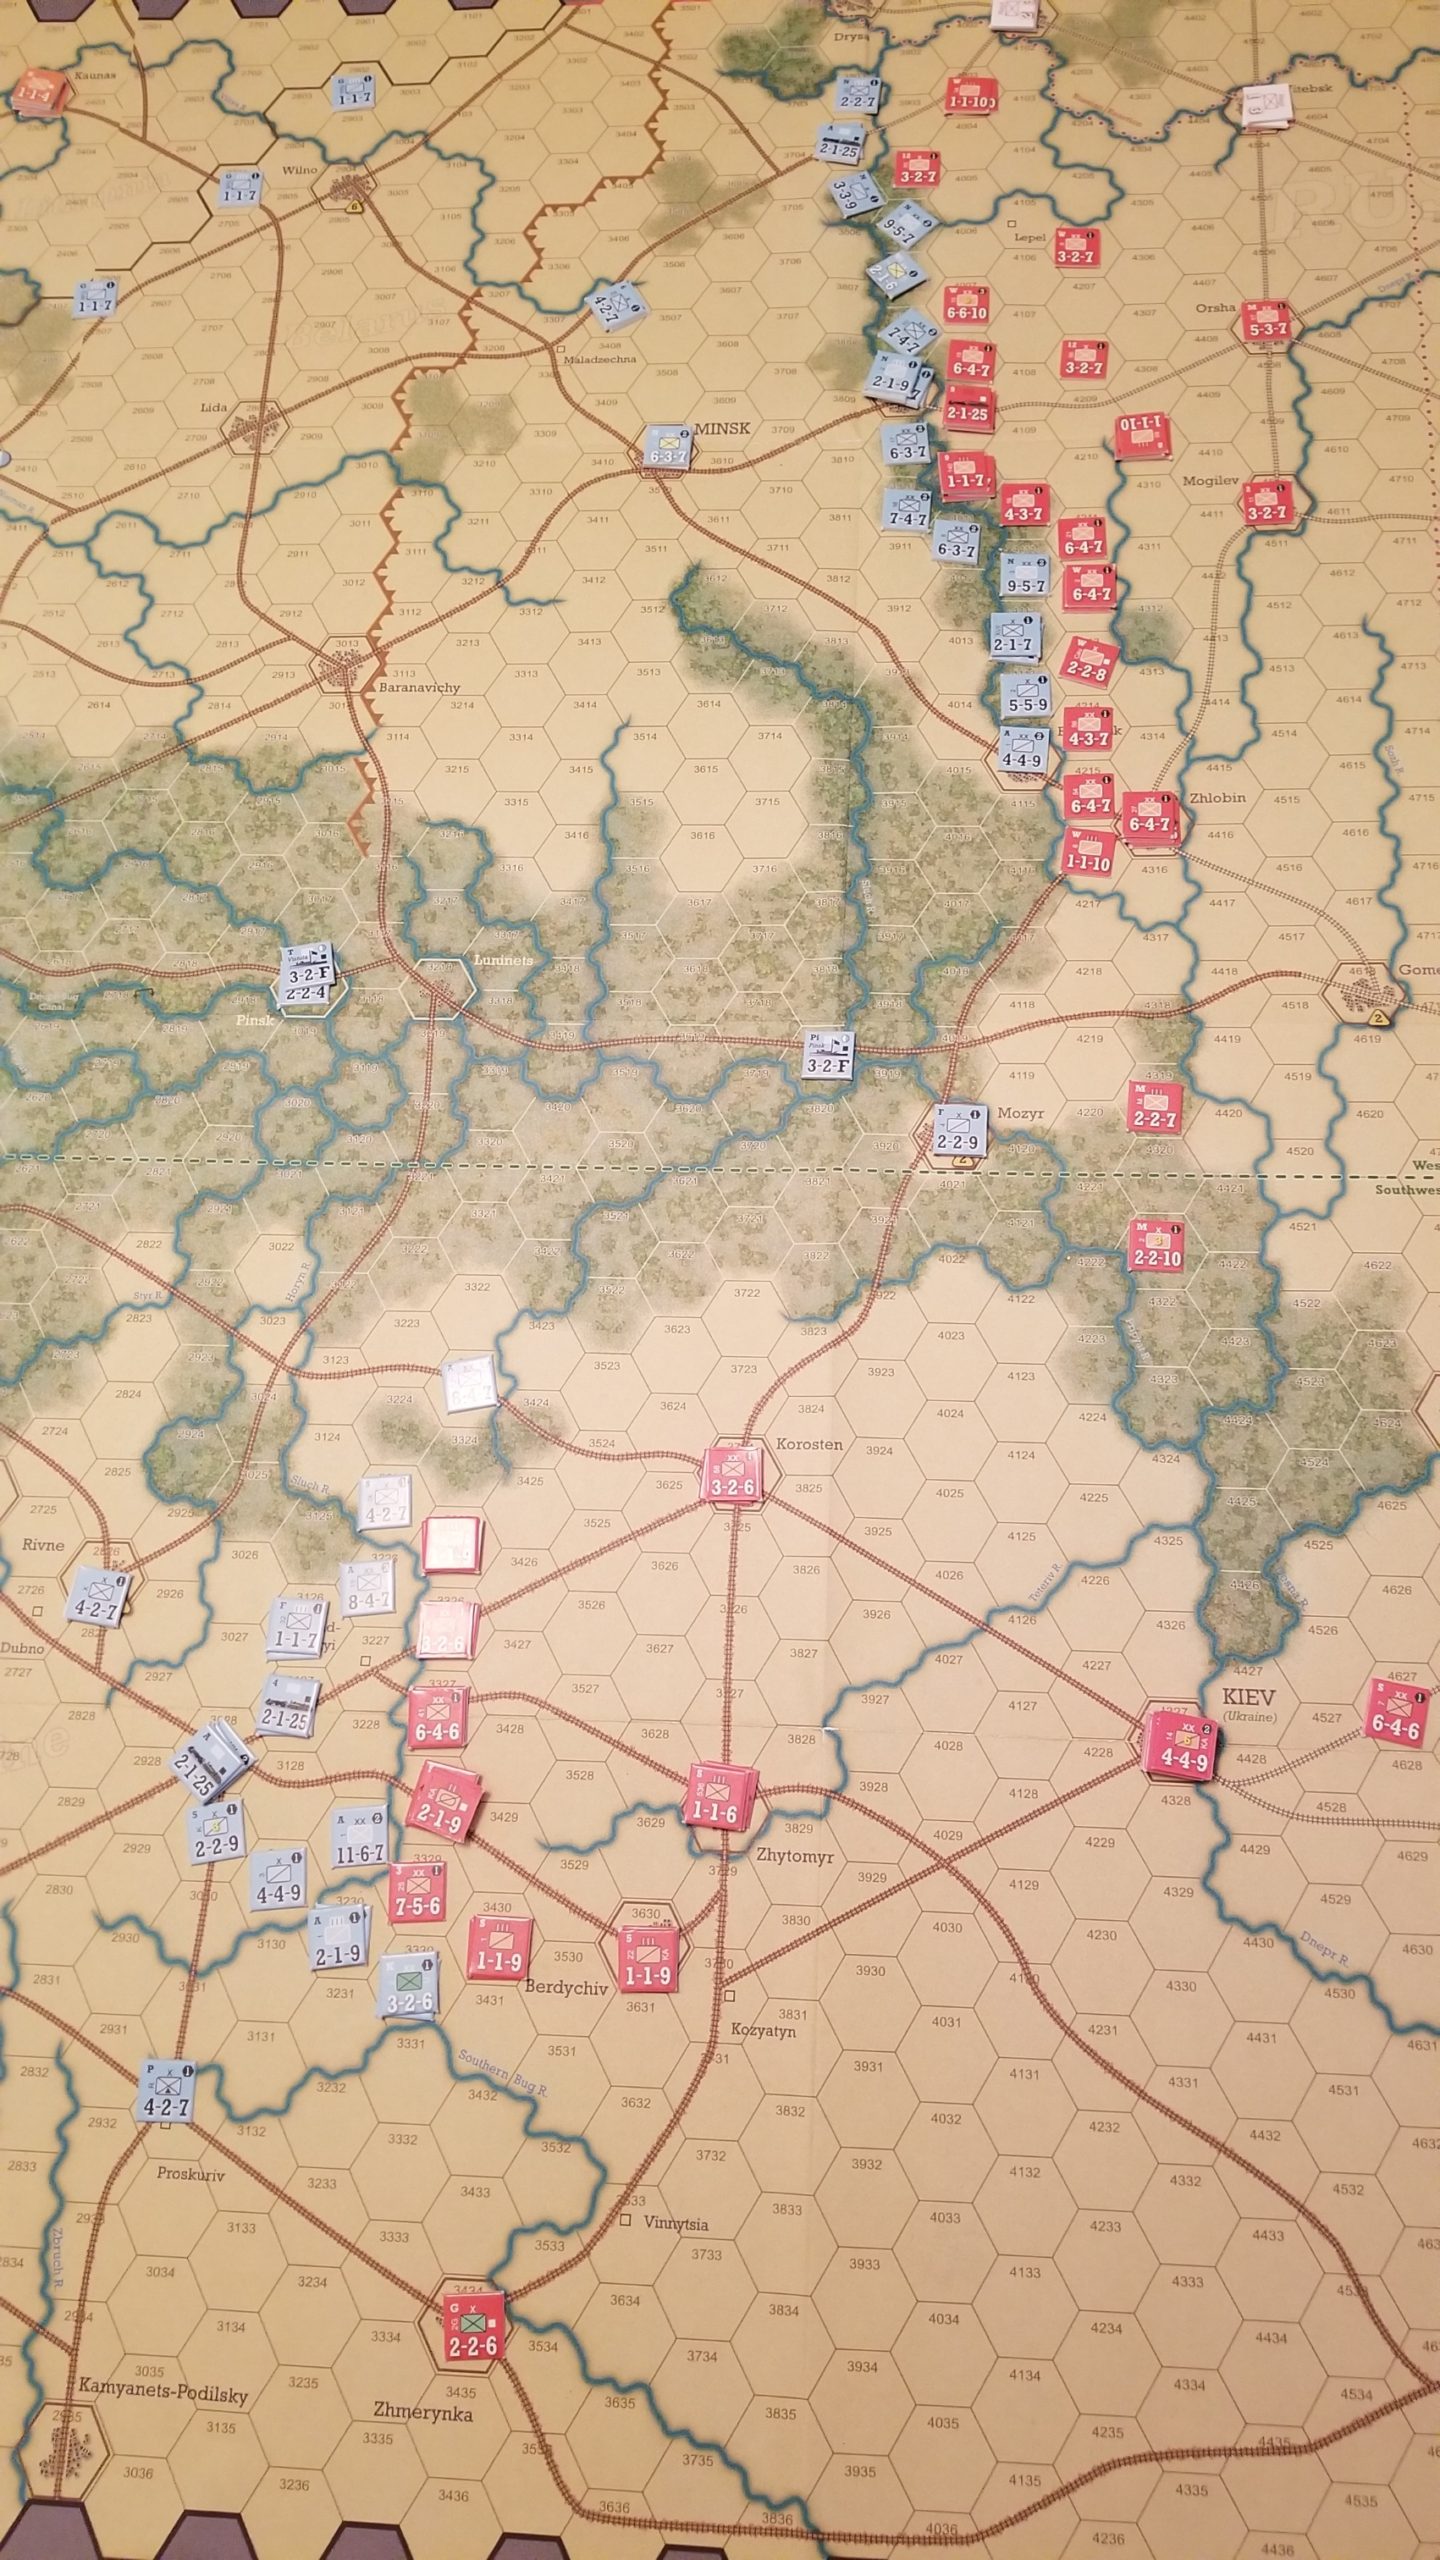
Back to Portland for a long-awaited replay of the new version of Red Star/White Eagle (RSWE). This Deluxe Edition is published by Compass Games.
Tim and I played the old GDW version several times (follow the tag) and always enjoyed it, despite some serious rules screw ups. We started playing the new version back in early February, but ran afoul of the Super Bowl and some accompanying wackiness.
The Compass edition of this classic Polish-Soviet War game is improved in every way, with a better map, thicker and larger counters (too large for our tweezers), as well as very functional set-up and reinforcement displays. These displays, combined with counters that include campaign set up designations, really help the set-up.
One aspect that hasn’t changed is the very bloody Combat Results Table (CRT). The CRT also allows the attacker to advance multiple hexes after combat. With good die rolls, an aggressive attacker can generate plenty of operational movement with opportunities for deep and wide envelopments.
But, these envelopments must be judiciously evaluated, since they also provide an opponent with opportunities to sever exposed supply lines or cutoff extended units.
Another game element that hasn’t changed, and one that significantly effects (maybe “shapes” would be a better term) play is how zones of control (ZOC) are treated. In RSWE, passing through the ZOCs costs additional movement points. The exact costs are shown on the unit’s counter. Also, enemy ZOCs cut supply lines, and the presence of friendly units doesn’t offset the effects of enemy ZOCs.
The attractive and functional map is divided into Soviet South and Southwest Fronts. The central area is heavily wooded, while the topography to each side is both sides is open, but with river barriers, especially in the South Front. Soviet units must remain in their respective fronts, and cannot be transferred from one front to another.
The game abstracts concurrent Soviet operations against White Russian forces. The primary tool for this is a mandatory “stand down” for the South Front units. During this stand down, these units cannot attack Polish forces unless Polish attacks occur, and then, only on a one-for-one basis. There are also mandatory unit withdrawals representing other developments during the Russian Civil War.
April IV (1920) the first of the weekly campaign turns. The Soviet player conducts his reinforcement/replacements, movement and combat first (except for the April IV turn!).
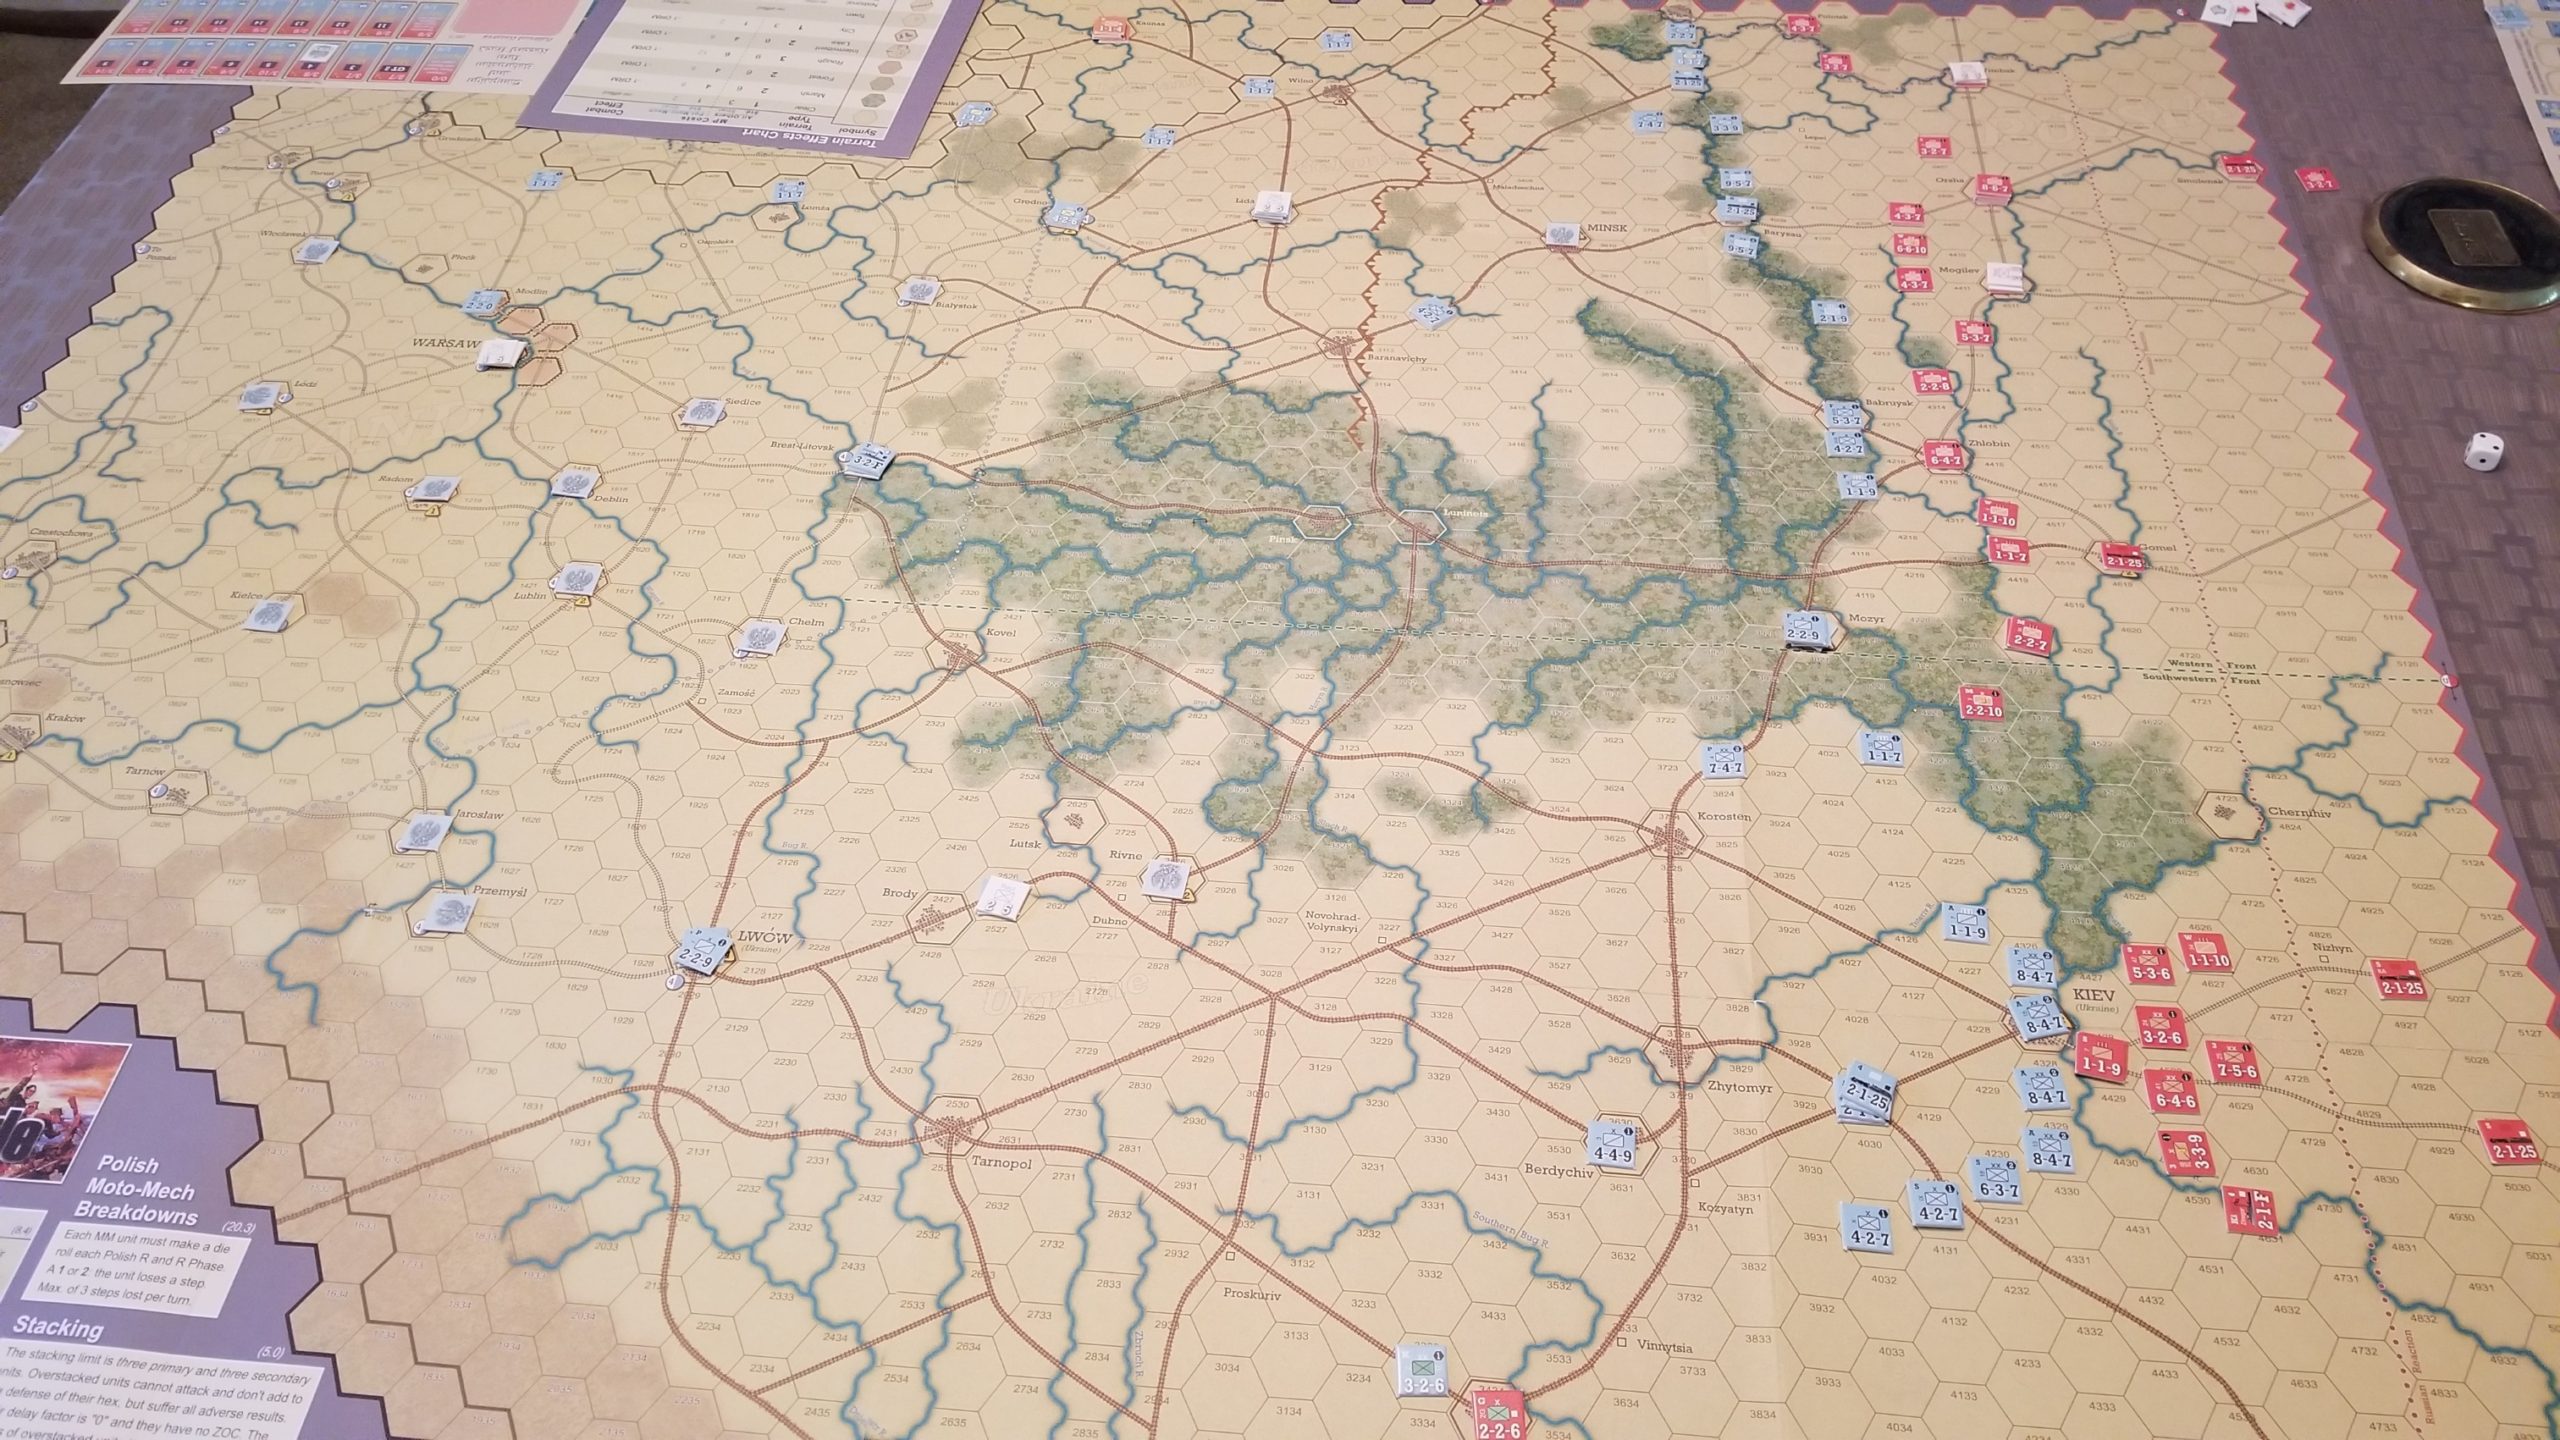
The Polish player has the initiative for the first few turns. The Soviet player must initially cover each hex along both fronts with either a unit or a ZOC; a very real Thin Red Line. The Poles set up last and can pick and choose where to attack. This creates several opportunities, especially around Kiev in the Southwest. Taking Kiev produces victory points as well as Ukrainian reinforcements. But any advance beyond Kiev faces a flood of Soviet replacements and reinforcements.
The management and placement of these replacements (within their assigned Front) is a critical aspect of the game, allowing the Soviet player to not only stabilize the Southwest Front, but also counterattack, especially after the arrival of the First Cavalry Army (Konarmia).
Replacements arrive as generic units placed either on the map, to rebuild reduced (divisions and some brigades have full strength and reduced combat values) units, or held off map to recreate eliminated units during the next turn.
Here is a quick visual summary of our game.
End May 3 Turn
The Poles are in Kiev (lower right hand corner), with the Soviets cobbling together a cordon defense.
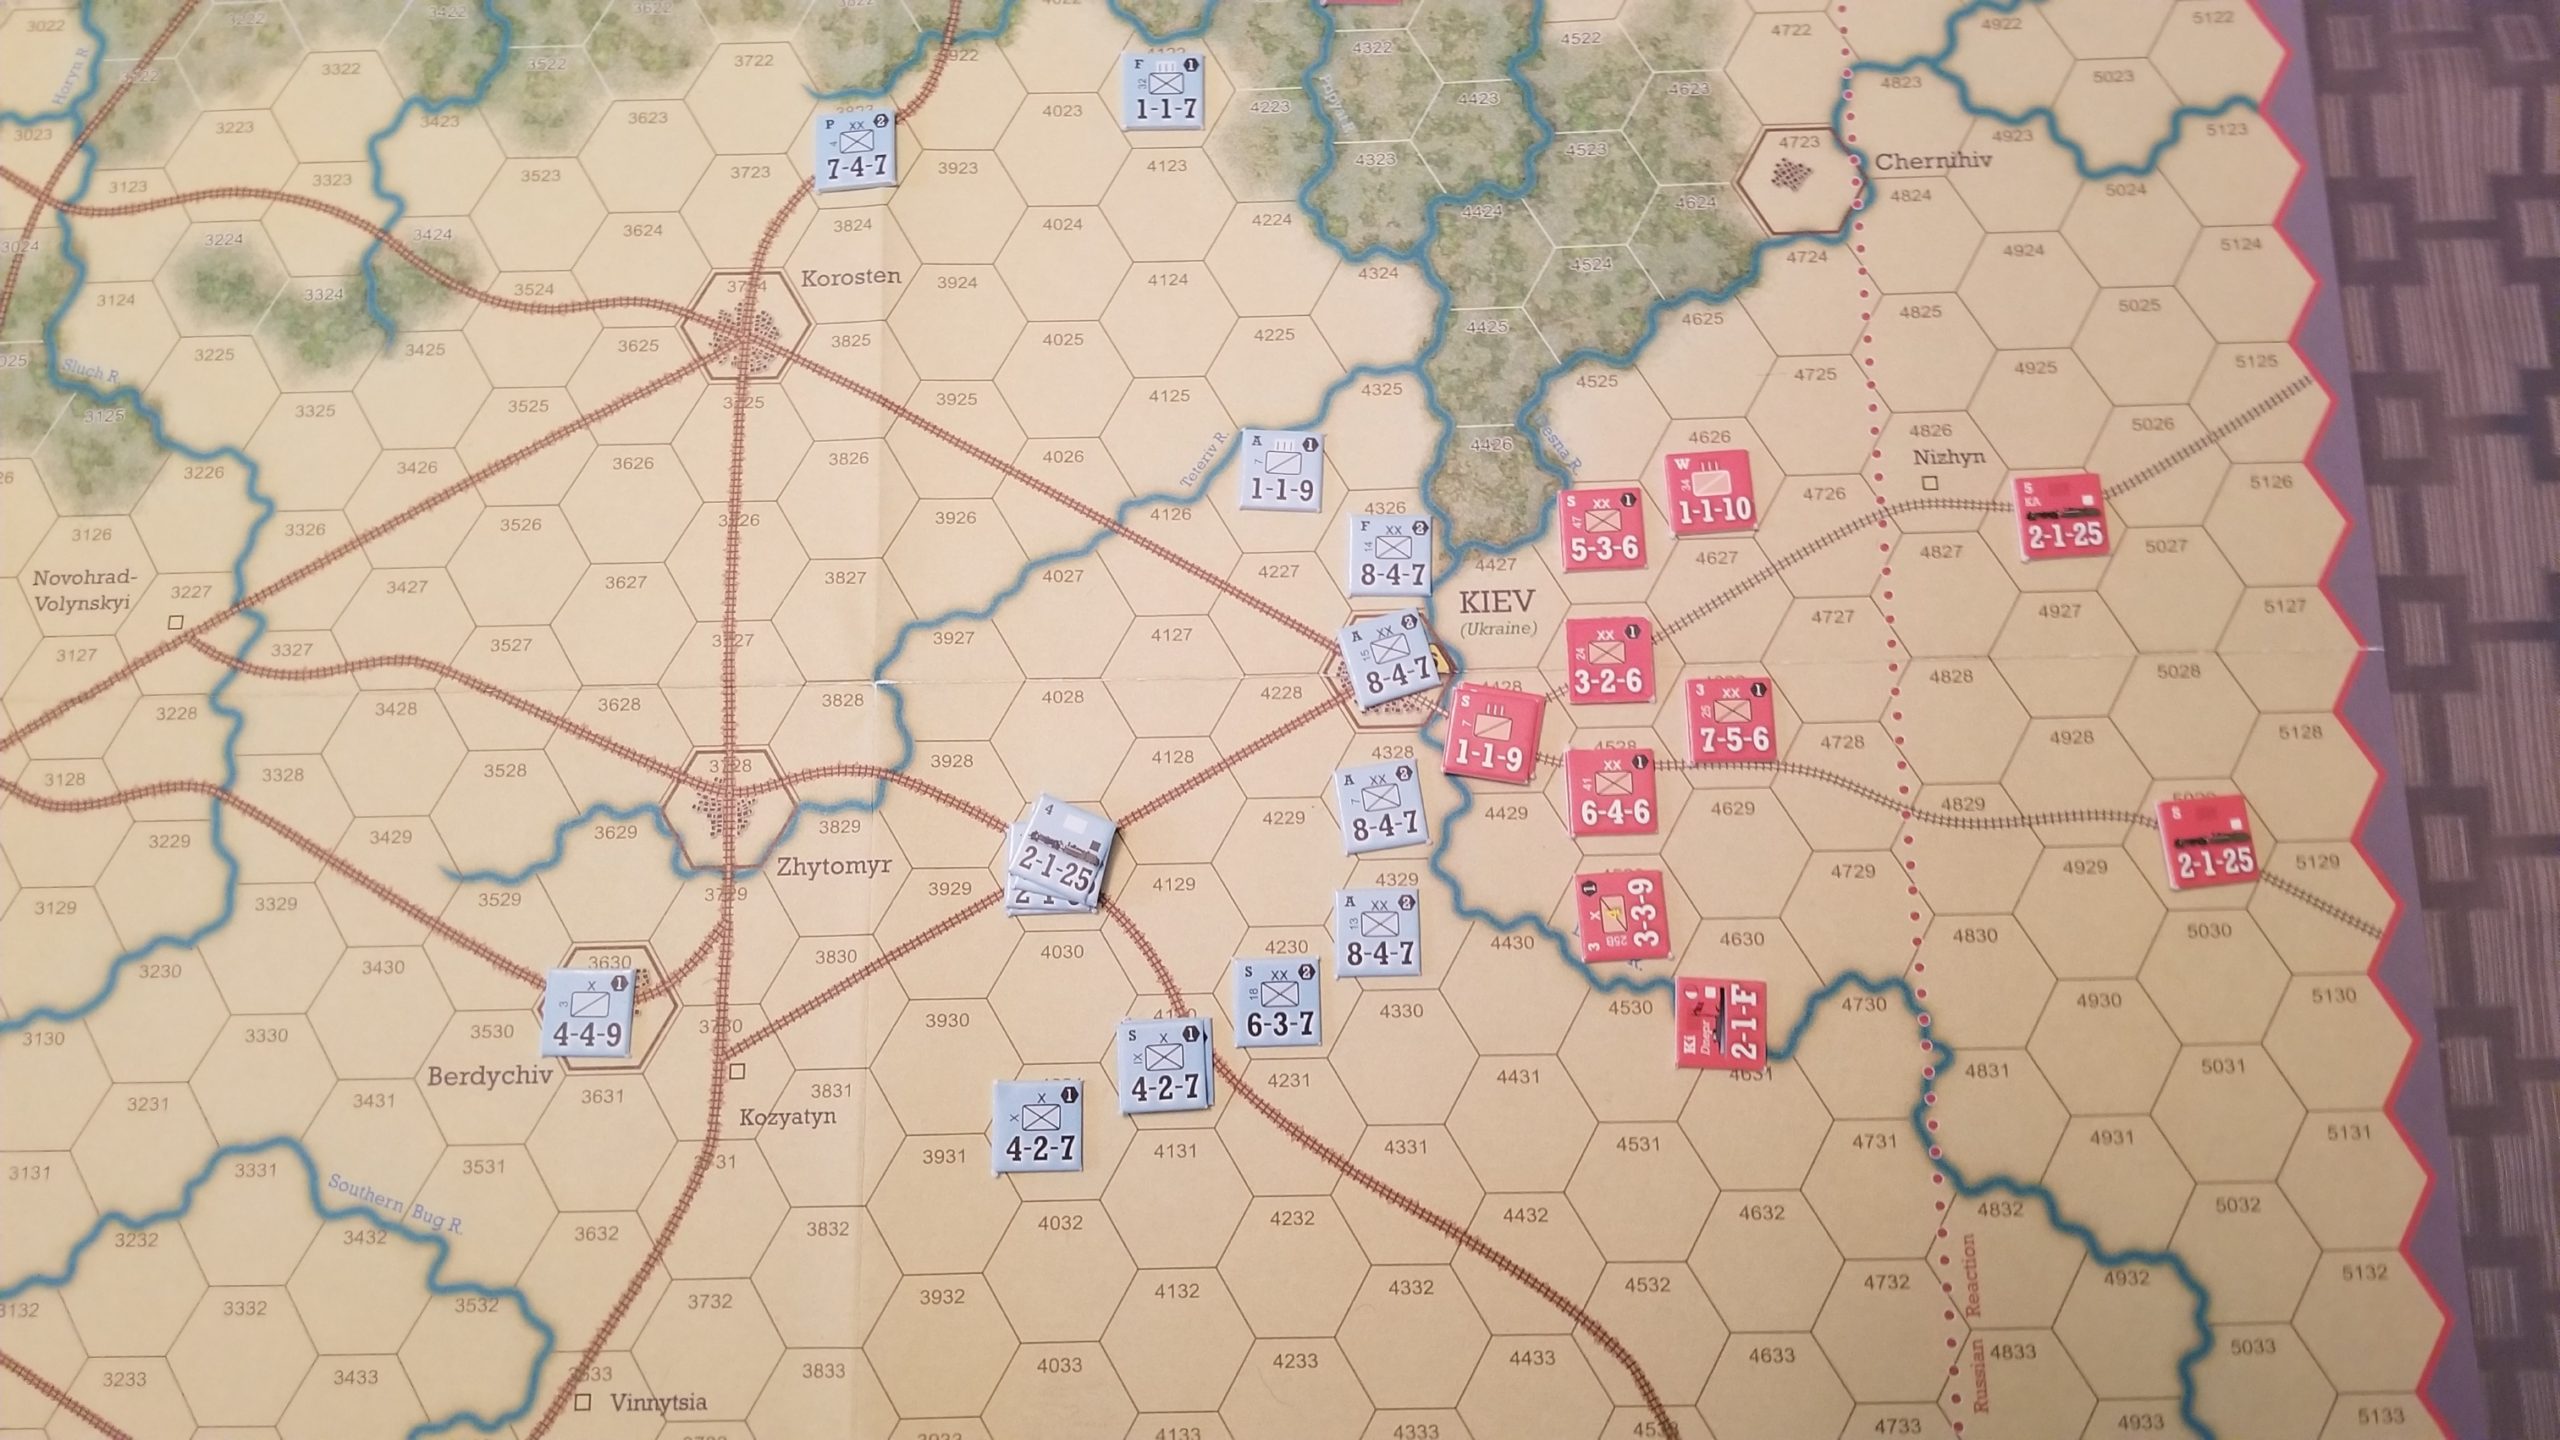
End May 3 Turn – Southwest Front Only
Armored trains cannot be rebuilt and are kept out of harm’s way until they can be productively used.
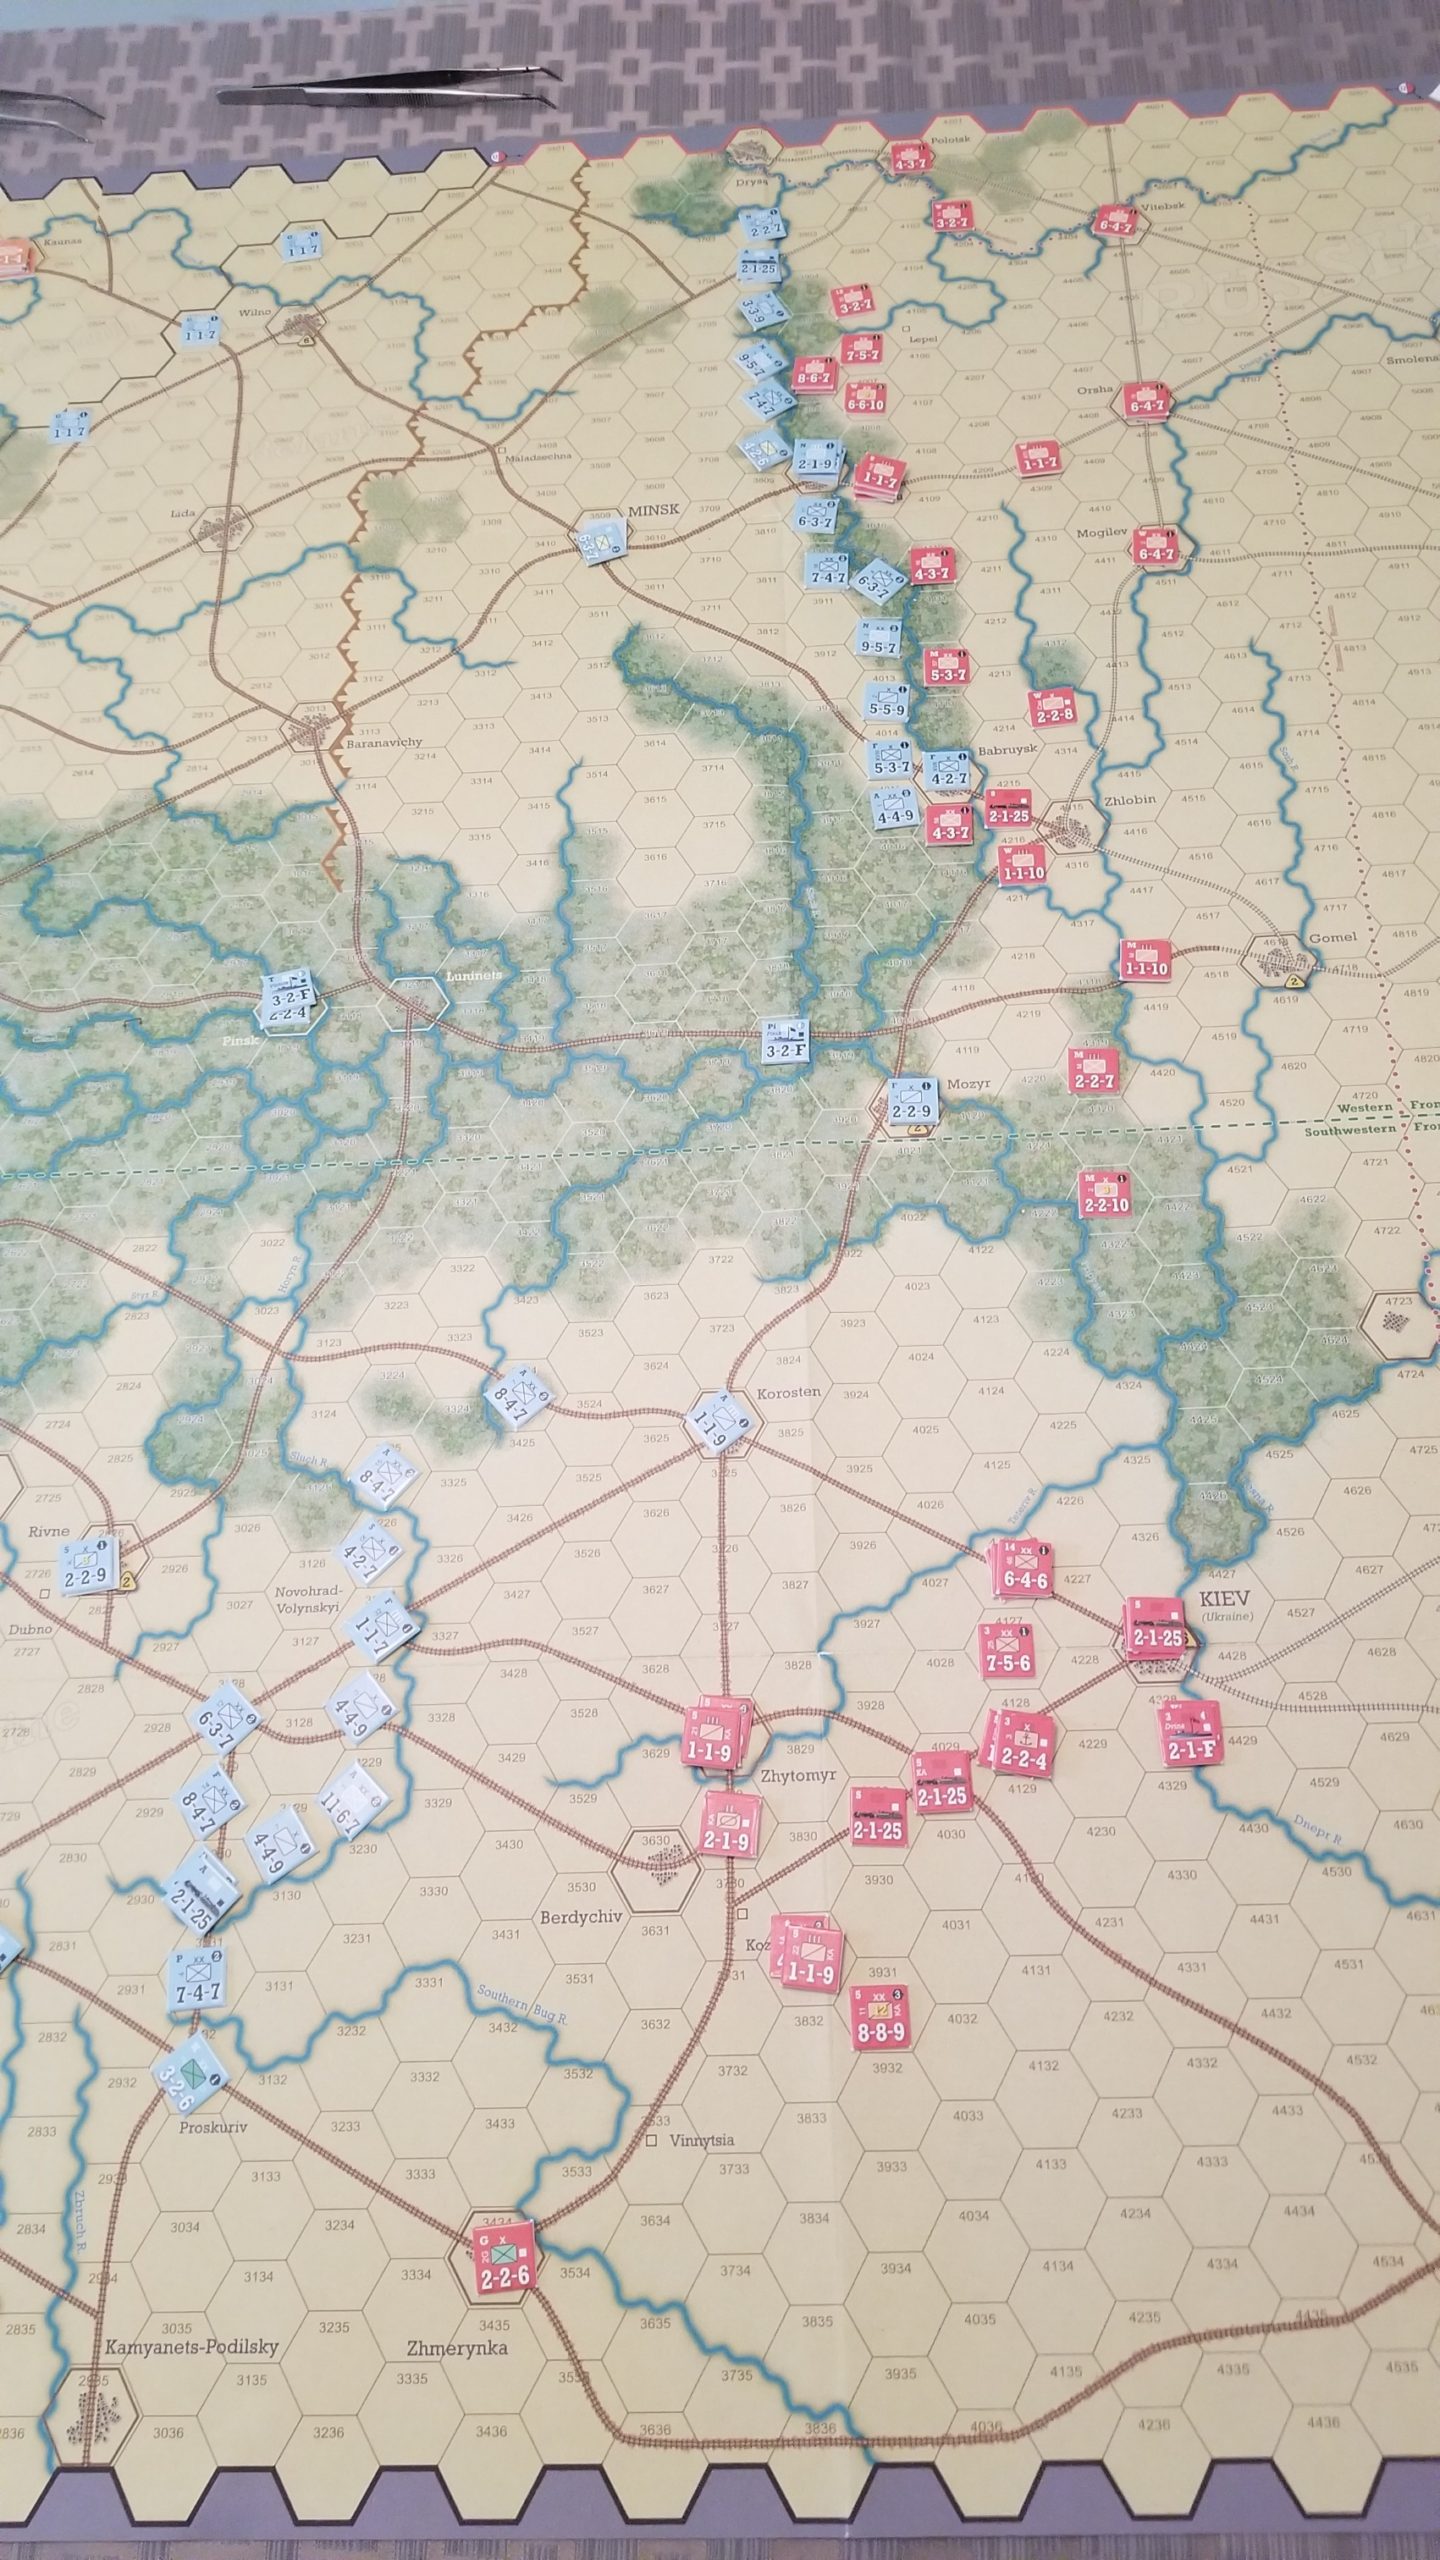
End June 1 Turn
The Poles have pulled back from Kiev, anticipating the arrival of the First Cavalry Army.
End June 3 Soviet Turn
Fighting now taking place along the river lines. The Soviet player now has the First Cavalry Army on the map.
A big meal and a tendency to bullshit led to an early end of play. A rematch is scheduled for the second week in June.
Getting close to covering all household horizontal surfaces with wargame related items.
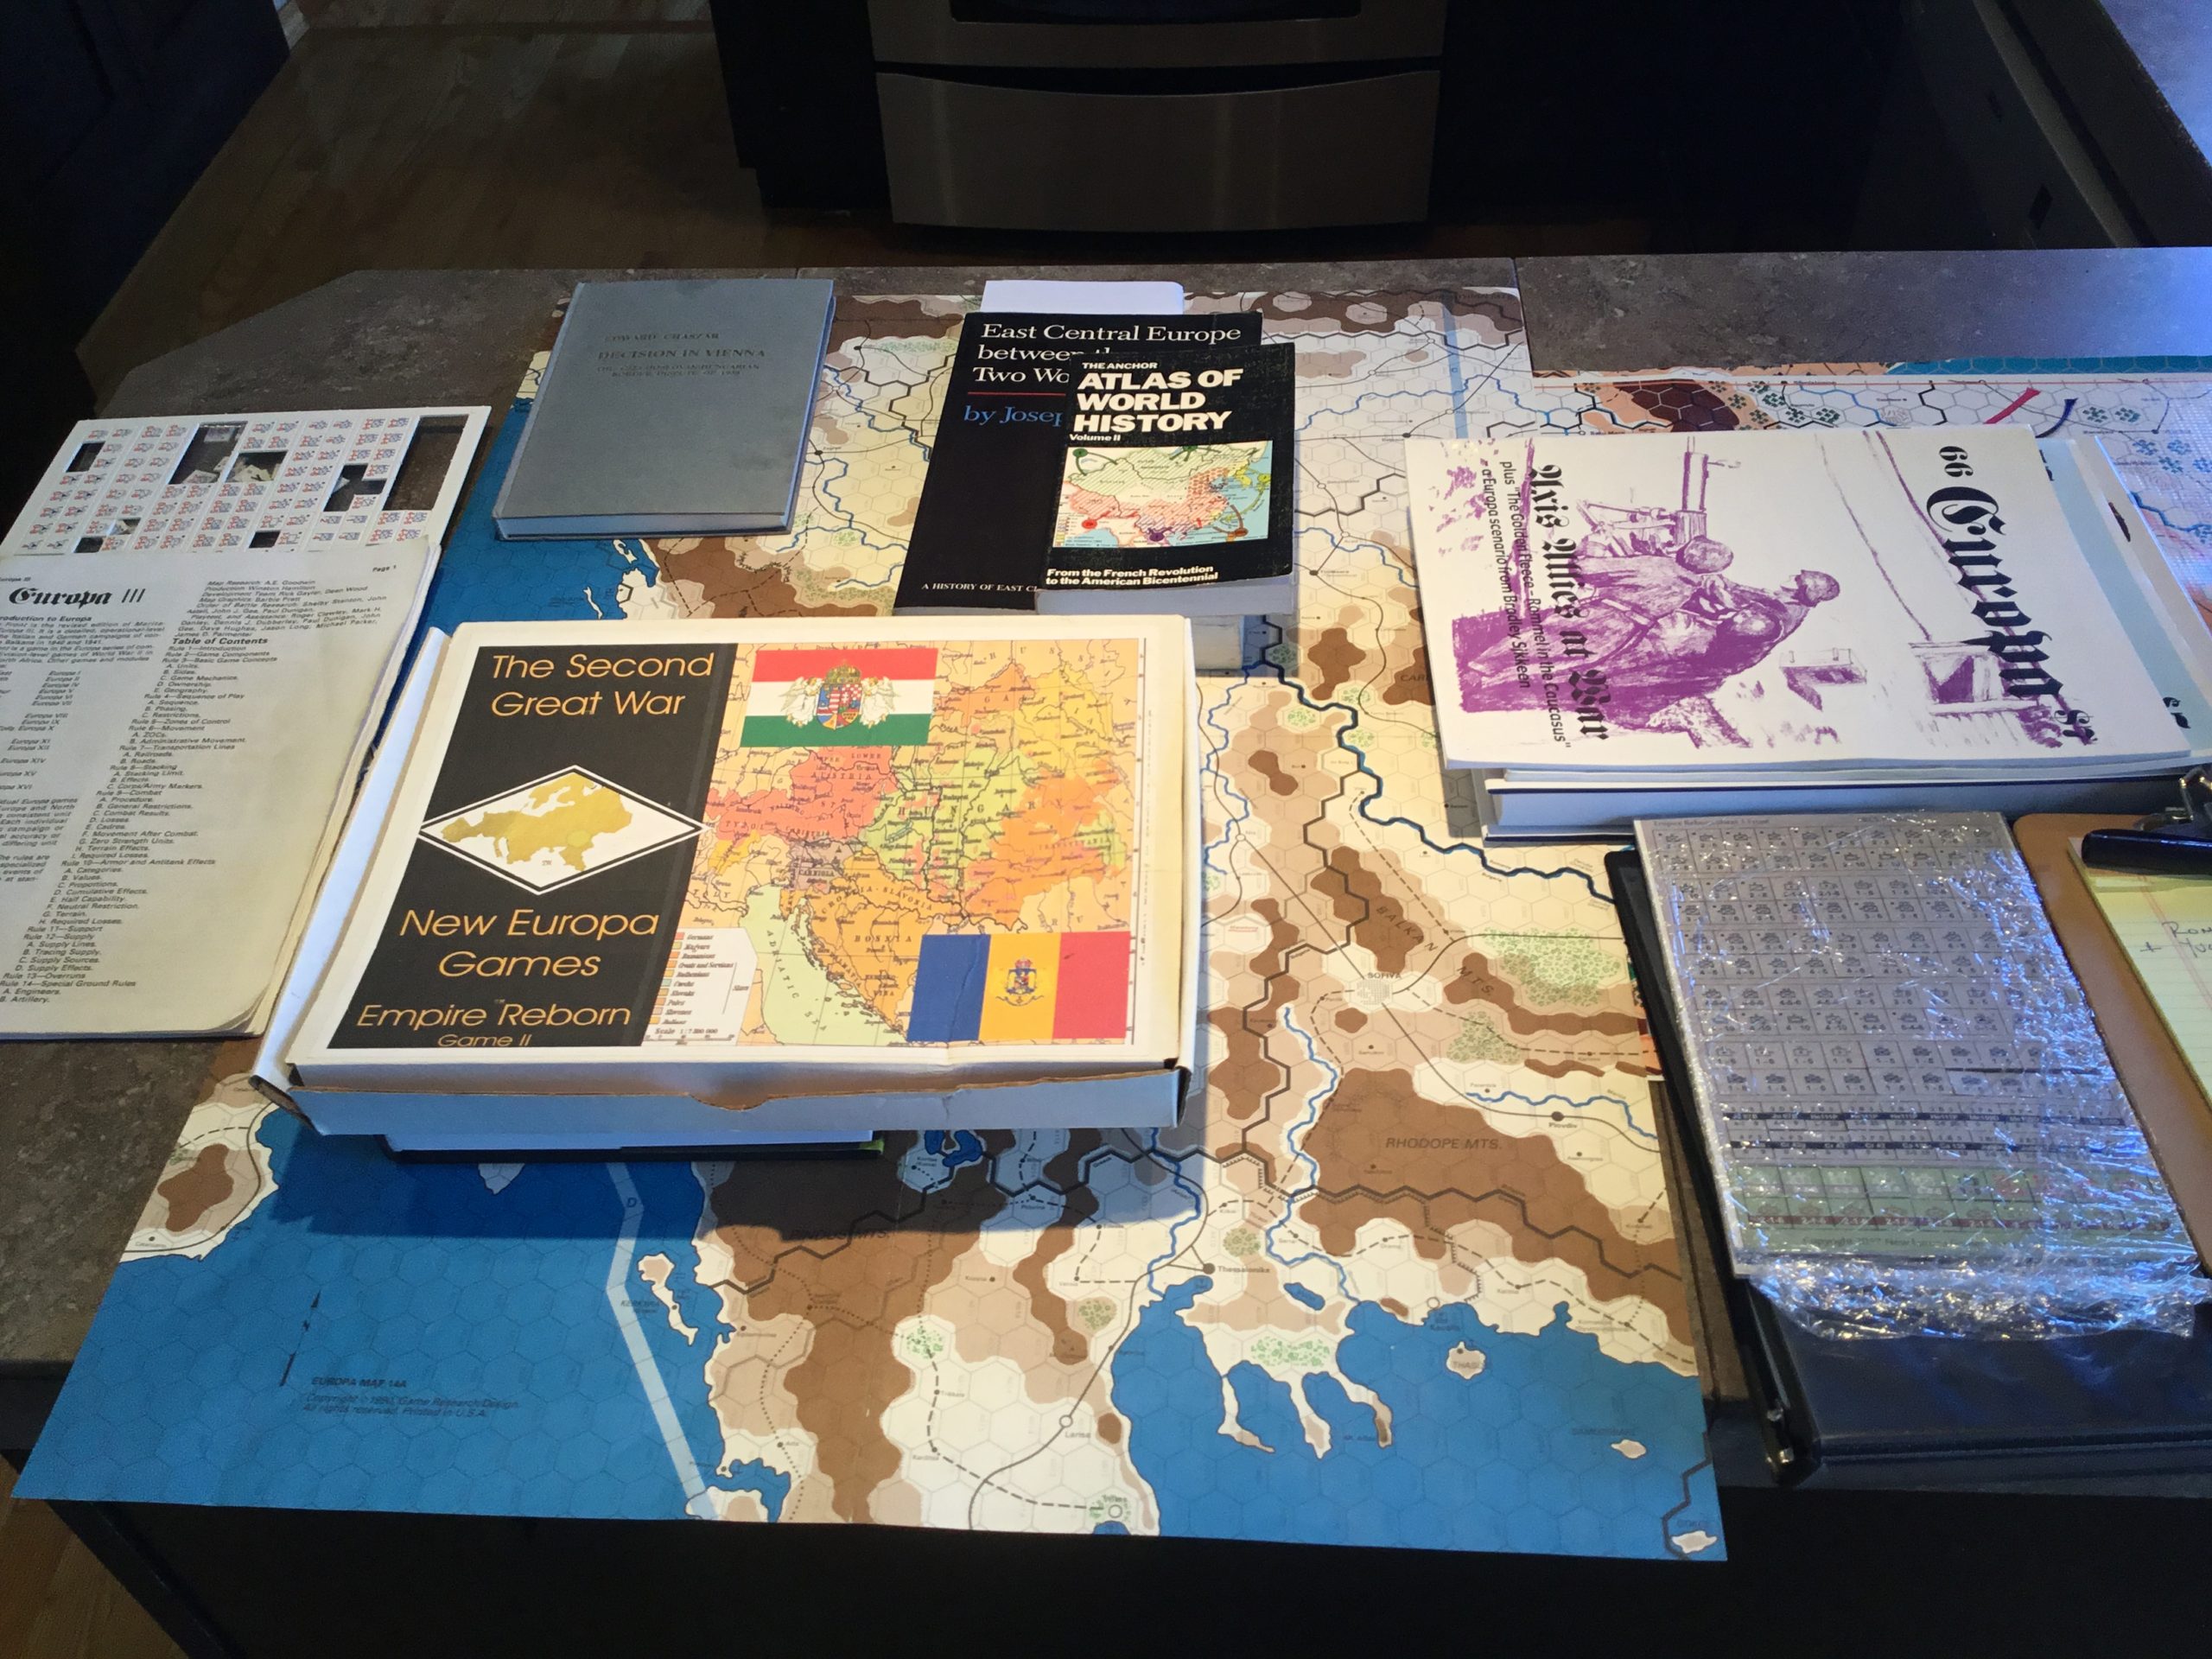
Europa Purists may not want to read any further.
The is the resource hodge podge assembled for my latest foray into out of kilter Europa scenarios, following in the steps of Fall Gertrude and the “Switzerland Must Be Swallowed” scenario pre-dating this blog.
As with any catastrophe, this one has several causes. They are, in no particular order, an email exchange with Tim Davis, the publisher of Fall Grun and Empire Reborn, a chance encounter with The Europa Magazine (TEM) #57, and glance at my copy of East Central Europe Between The Two World Wars.
Empire Reborn posits a Romanian-Hungarian conflict in the wake of the Munich Pact. TEM #57 contains a Macedonian War scenario developed by Frank Watson, portraying a 1940 Bulgarian invasion of Yugoslavia.
Both scenarios are based on ethnic/cultural/geographic grievances which (although centuries old) were the immediate products of the Balkan Wars and World War I. It is a long and twisted story resulting – as best I can figure – in the following.
Hungary wanted to regain Transylvania from Roumania, and the Backa and Prekmurje regions from newly created Yugoslavia. Bulgaria wanted much,if not all, of Macedonia from Yugoslavia, and to regain Dobruja from Roumania.
Hungarian revanchism was a result of the Treaty of Trianon (1920), which stripped the country of land, ethnic Hungarians and resources. This desire to regain what was lost led to the creation of the Little Entente between Czechoslovakia, Yugoslovia and Roumania.
Greece, Turkey, Roumania and Yugoslavia reacted to Bulgaria’s territorial grievances by signing the Balkan Pact (1934). The Pact was intended to maintain the region’s territorial status quo and peacefully solve any differences.
So, I am now ready to begin what Mr. Watson characterized as “wandering in the Balkan darkness….” in explaining why he limited the scope of his Macedonian scenario.
I will, however, take his guidance and set my scenario in 1940, as “(it) provides a convenient way to do away with great power meddling.”
The shortest distance between two points is to assume a Hungarian and Bulgarian alliance (whatever form that might take) aimed at Yugoslavia and Roumania, all that was left of the Little Entente.
Most available order of battle information begins in 1941, but there are enough fragmentary sources to take a pretty good guess at 1940. In each case, the combatants were modernizing and reorganizing their armed forces.
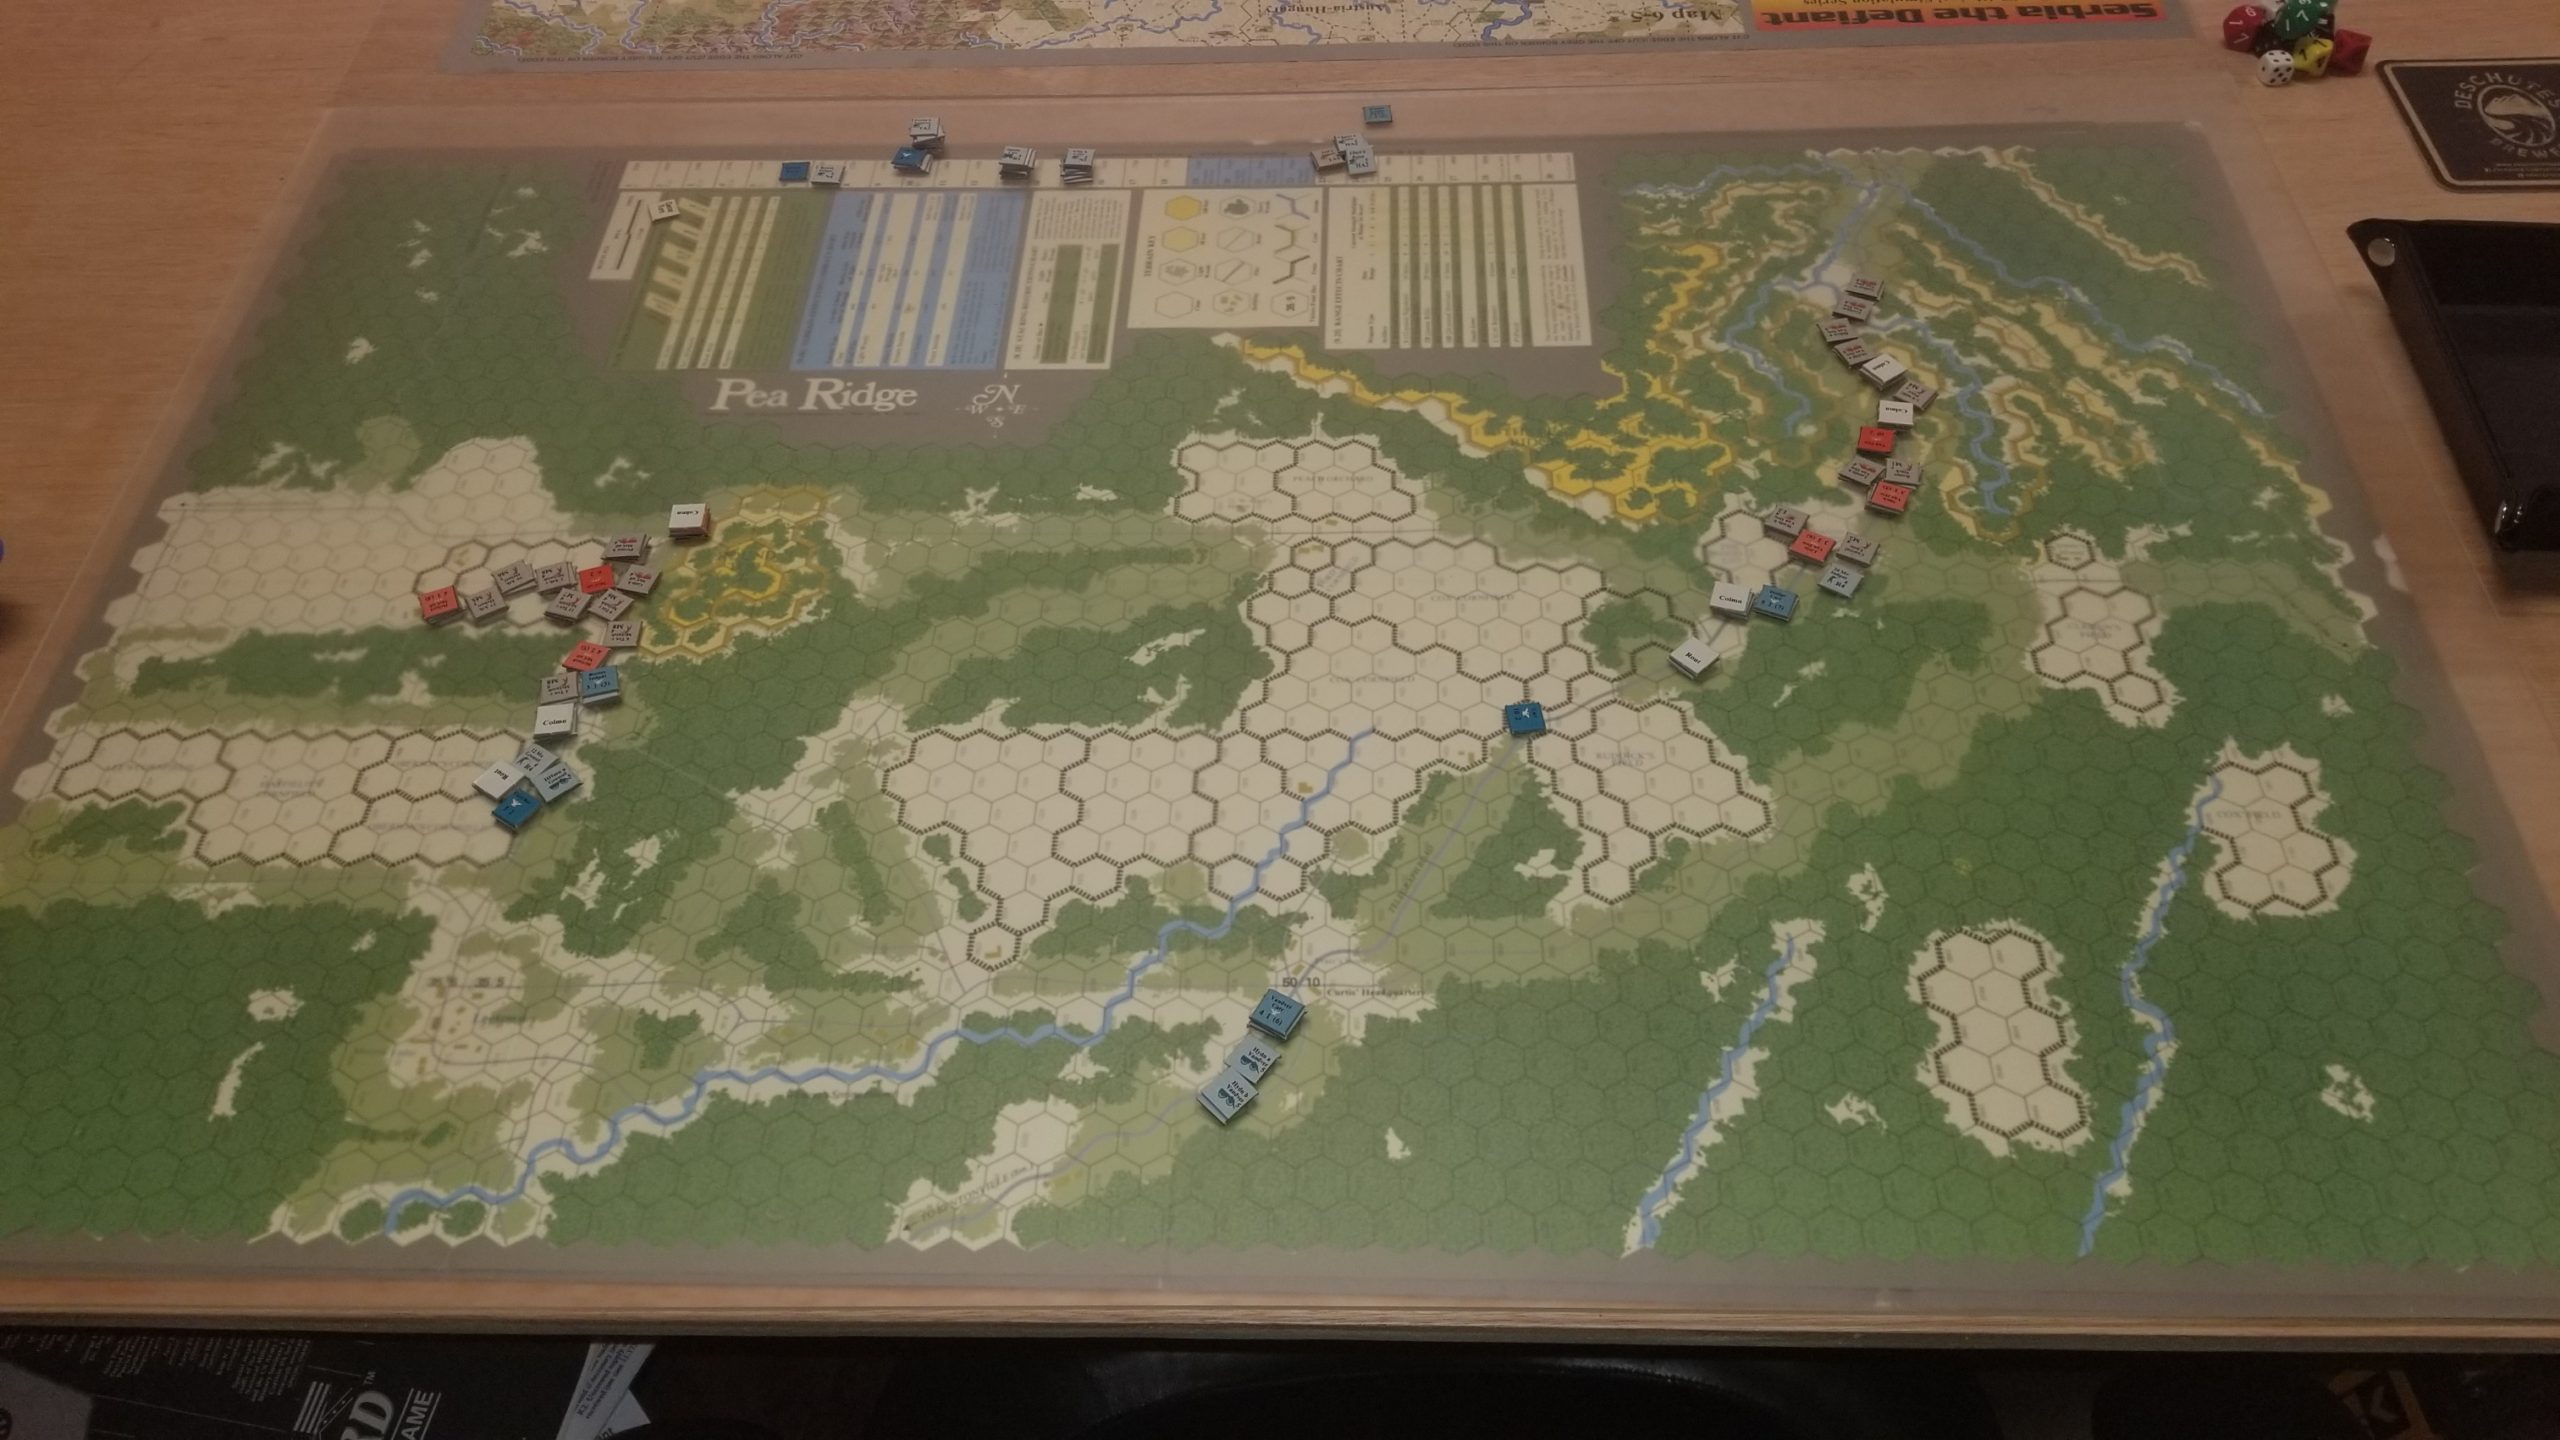
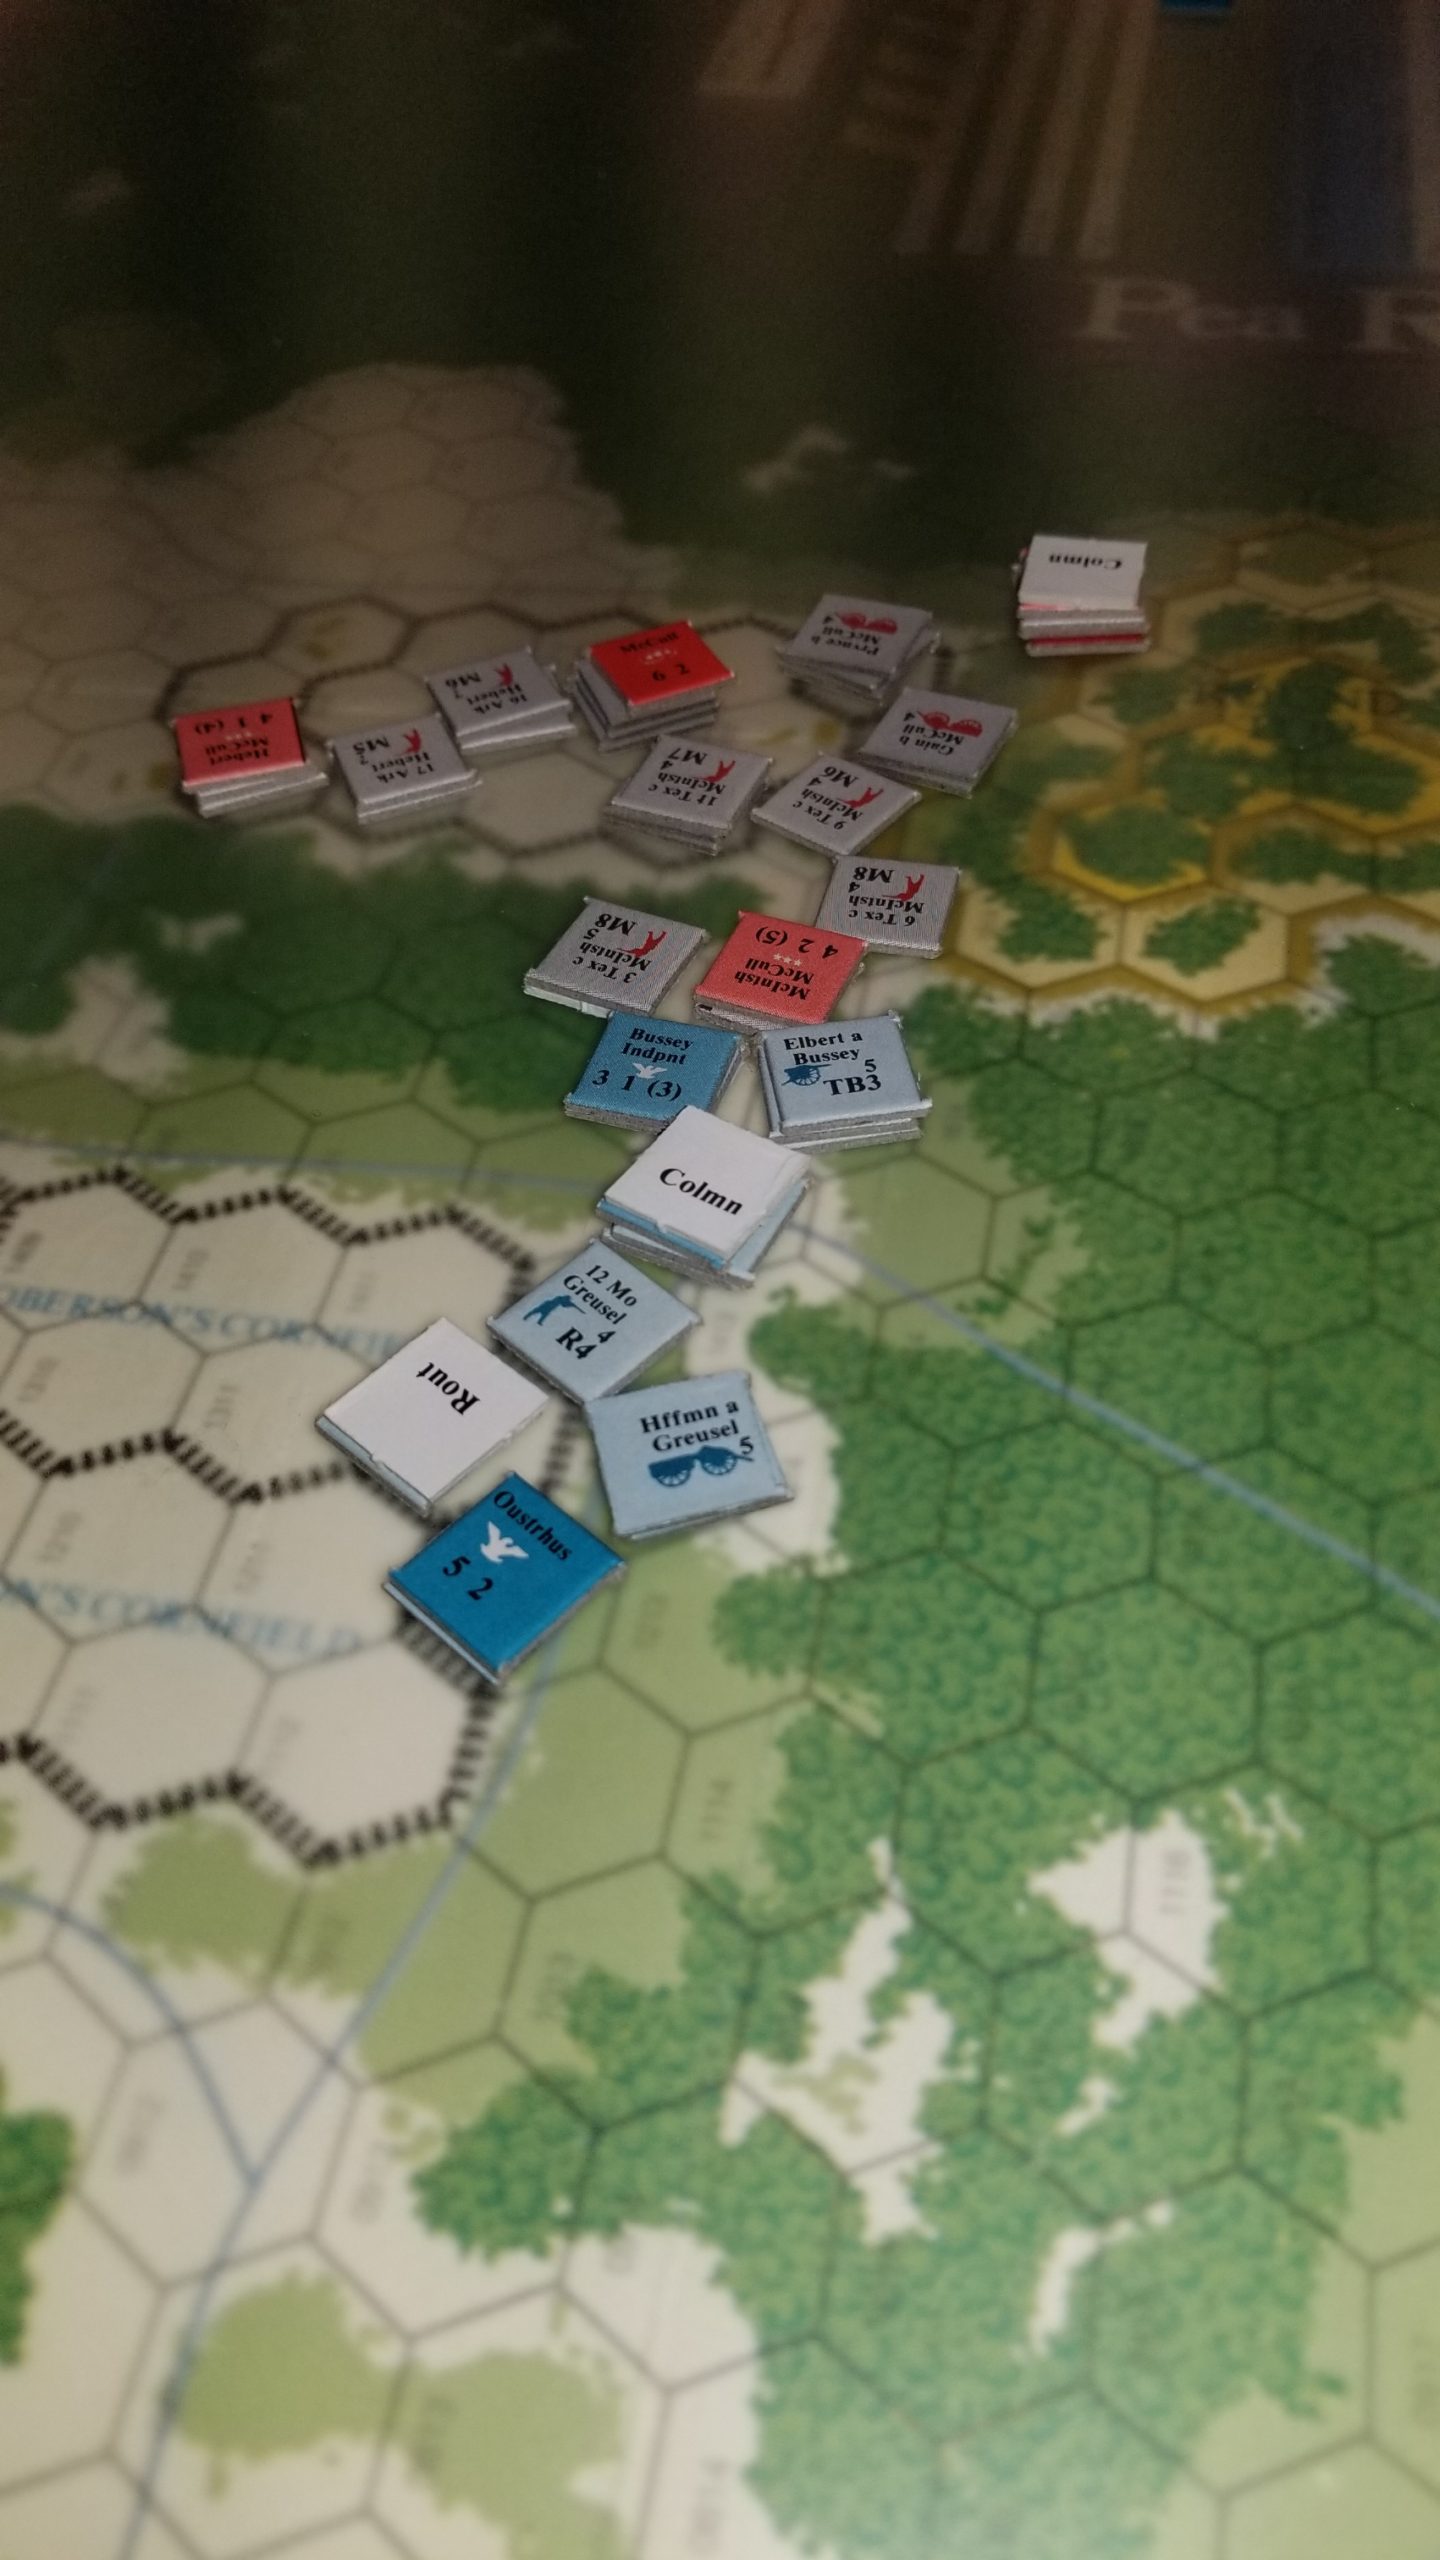
A meeting engagement, regiments arrive piecemeal, with the Confederates having to negotiate constricted roadways in order to attack and reach their victory objectives.
I always tussle with whether or not to read about a battle before I play it. I tend to not consult a reference so to avoid any pre-conceived notions about my approach for my first play-through. After that, I’ll take a look, especially since I am fortunate enough to have the original two volume West Point History of American Wars.
Here’s a bad shot of the situation after five turns. Top of picture is North. The Confederate victory objectives are, for all intents and purposes, at the south end of the board. Union victory objective is to hold in-place at their present position (Elk Tavern) to the East.
The game’s characteristics are interesting.
Union forces are outnumbered, but most Confederate units are armed with short ranged (one hex) muskets. But, using fire and melee tactics is complicated by the need for Confederate units to be stacked with a leader in order to melee. This rule is intended to reflect the high historical casualties among Confederate brigadiers. It also makes a two hex melee attack very difficult.
Many regiments’ morale is unknown. A die roll the first time a check is necessary determines their rating. Units keep that rating for the rest of the game. This differs from TSS, which calls for a new roll for each check. There is also a night turn, when both sides have an opportunity to regroup.
Managing the movement to contact is difficult. Command radii are limited, there are lots of artillery units to clog roads, with very little room to deploy from column – necessary for movement at any pace through the heavily wooded areas – to line. This makes coordinating attacks difficult, especially when time is of the essence for the Confederates.
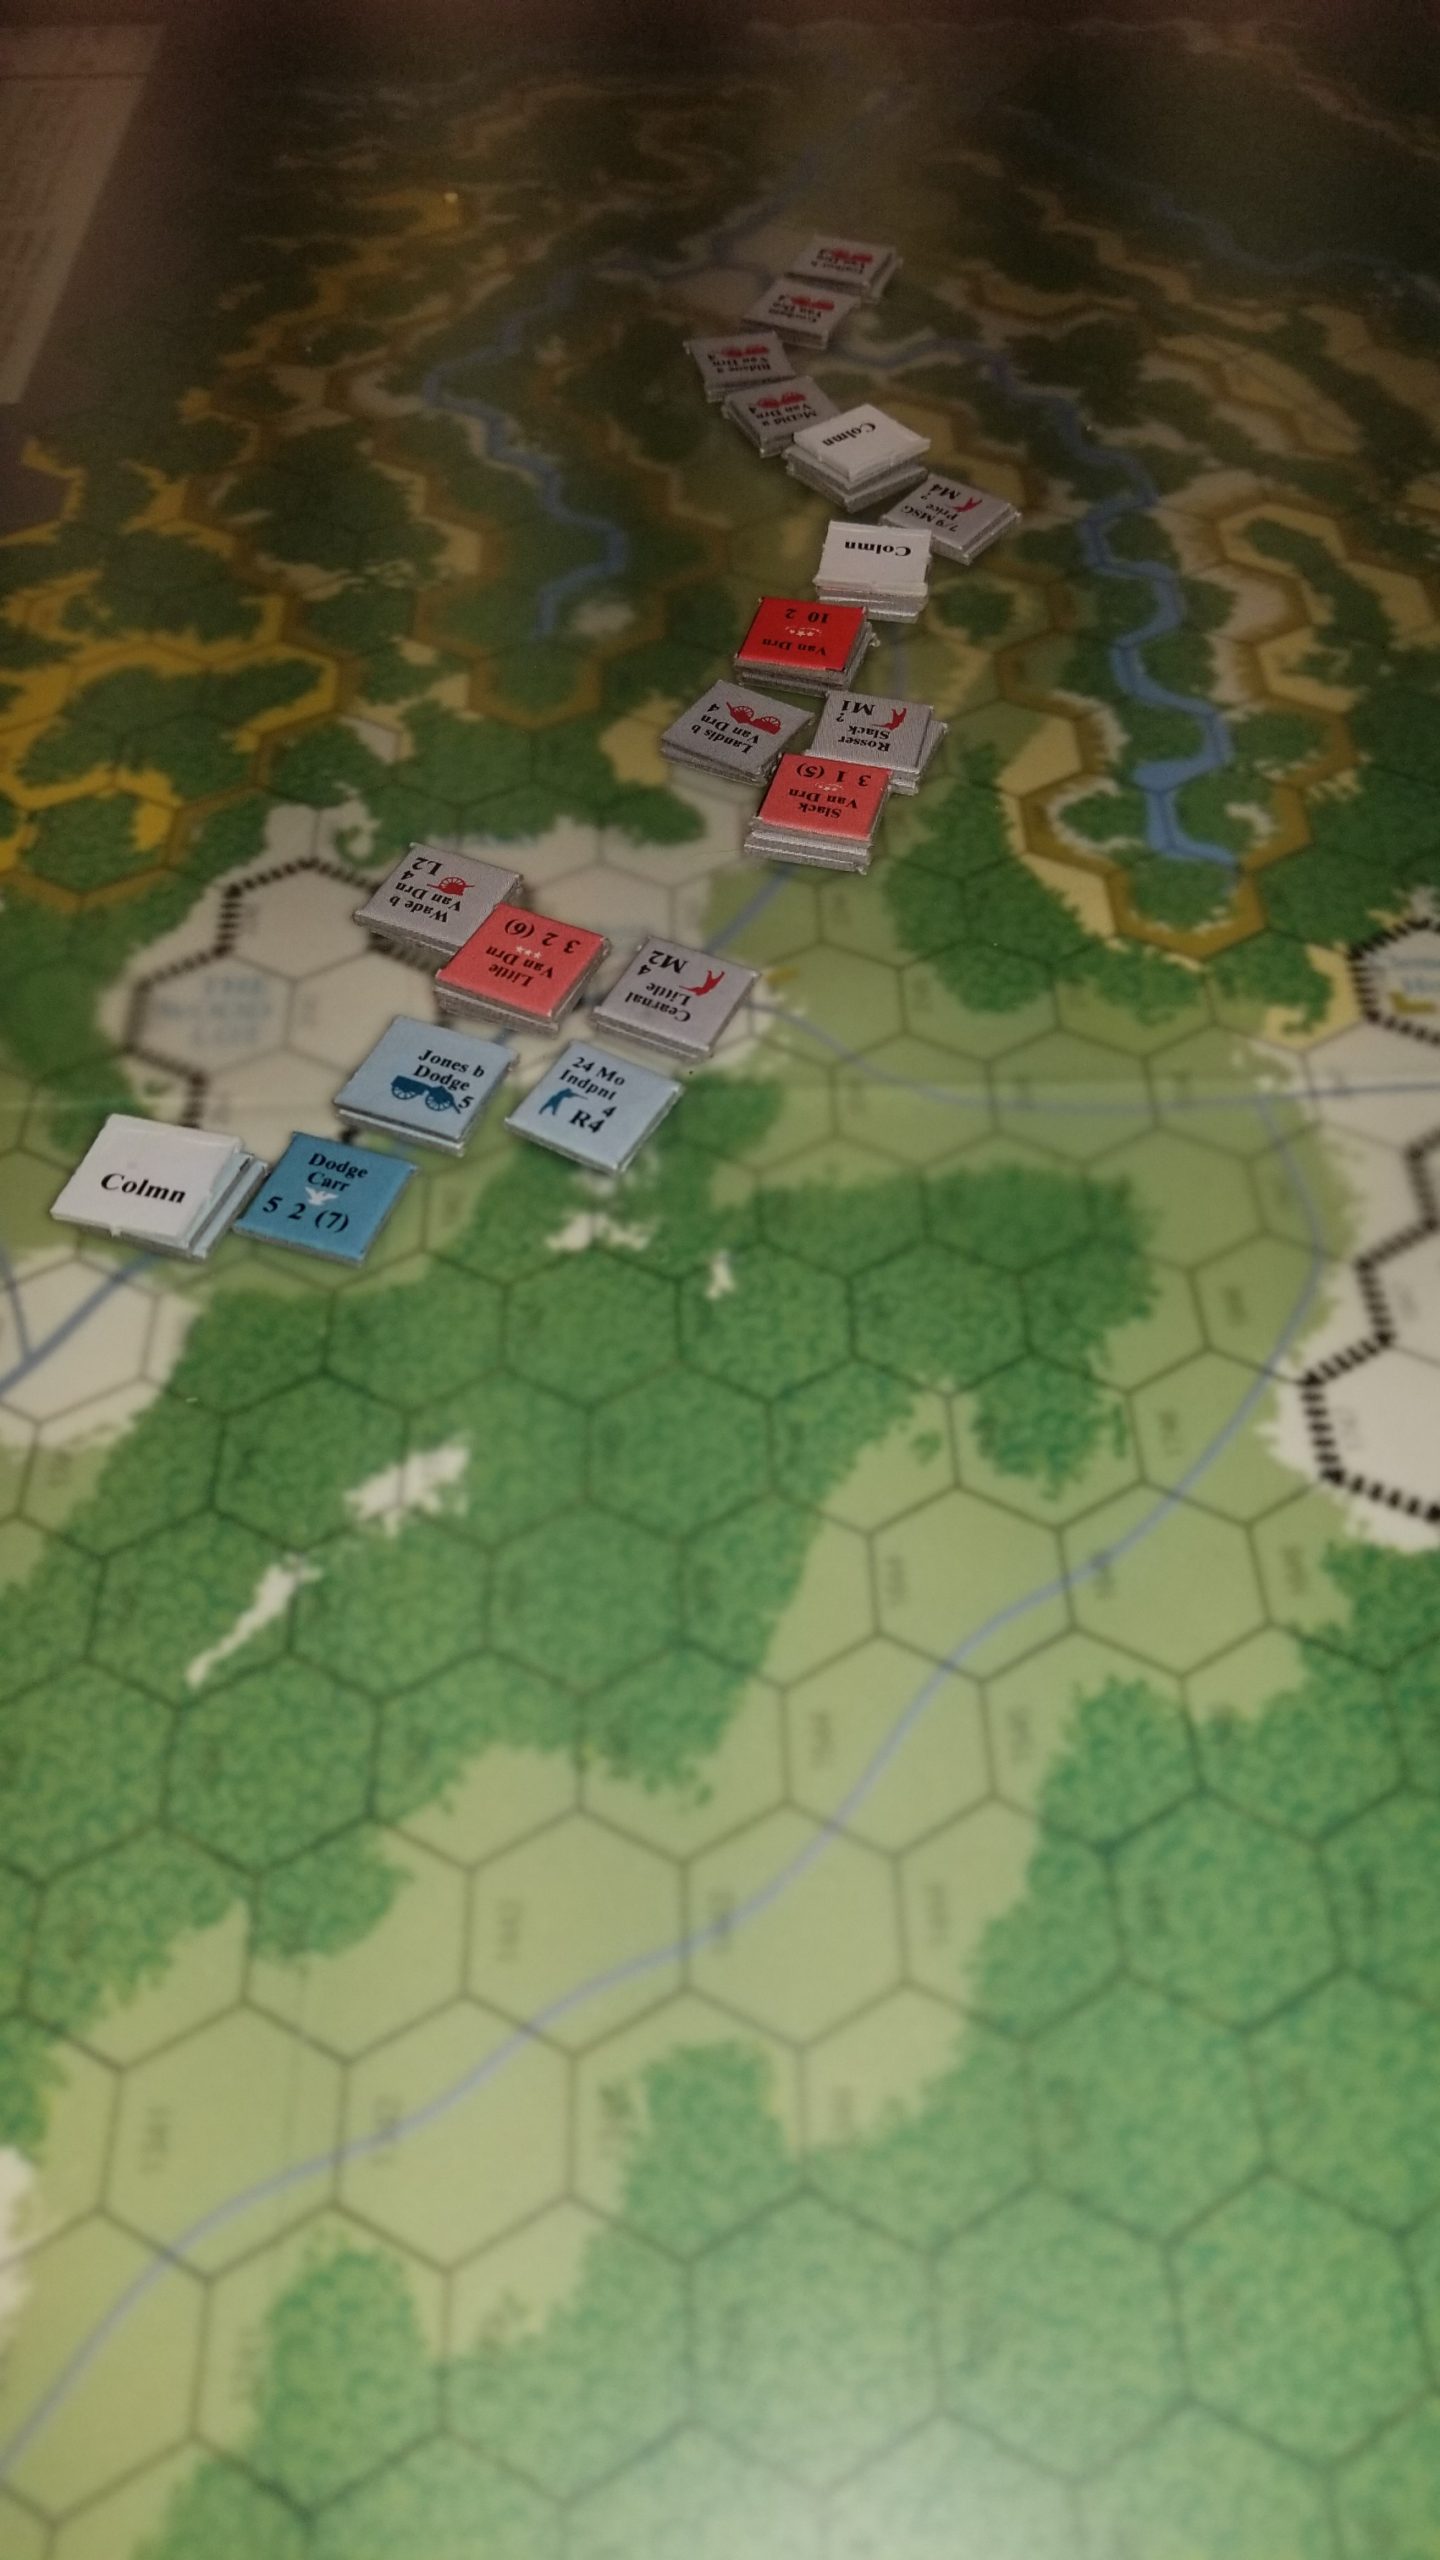
All-in-all, an interesting challenge. Here are close ups of the west and east flank’s action. Notice at east flank (2nd photo), that the Confederates have to move through heavy woods (which effectively limit movement to one hex per turn) in order to envelope the Union blocking force at Elk Tavern.