Tim forward these comments. I give him full marks for having the psychological health to even remember the traumatic experience………….You can read his comments on our earlier game, here.
Man, what a weird game…You could probably tell, but I was mentally off balance after my atrocious dice rolling…I think what frustrated me is that I knew that you would be getting many, many replacements and reinforcements and that I needed to hit you hard when I had the chance, so the poor results from my opening attacks blew up my strategy. Then, I didn’t fall back far enough…
I think the Poles after the opening attacks should fall back quite a ways, at least far enough where it takes a while for Russian replacements/reinforcements to get to the front. That also helps to shorten the line and free up troops for counterattacks. I wonder if it would be the Poles’ while to knock out the Lithuanians during the period when they can’t attack in the North. I’m not sure, but it would be good to be actually doing something in the North….
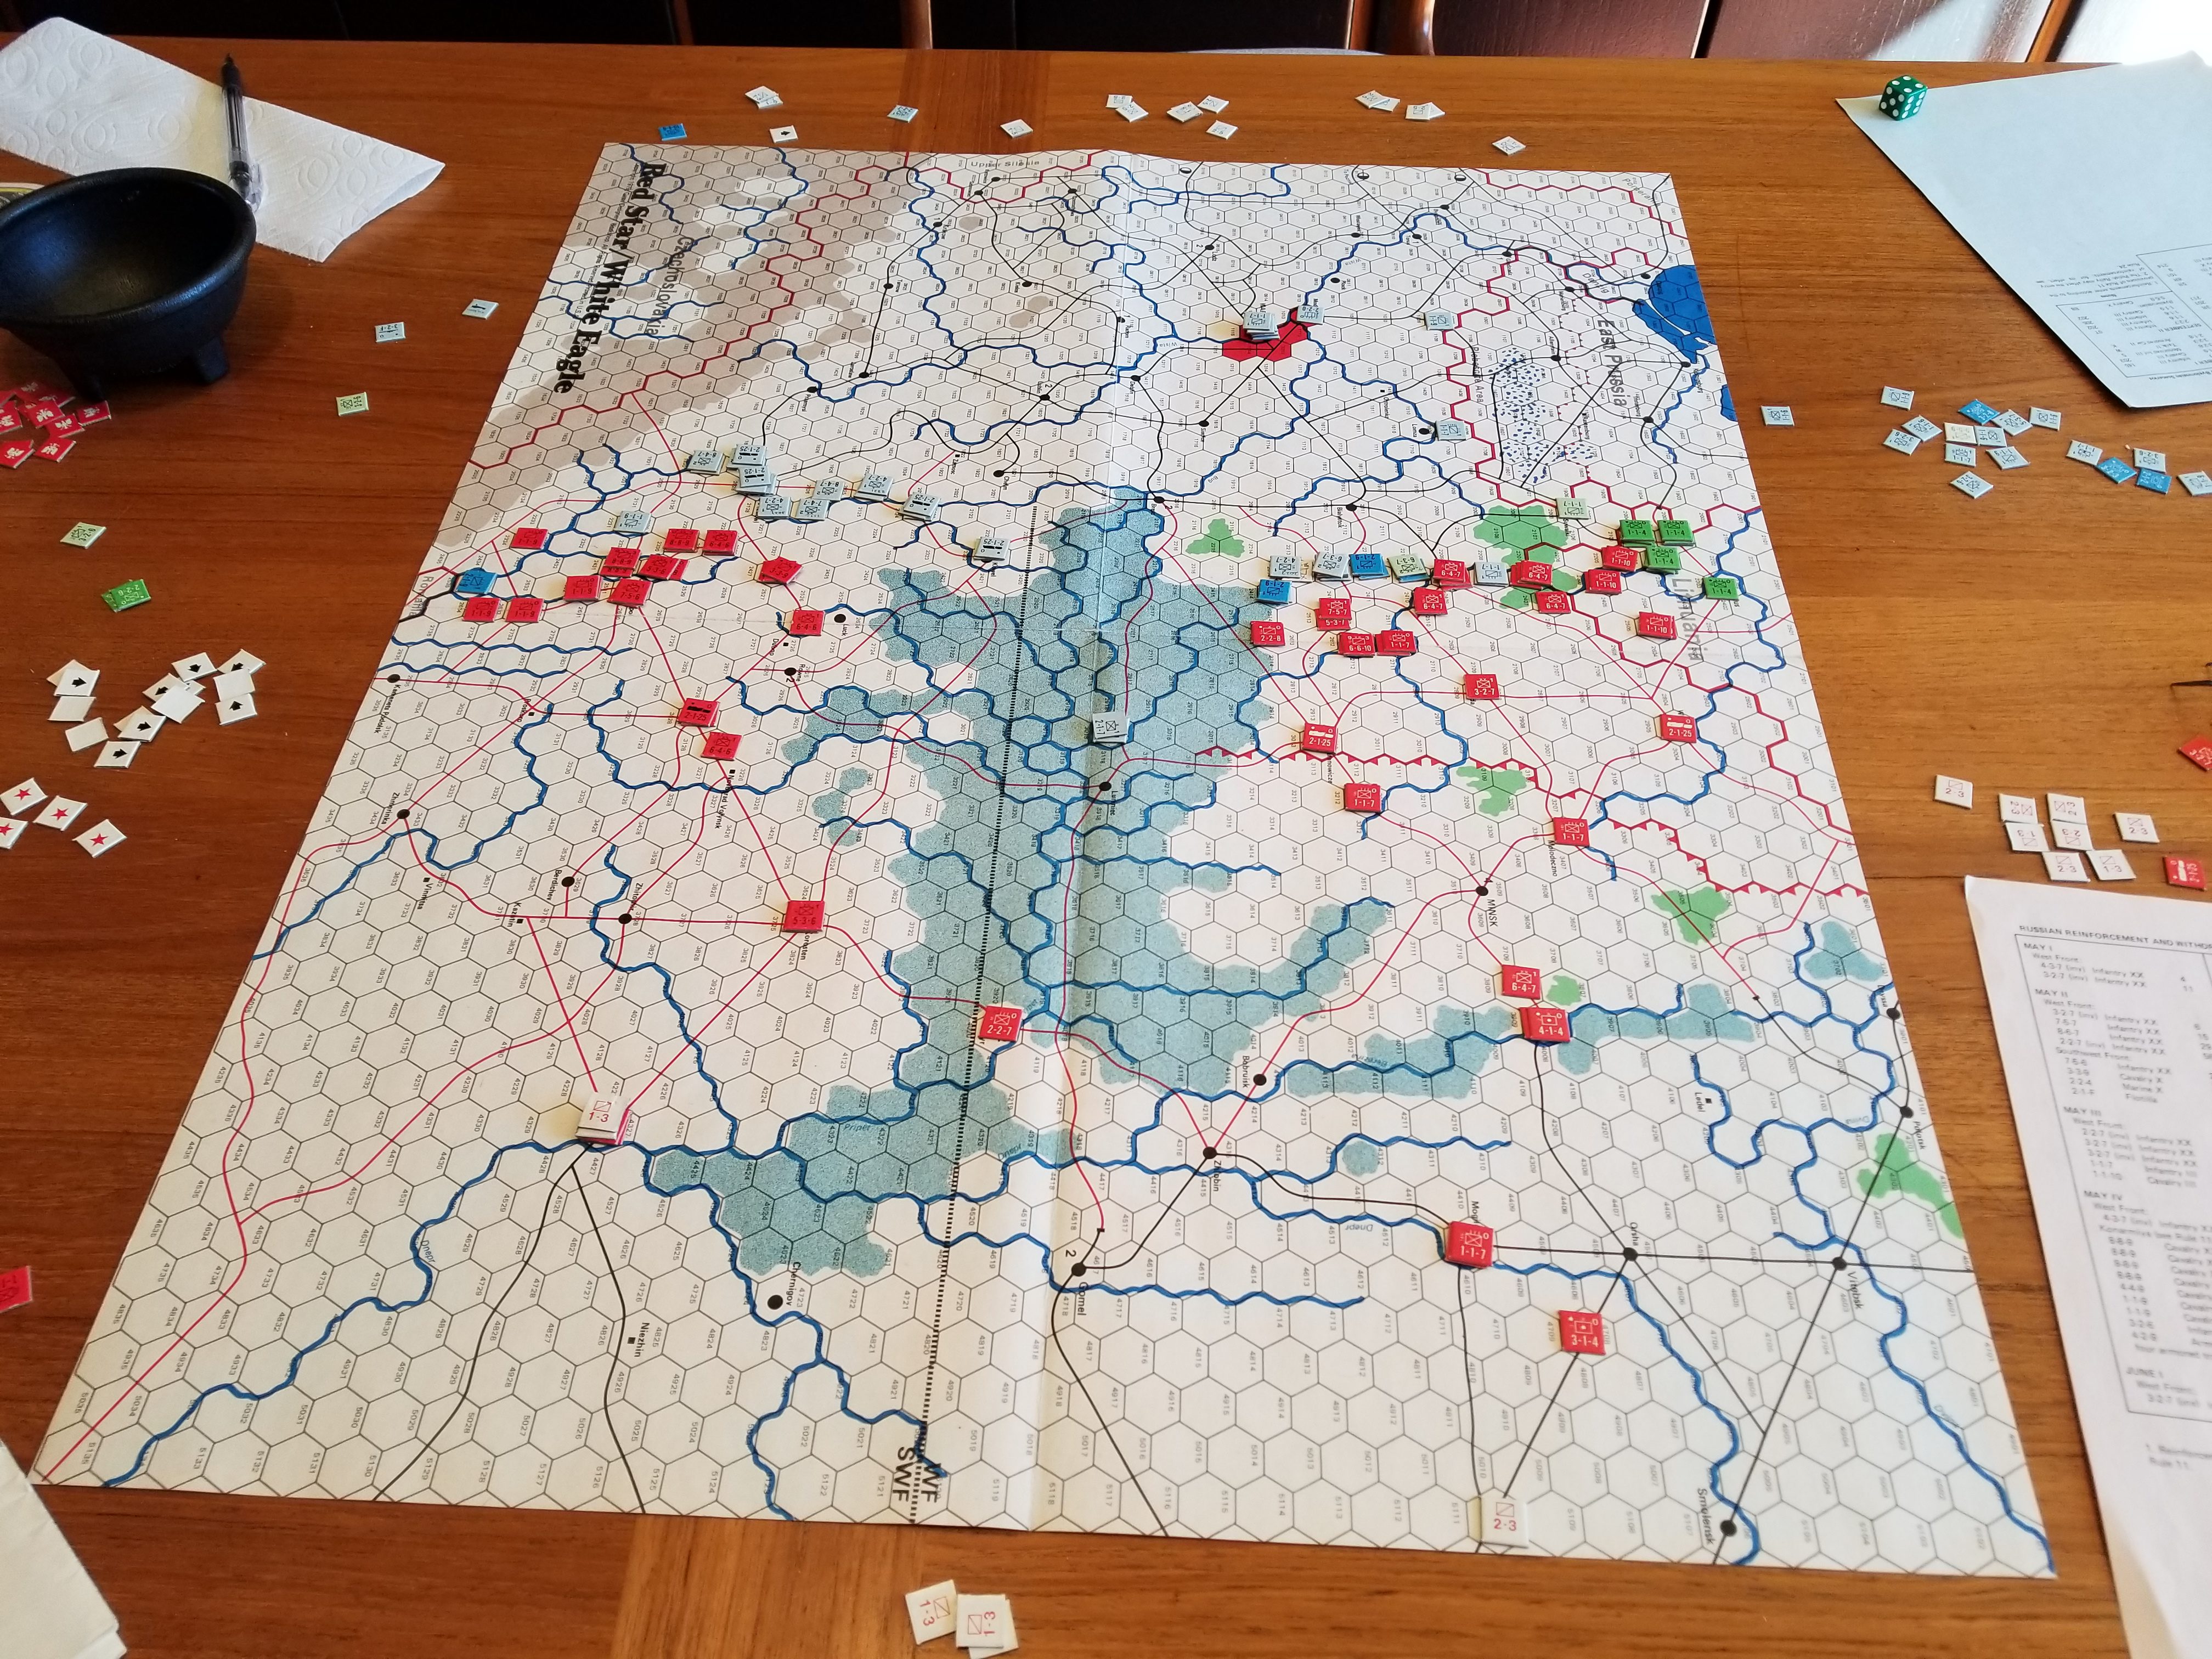
Tim came over for part of the Fourth of July weekend . Our game of choice was not really in the spirit of the holiday. While we have played Red Star/White Eagles Eagle before, this weekend was an entirely new experience . Once again, Tim took the Poles.
Here’s a summary of the important rules/characteristics of the game.
Bloody Combat Results Table (more on this later).
Extended Movement After Combat (both advance and retreat).
Strong Zones of Control for many Polish units (these can limit advances after combat and attrit defeated units retreating through the ZOC).
Soviet Fronts cannot cooperate.
Lack of traditional strong defensive positions (only forest and river lines that have exploitable gaps).River defensive positions lose their modifier if one attacking unit is not attacking across the river.
Fronts separated by Pripet Marshes
High reinforcement and replacements, especially for the Soviets.
Four turns per month.
Victory points awarded for capture of specific cities, only.
Tim arrived Friday afternoon having fought early holiday traffic and drivers of marginal capabilities . After sucking down three Henrys (each….I had to show solidarity), we set up and played three turns .
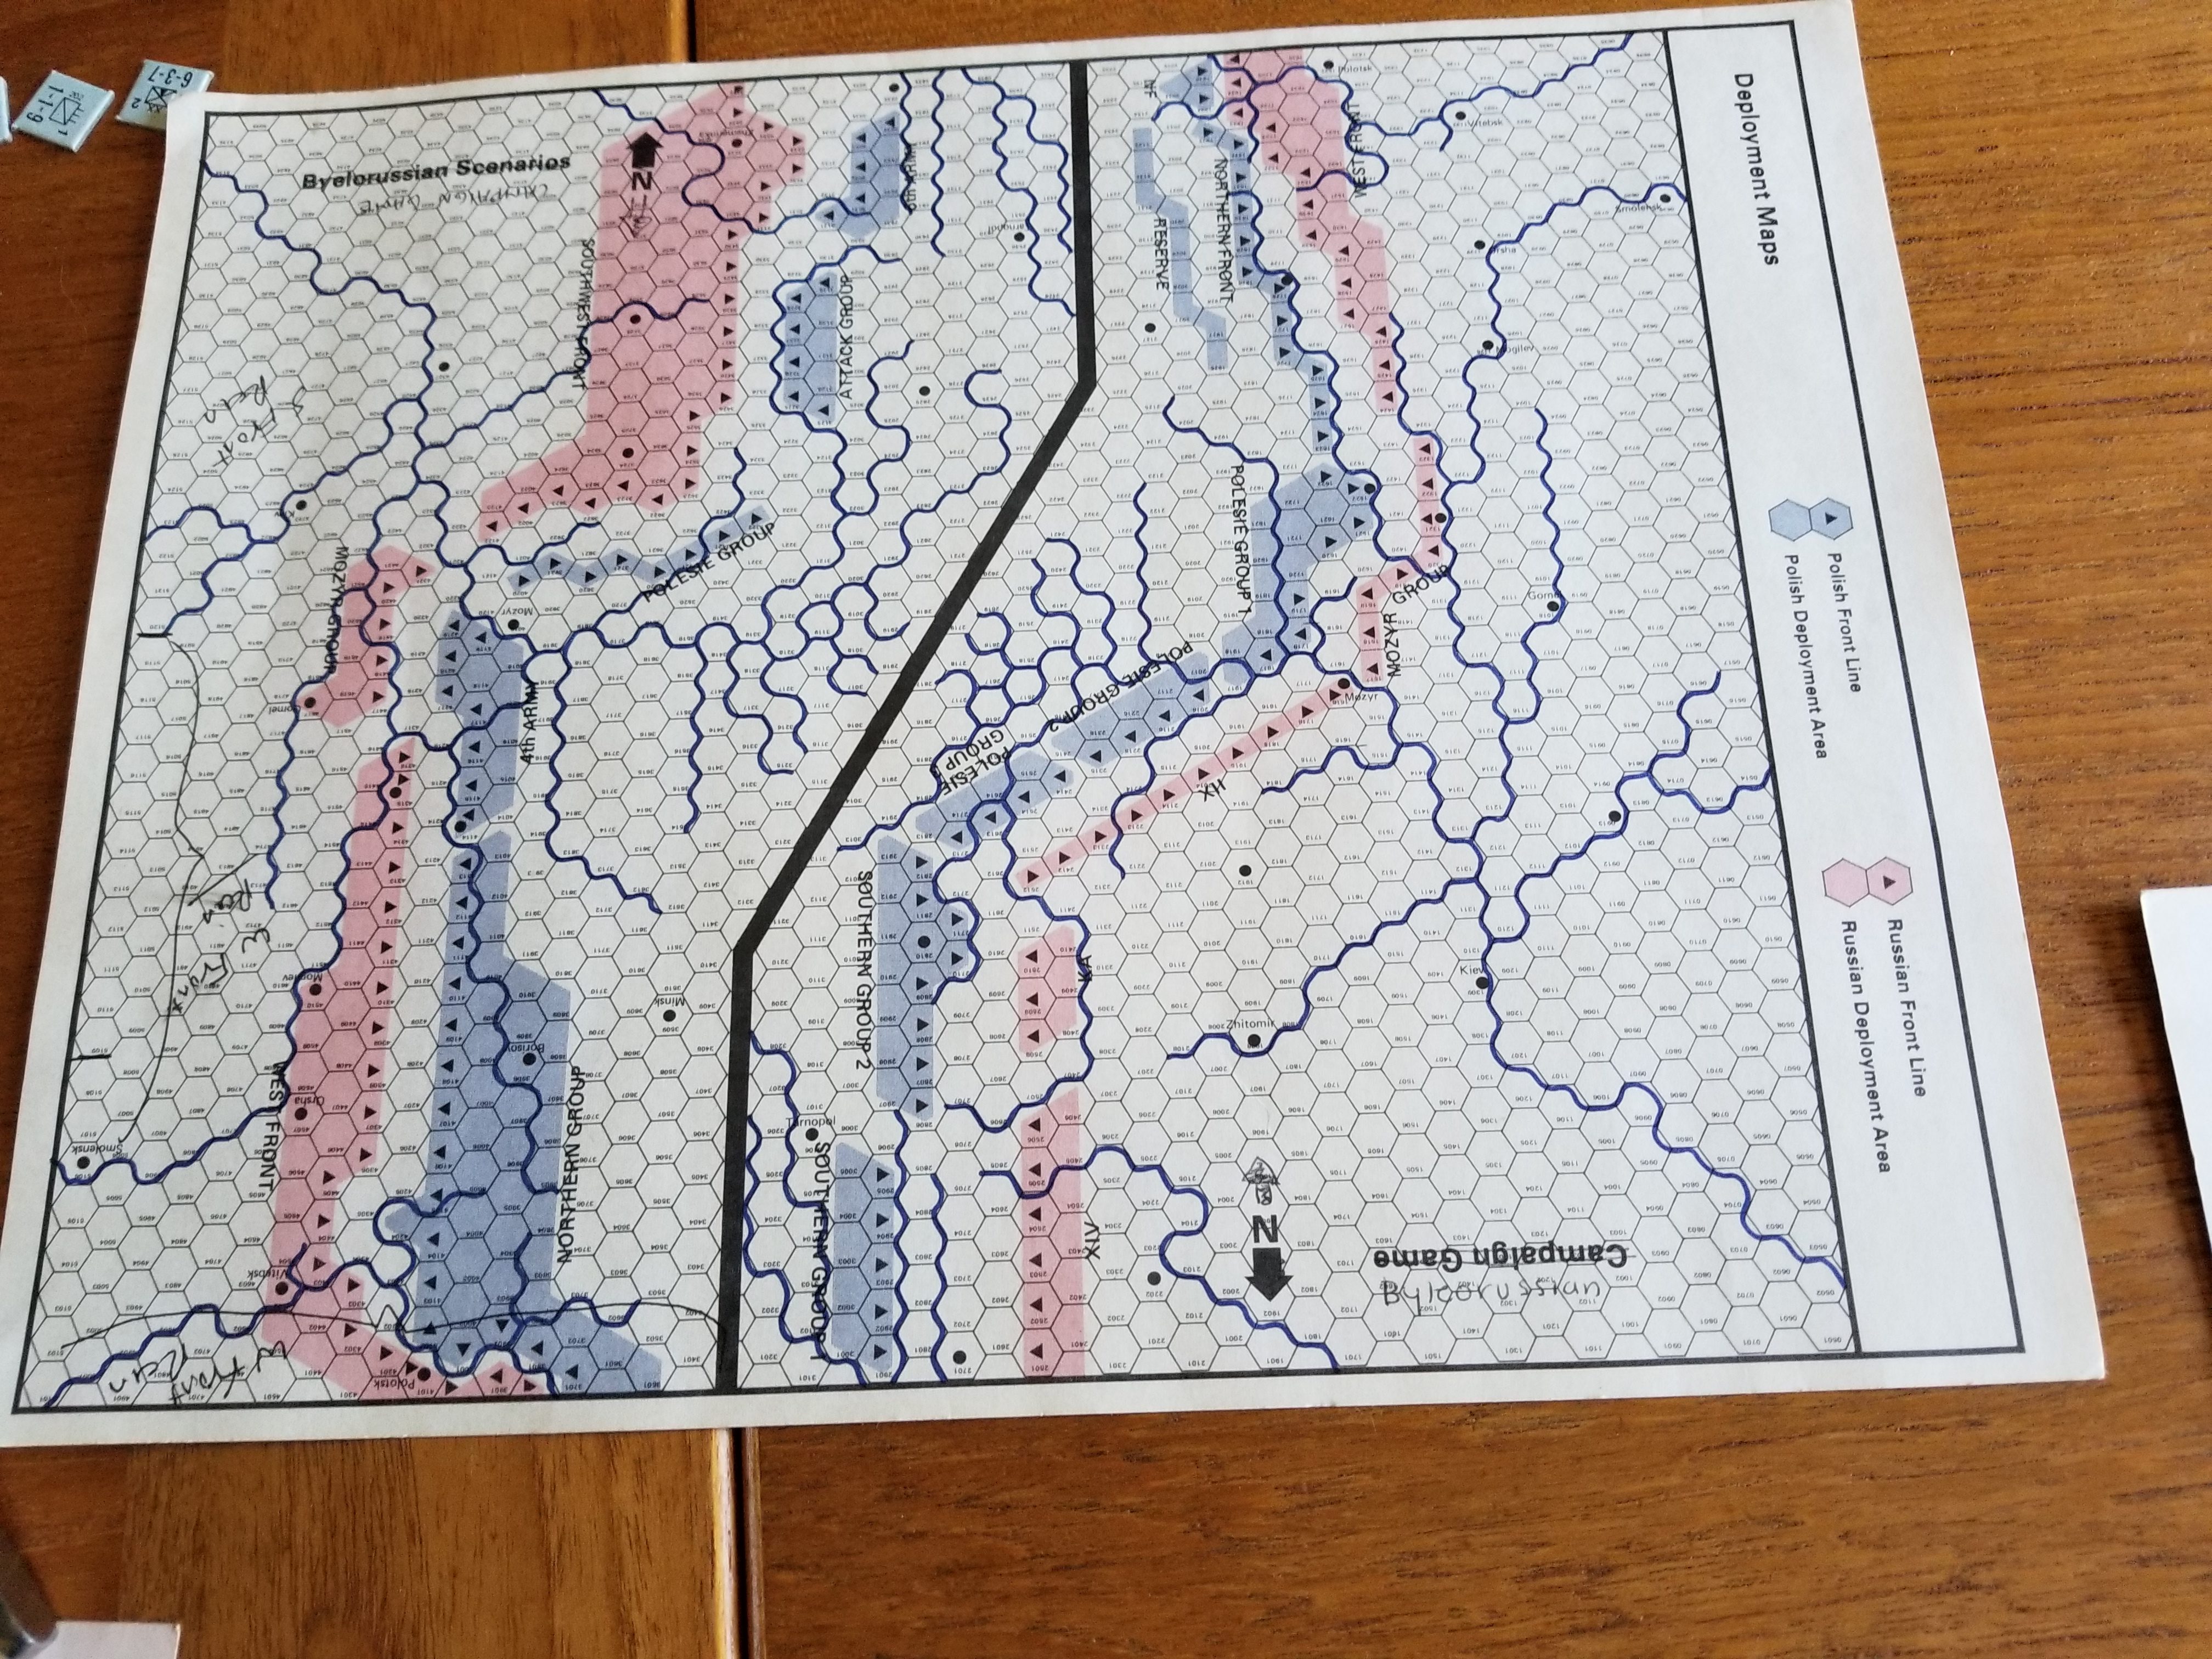
Play resumed the next morning. Right after we sat down Tim muttered , “You are going to hate me.” The initial set up was all wrong . Some might say alcohol had been involved , but the real culprit was the horrifically flawed set up diagram . Yes, it’s covered in the errata………
***Important Disclaimer*** I have absolutely no idea why all the photographs are canted. I am unaware of any body/head/eye bias that might have caused this. Also, the level of drinking was reasonable. May need tests.
The Set Up Diagram. Note Handwritten Annotations For Errata…..They Didn’t Help.Initial Setup Mk II. I Think We Got It Right This Time
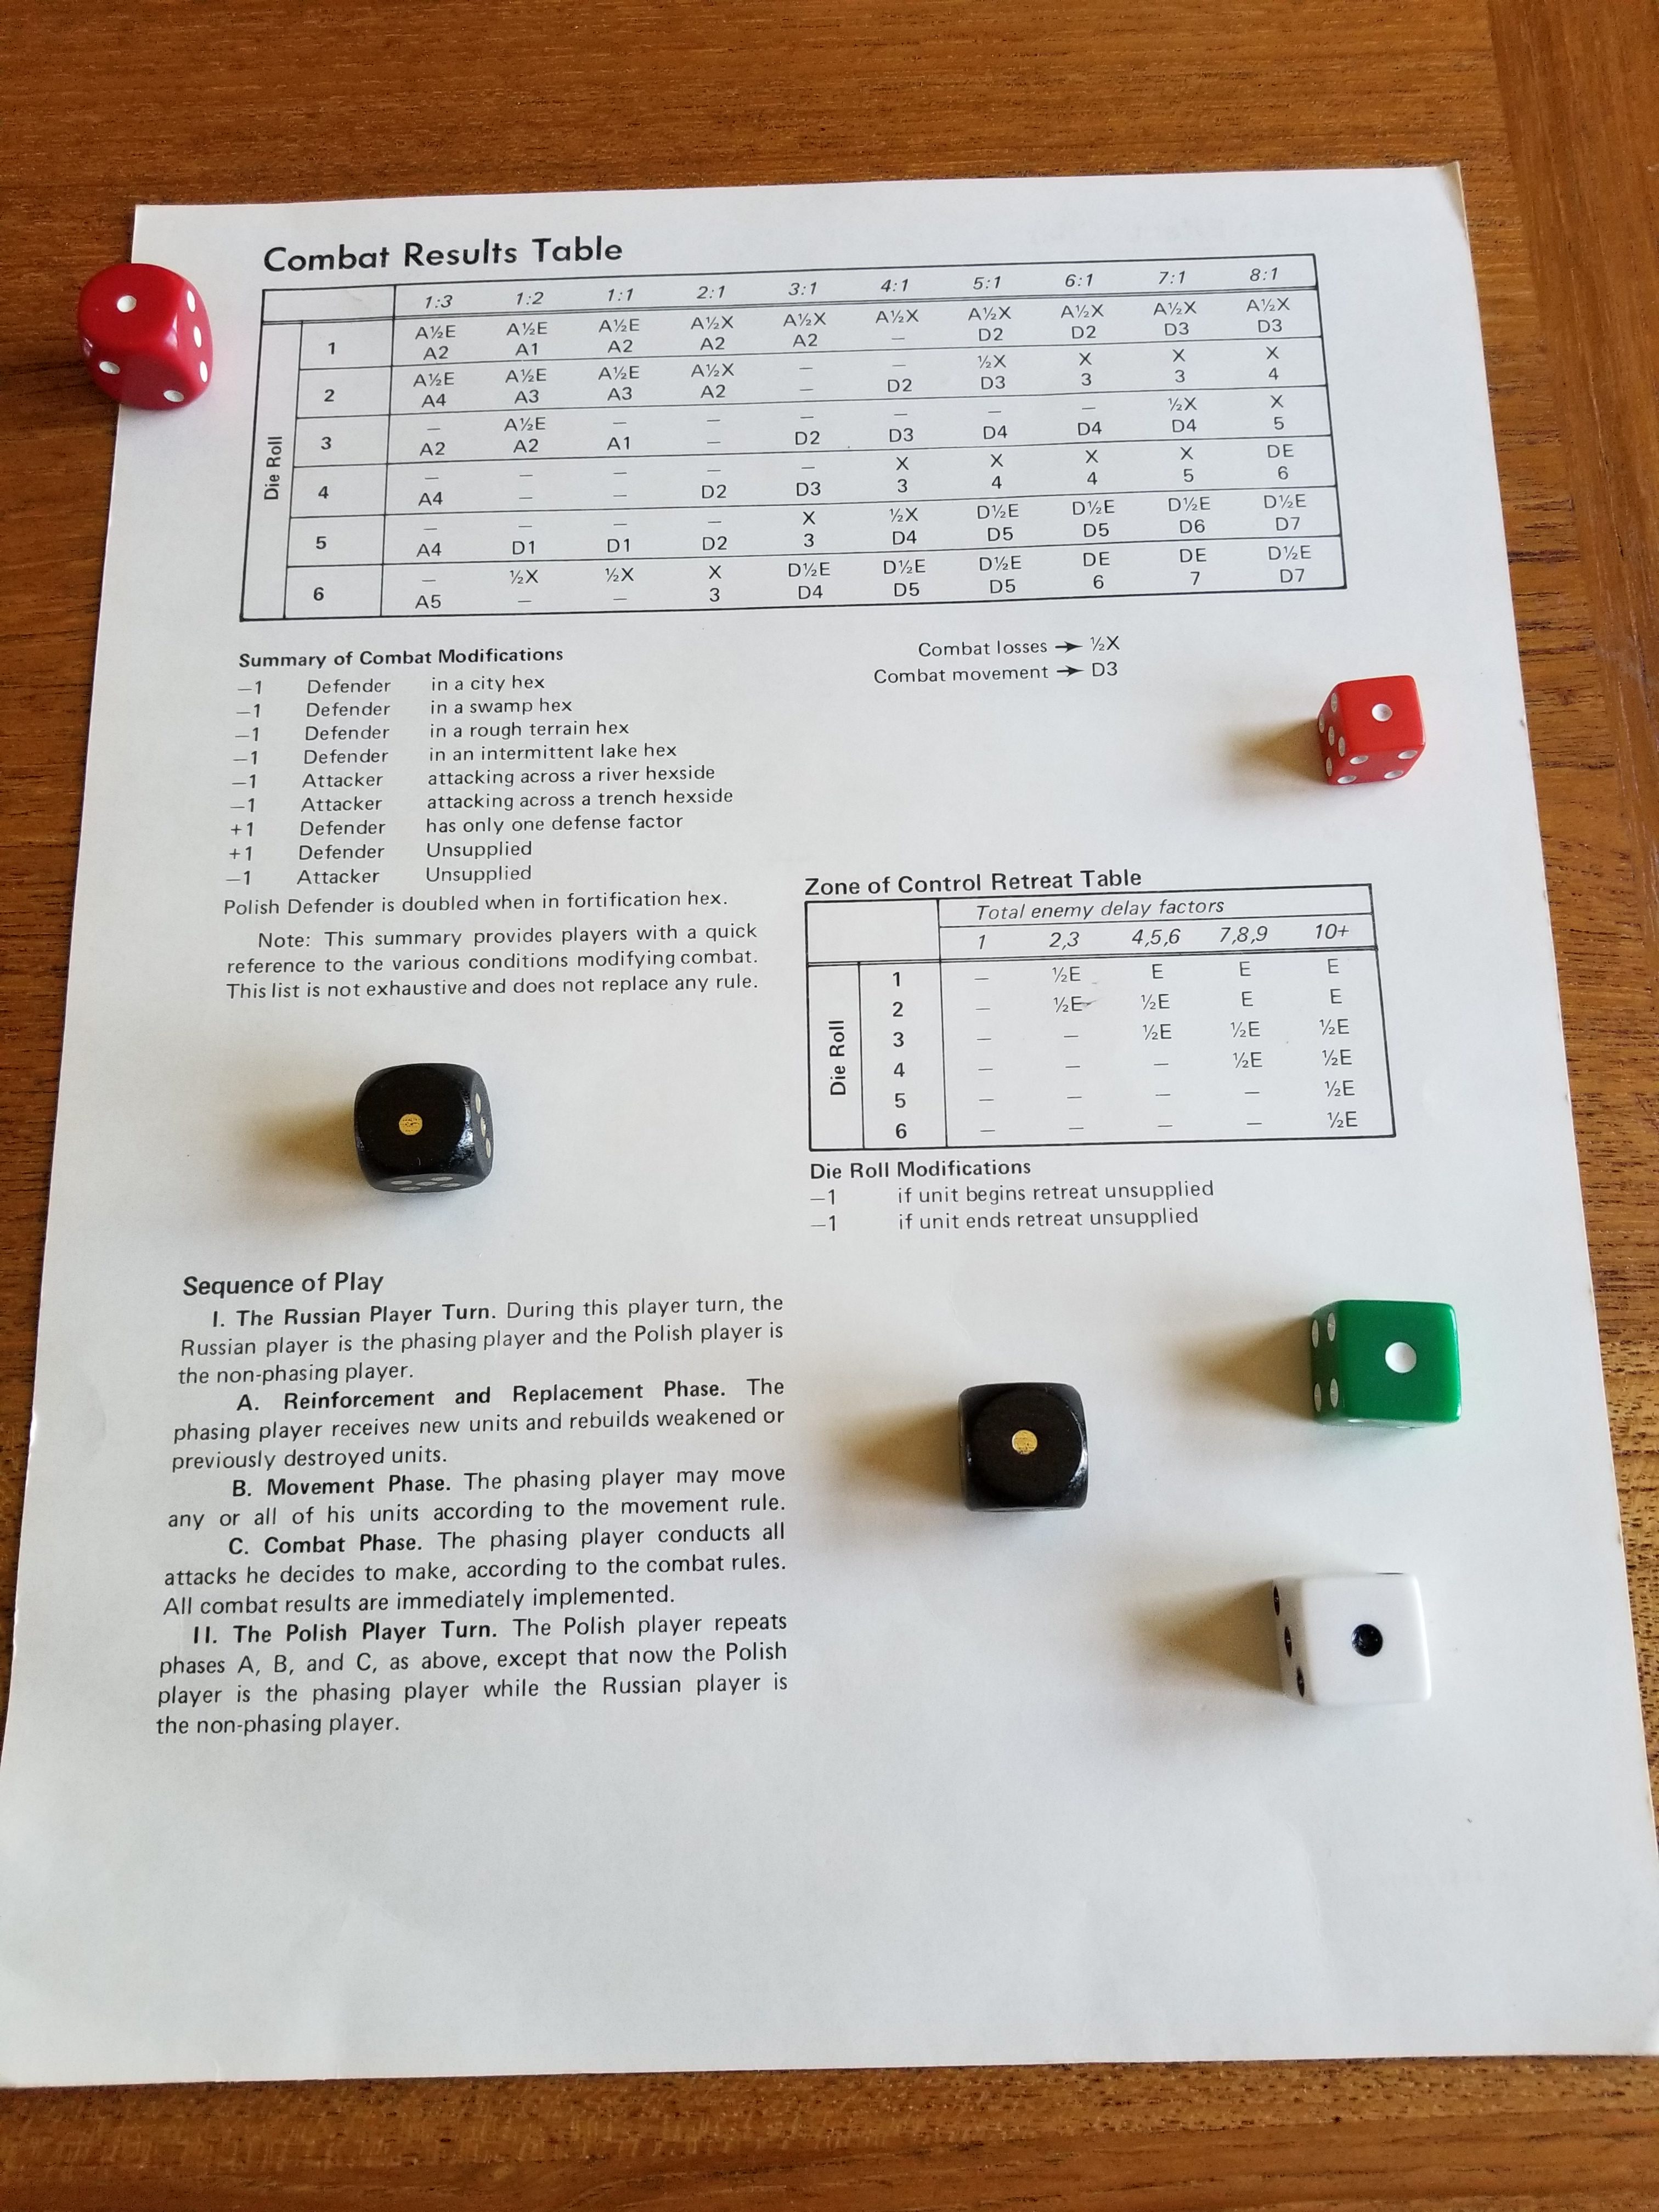
After we reset, things went from bad to worse for Tim. His southern front offensive staggered due to a series of D6 rolls of one. In this game a D6 role of one is not simply an exchange based on the defenders strength, it is an exchange where the attacker loses one half of its attacking force. At odds of 5:1 to 8:1 this is a staggering loss . In the past we assumed that the CRT was the same as that for Europa – after all the game’s mechanics are very similar to that system. The result was high levels of anxiety when rolling for an attack.
Tim’s Nightmare
Tim’s rolls were so bad I gave him three Mulligans . While this might seem overly generous, I realized that this results table could cut both ways .
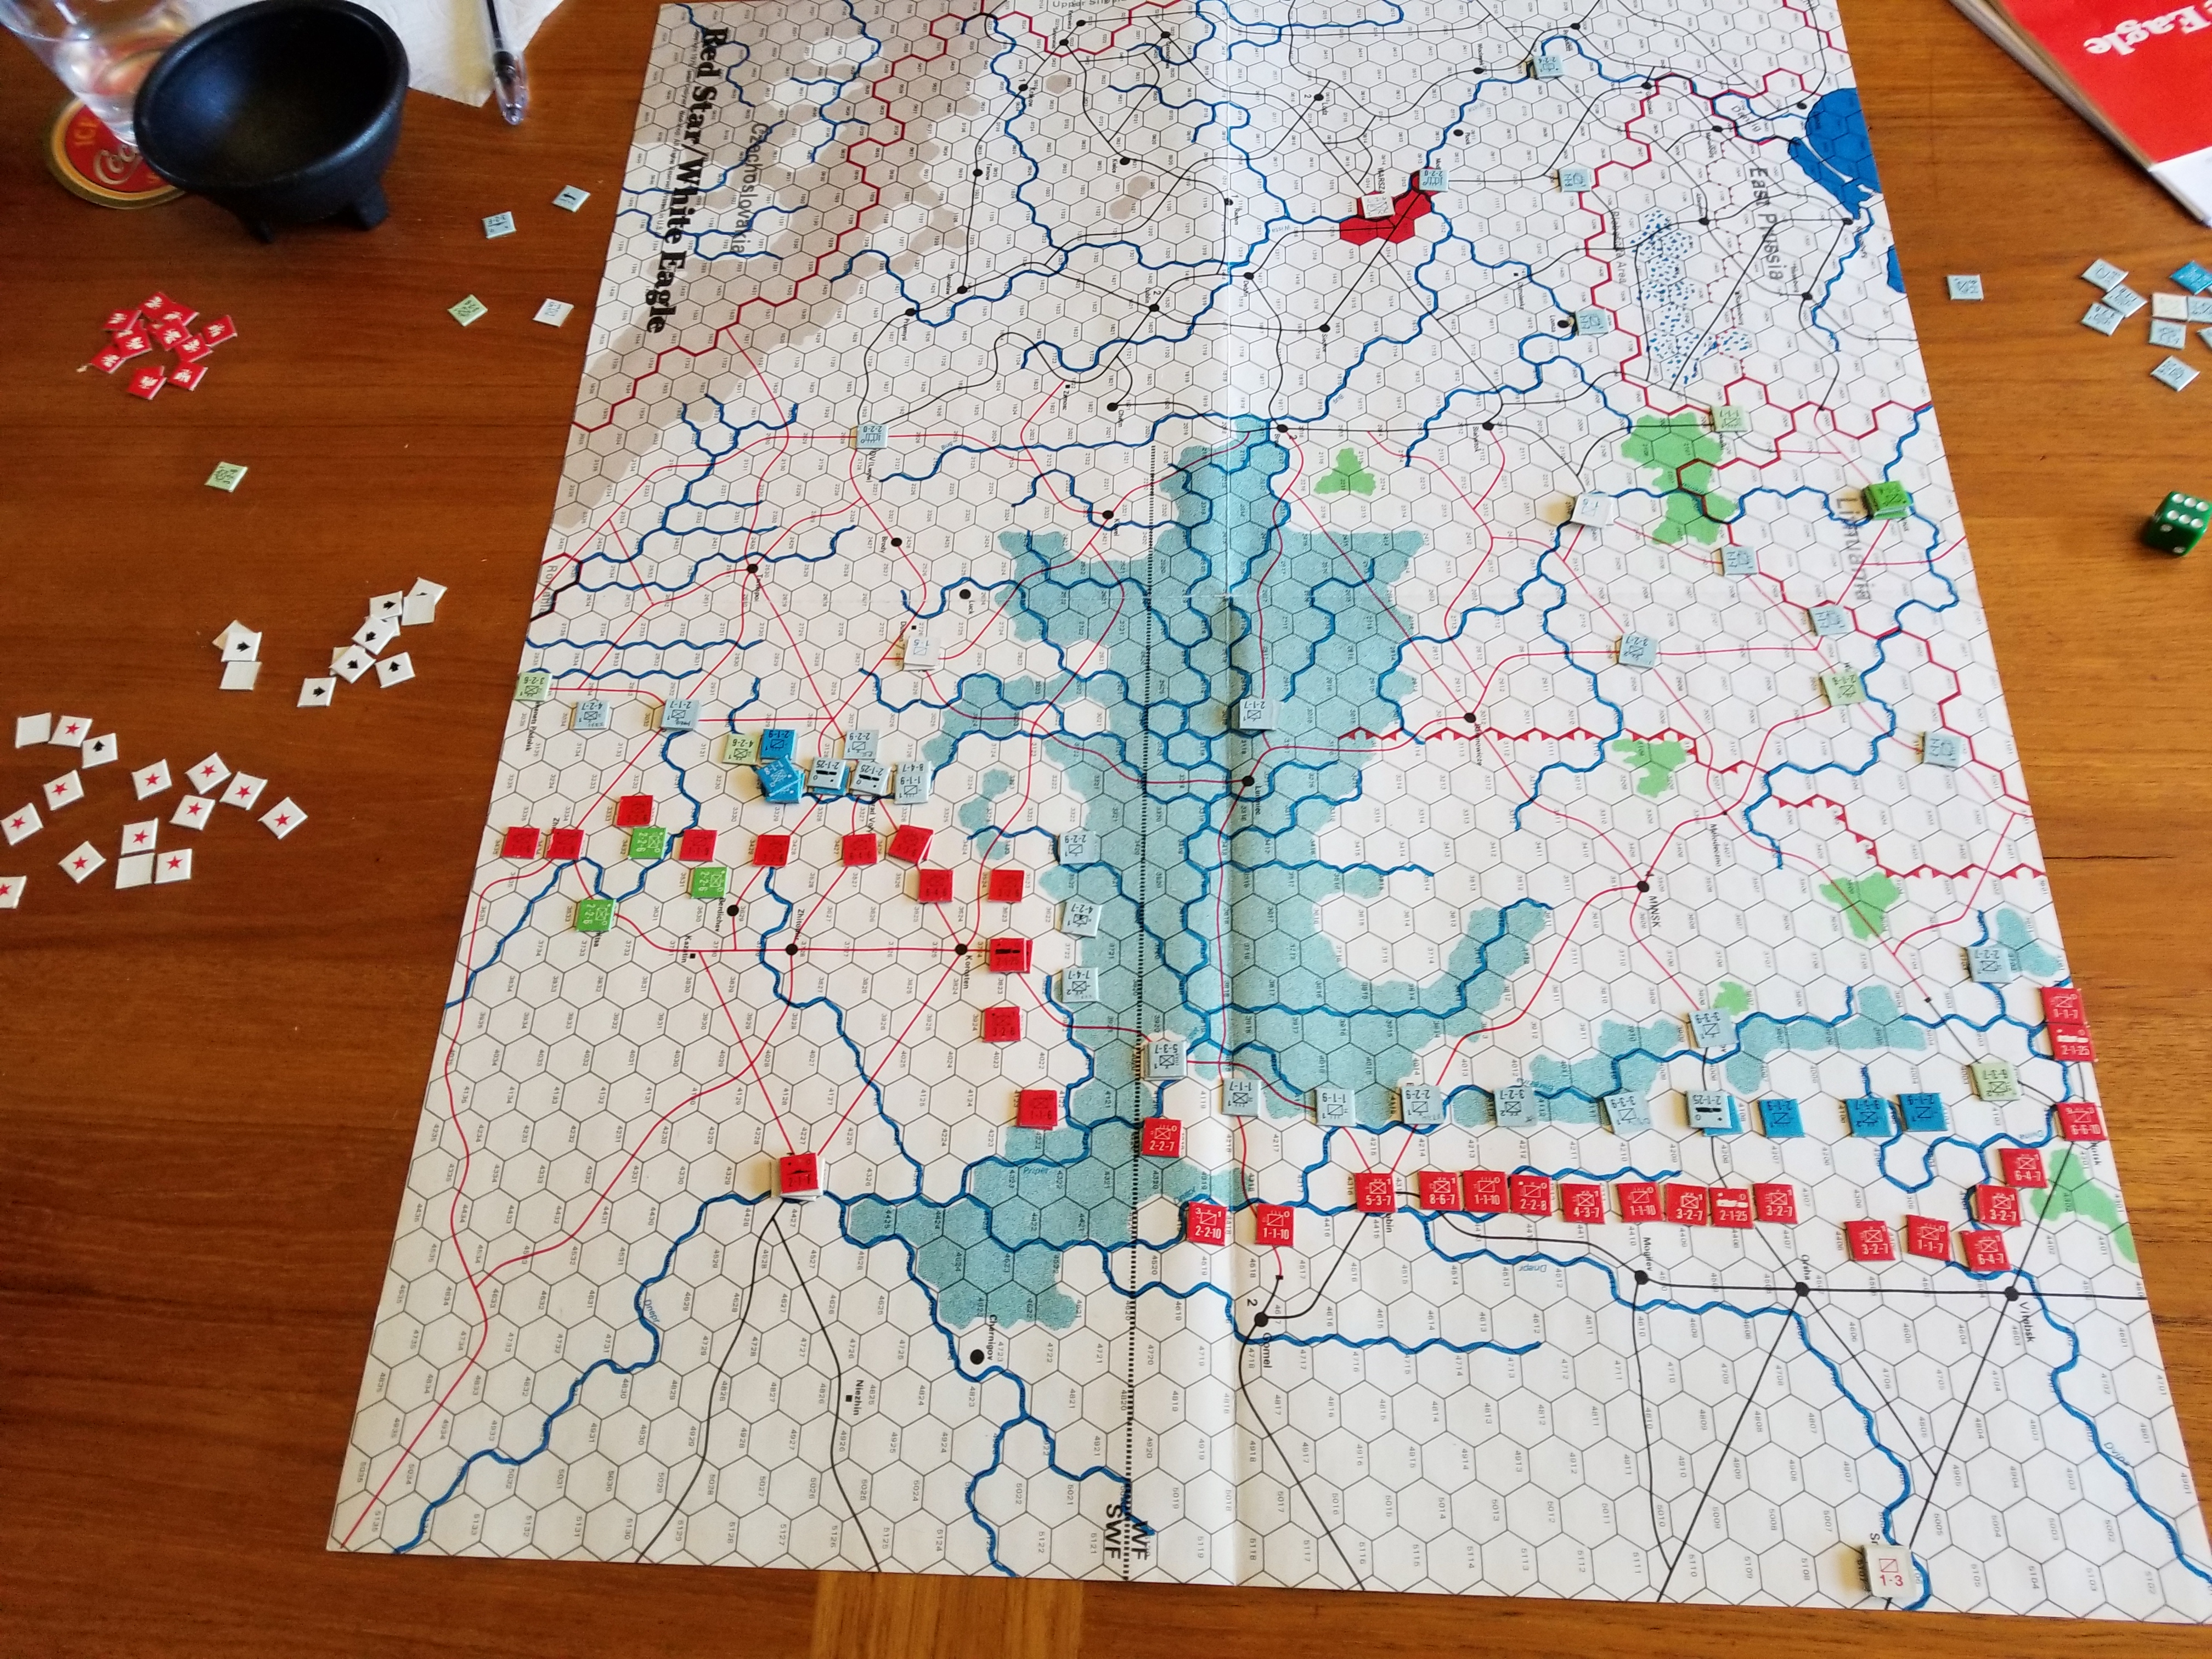
Despite this bad luck the Poles took Kiev .
Poles Take Kiev.
Early in the game almost all of the action occurs in the south . Both players are limited in their options in the north due to a mandated Red Army stand down .
The other defining aspect of the campaign game is the arrival in the south of the Konarmiya Cavalry Army on the May IV turn. This is a powerful force made even more dangerous due to a charge bonus which increases the value of its cavalry’s by fifty percent . A combination of the early stand down and appearance of the Konarmiya puts the Soviet player in the position to launch very strong offensives on both fronts beginning with the June I turn.
Anticipating this, the Poles began a series delay/defend actions covering the withdrawal of both fronts to more favorable defensive positions. He skillfully took advantage of the ZOC control of of withdrawals, using some units for the delay/defense.
Favorable is a subjective term in this game as there is very little rough or mountainous terrain on either side of the Pripet marshes . The river lines while affording some defensive bonuses have significant gaps which can be flanked .
The Poles were subjected to a number of aggressive attacks, with the Soviets focused on flanking Polish units. The Soviet player can afford to be aggressive due to a very high rate of both reinforcements and replacements. And, yes, I had use those Mulligans.
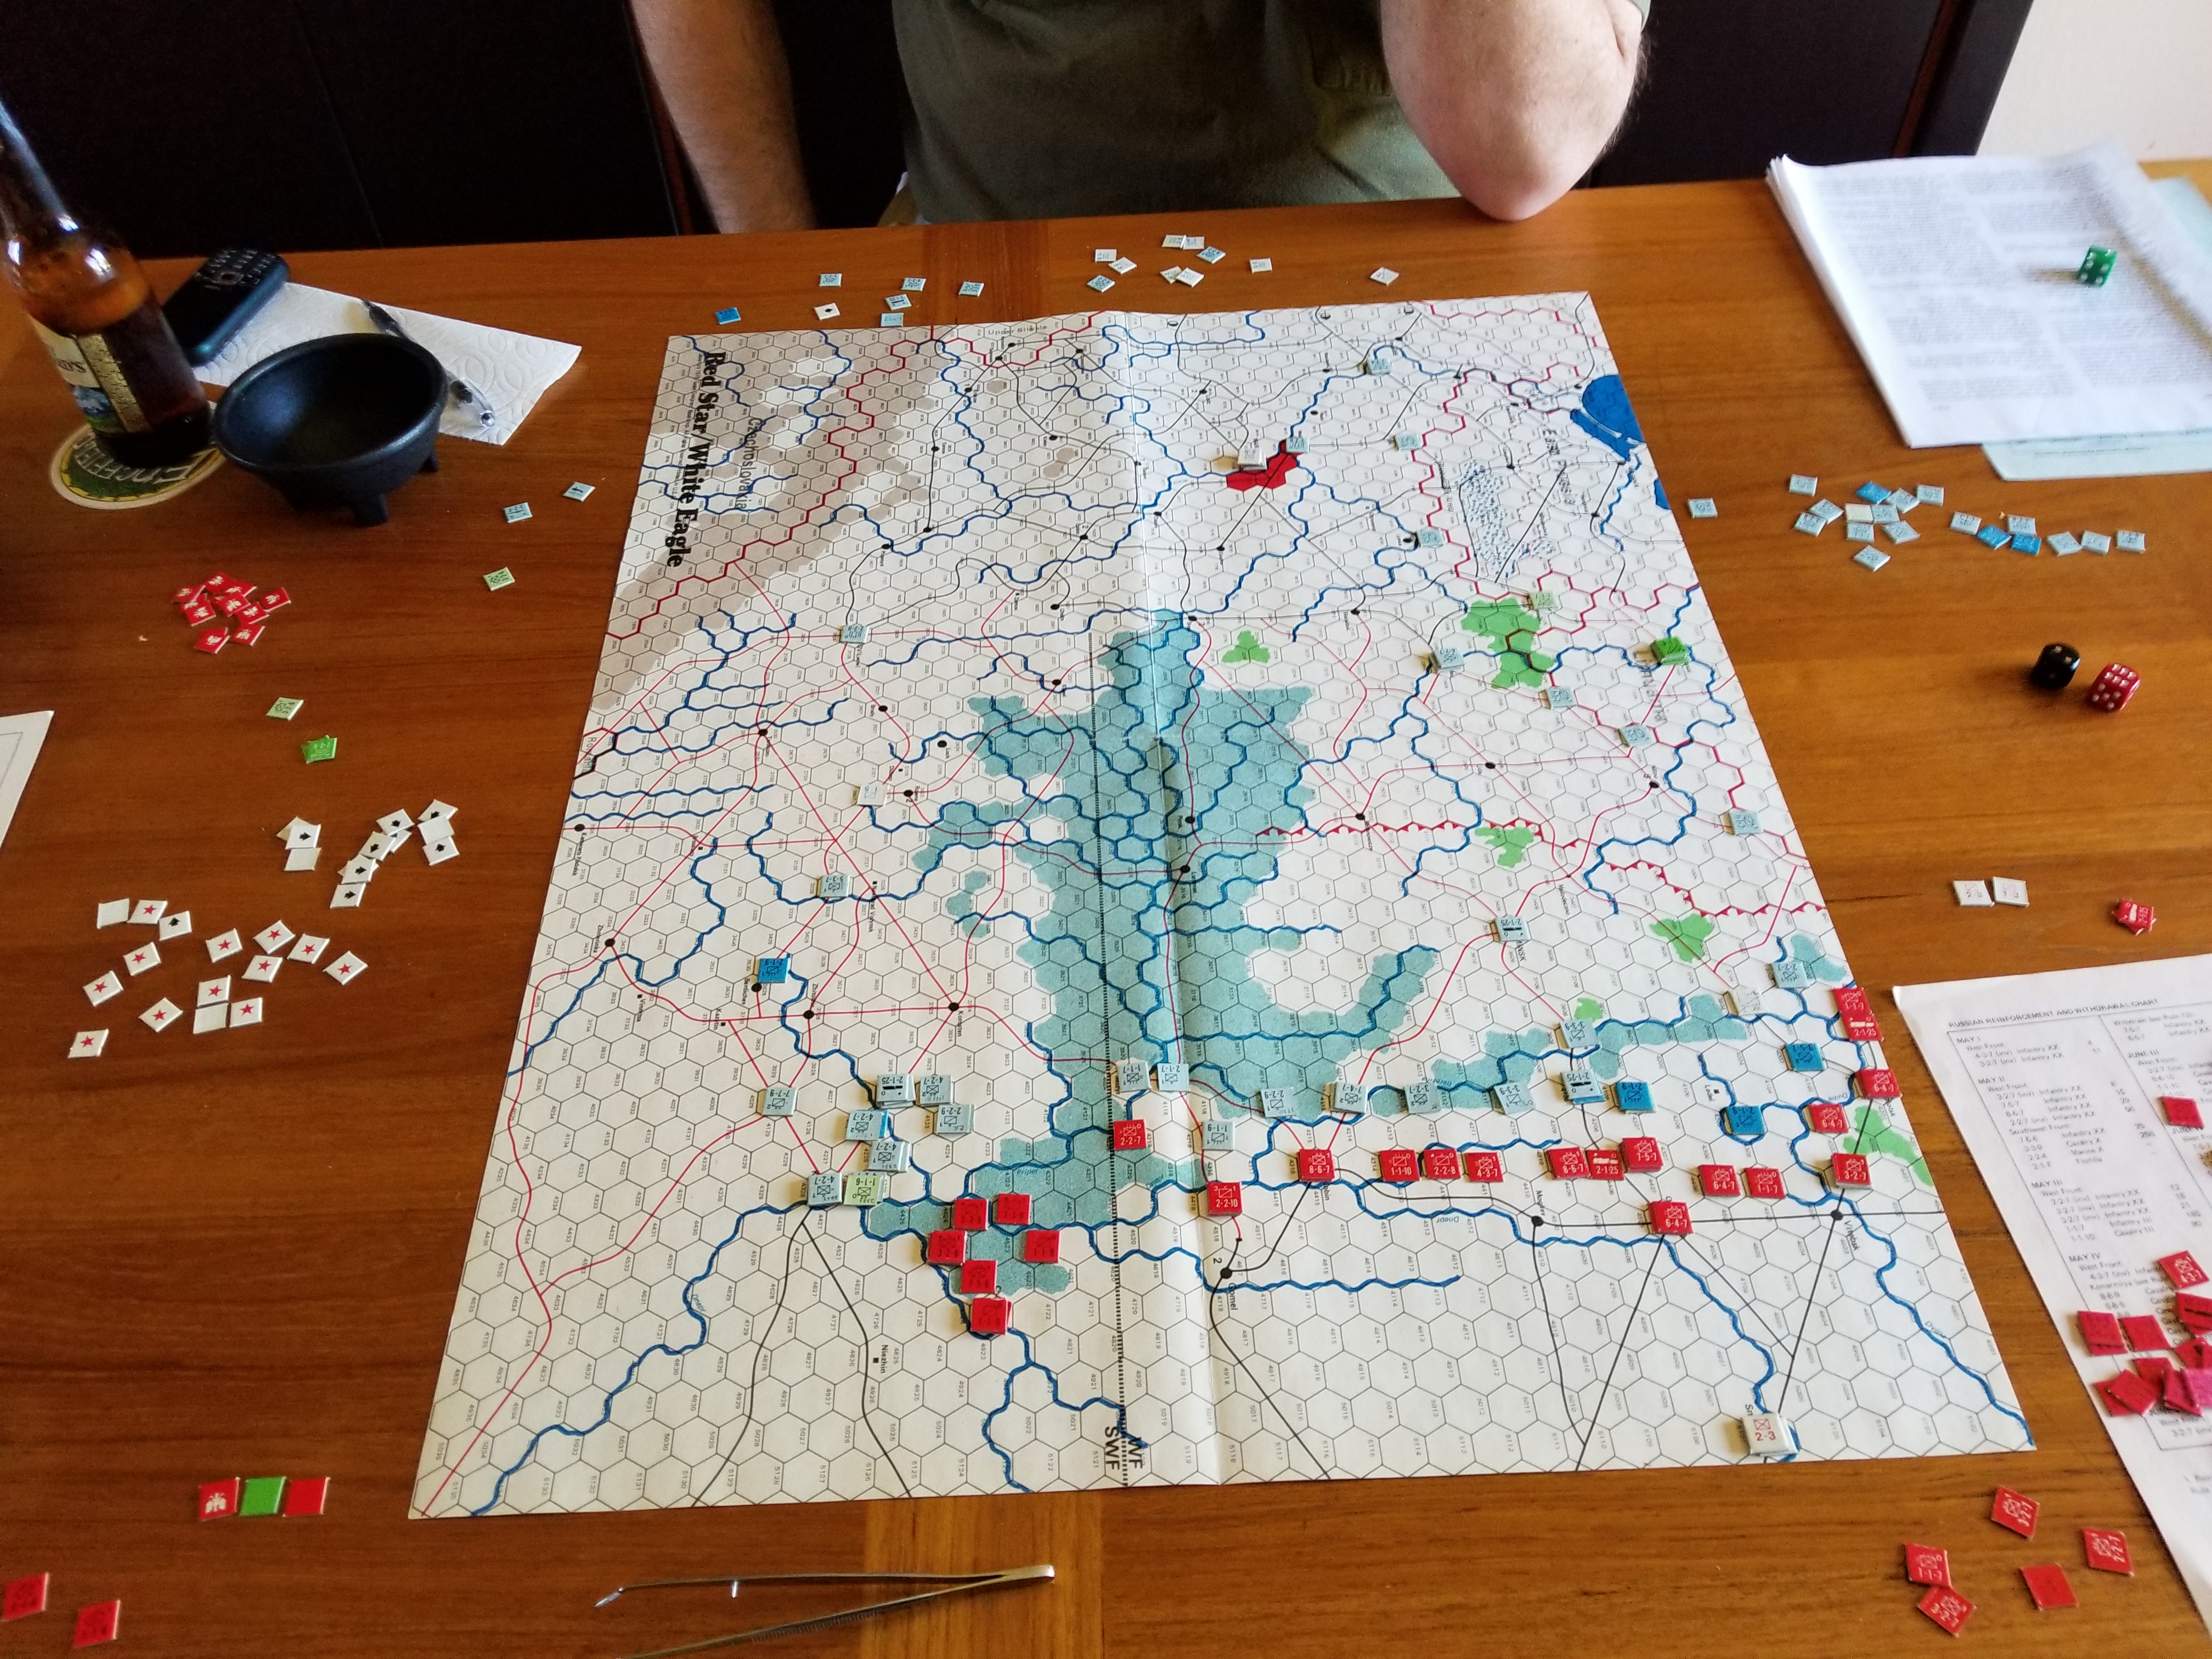
We called it quits after the July II turn. The Poles’ only hope was to hold on for another ten turns, when the Konarmiya must withdraw. Any destroyed Konarmiya units have to be replaced by other units, which could significantly attrit the Soviet forces. At that point, the Poles have only one turn to advance and grab as many cities as possible.
July II. End Game
The terms Tim and used most often when playing were “weird” and “crazy”. The CRT is a little different, the die rolling was crazy, but it was an interesting game.
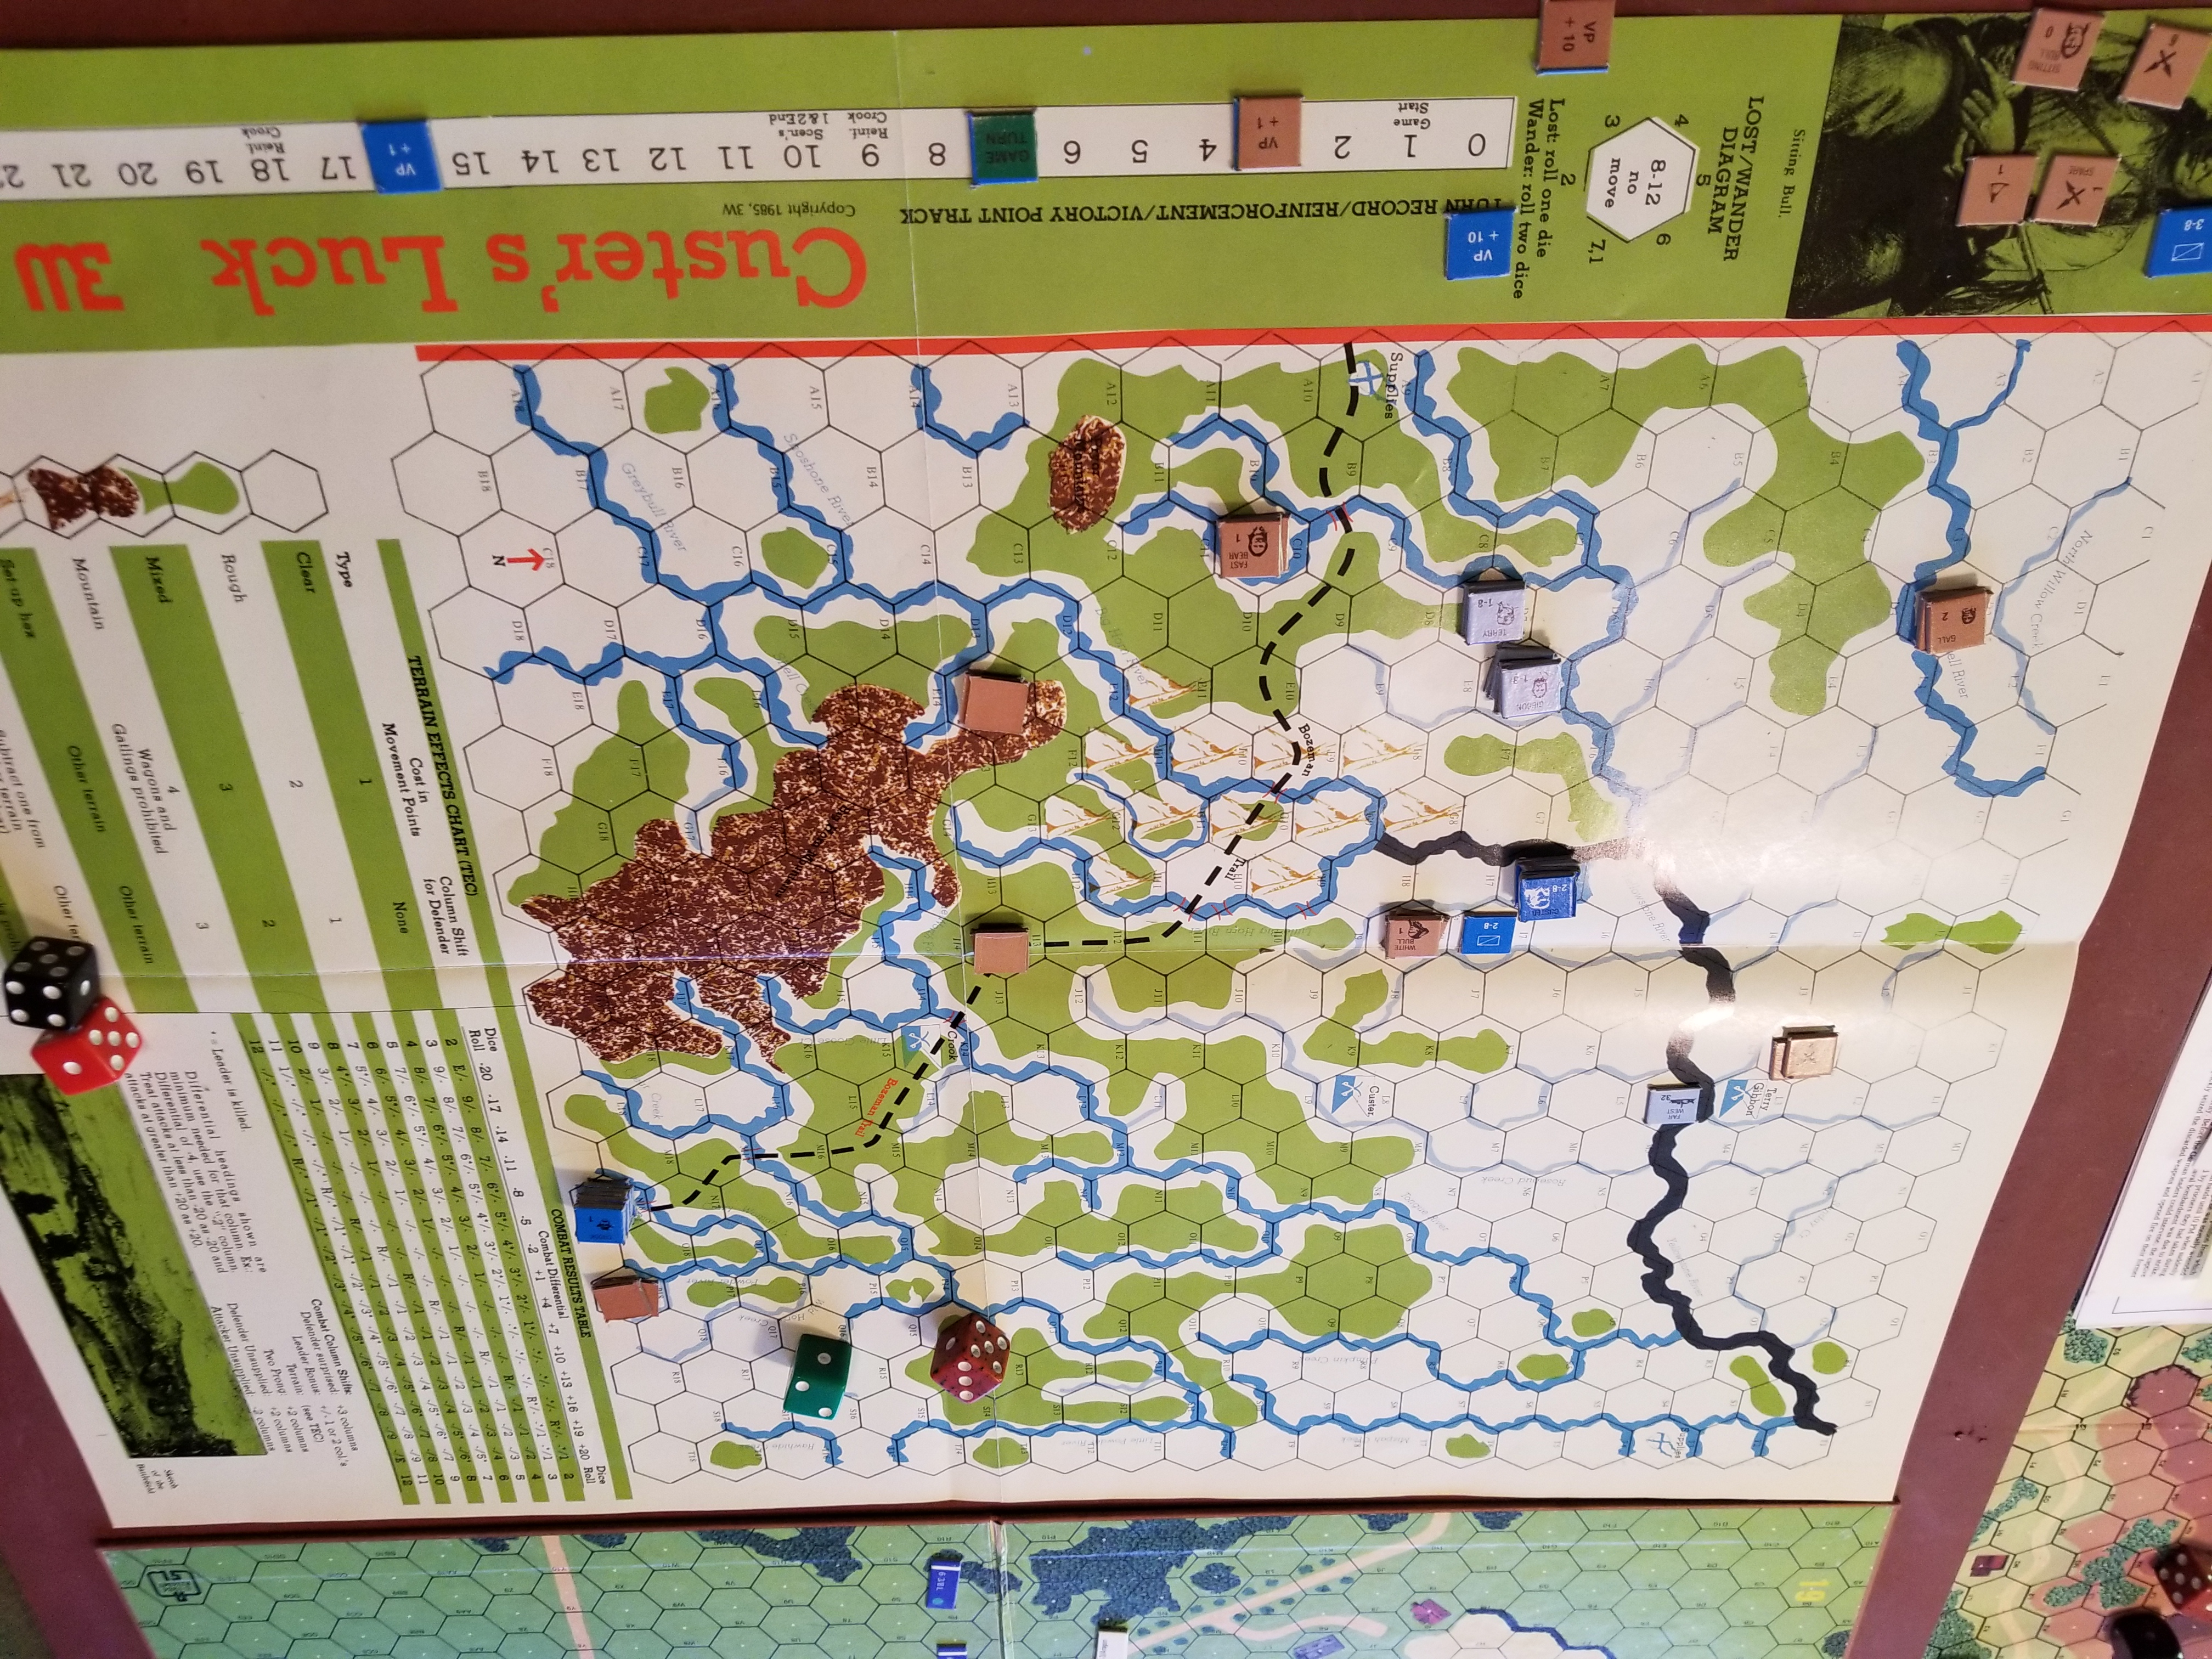
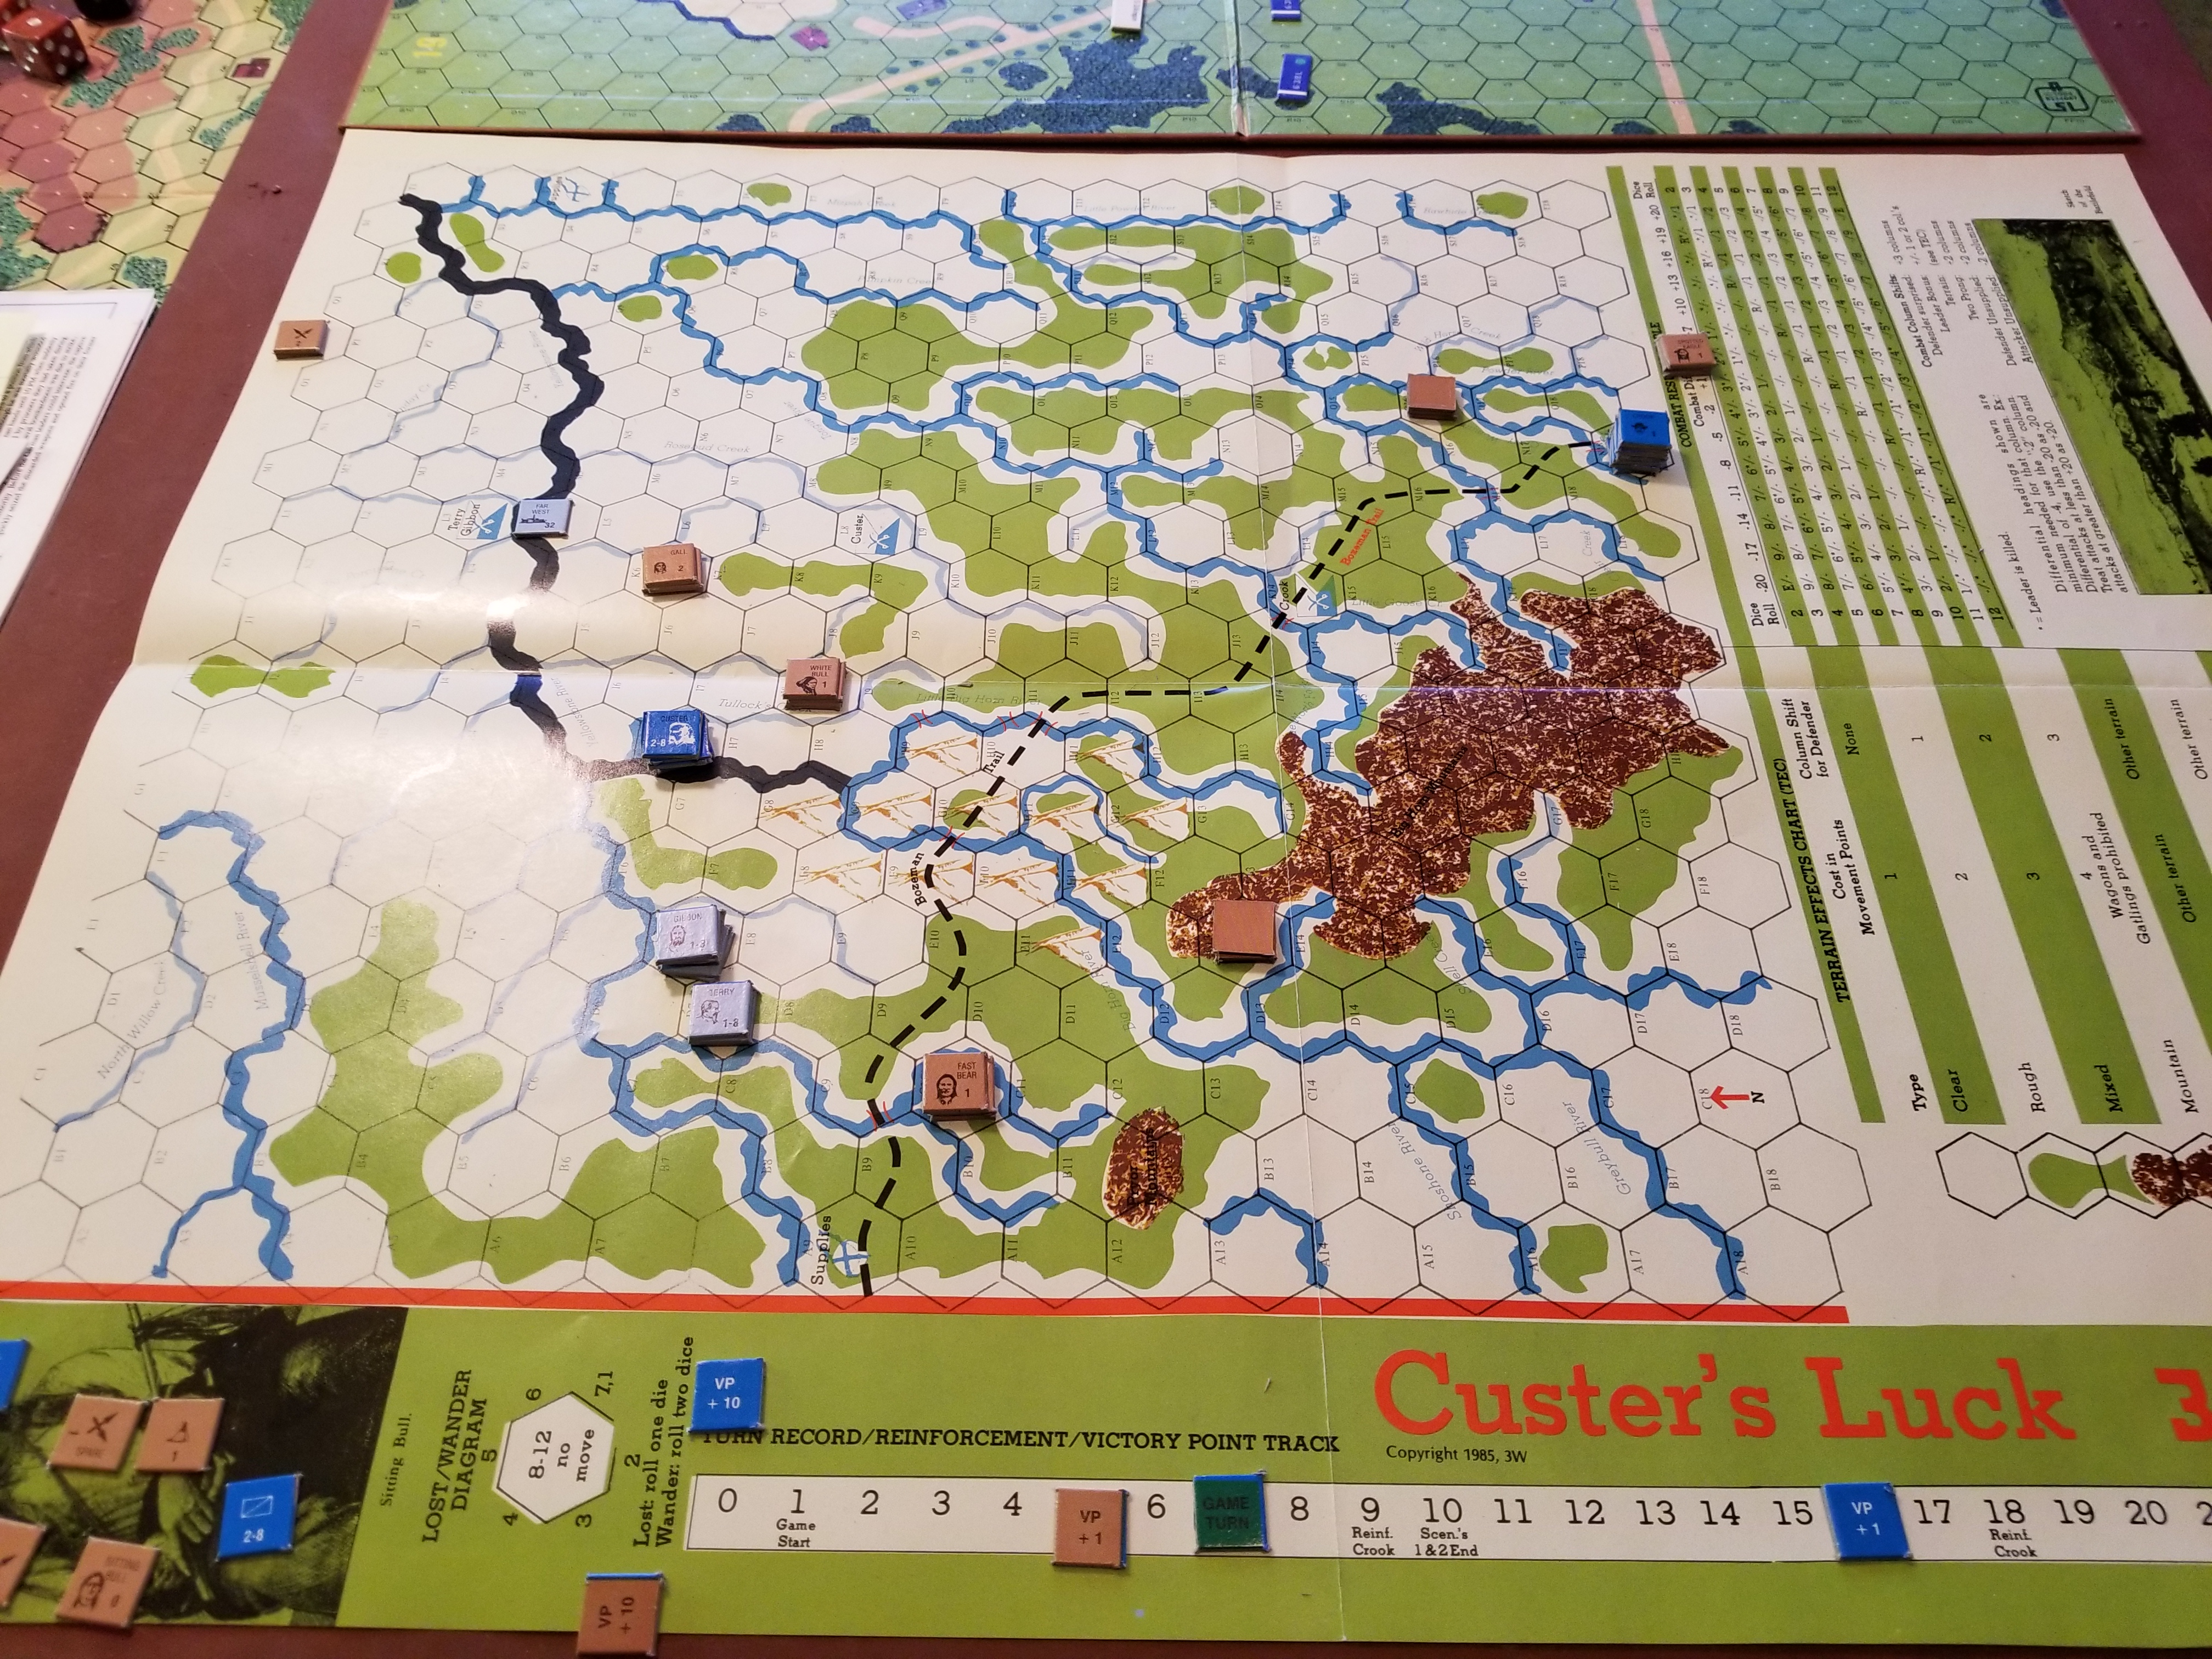
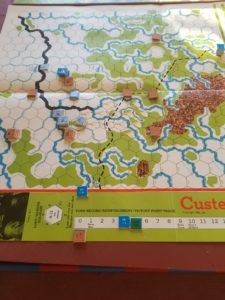
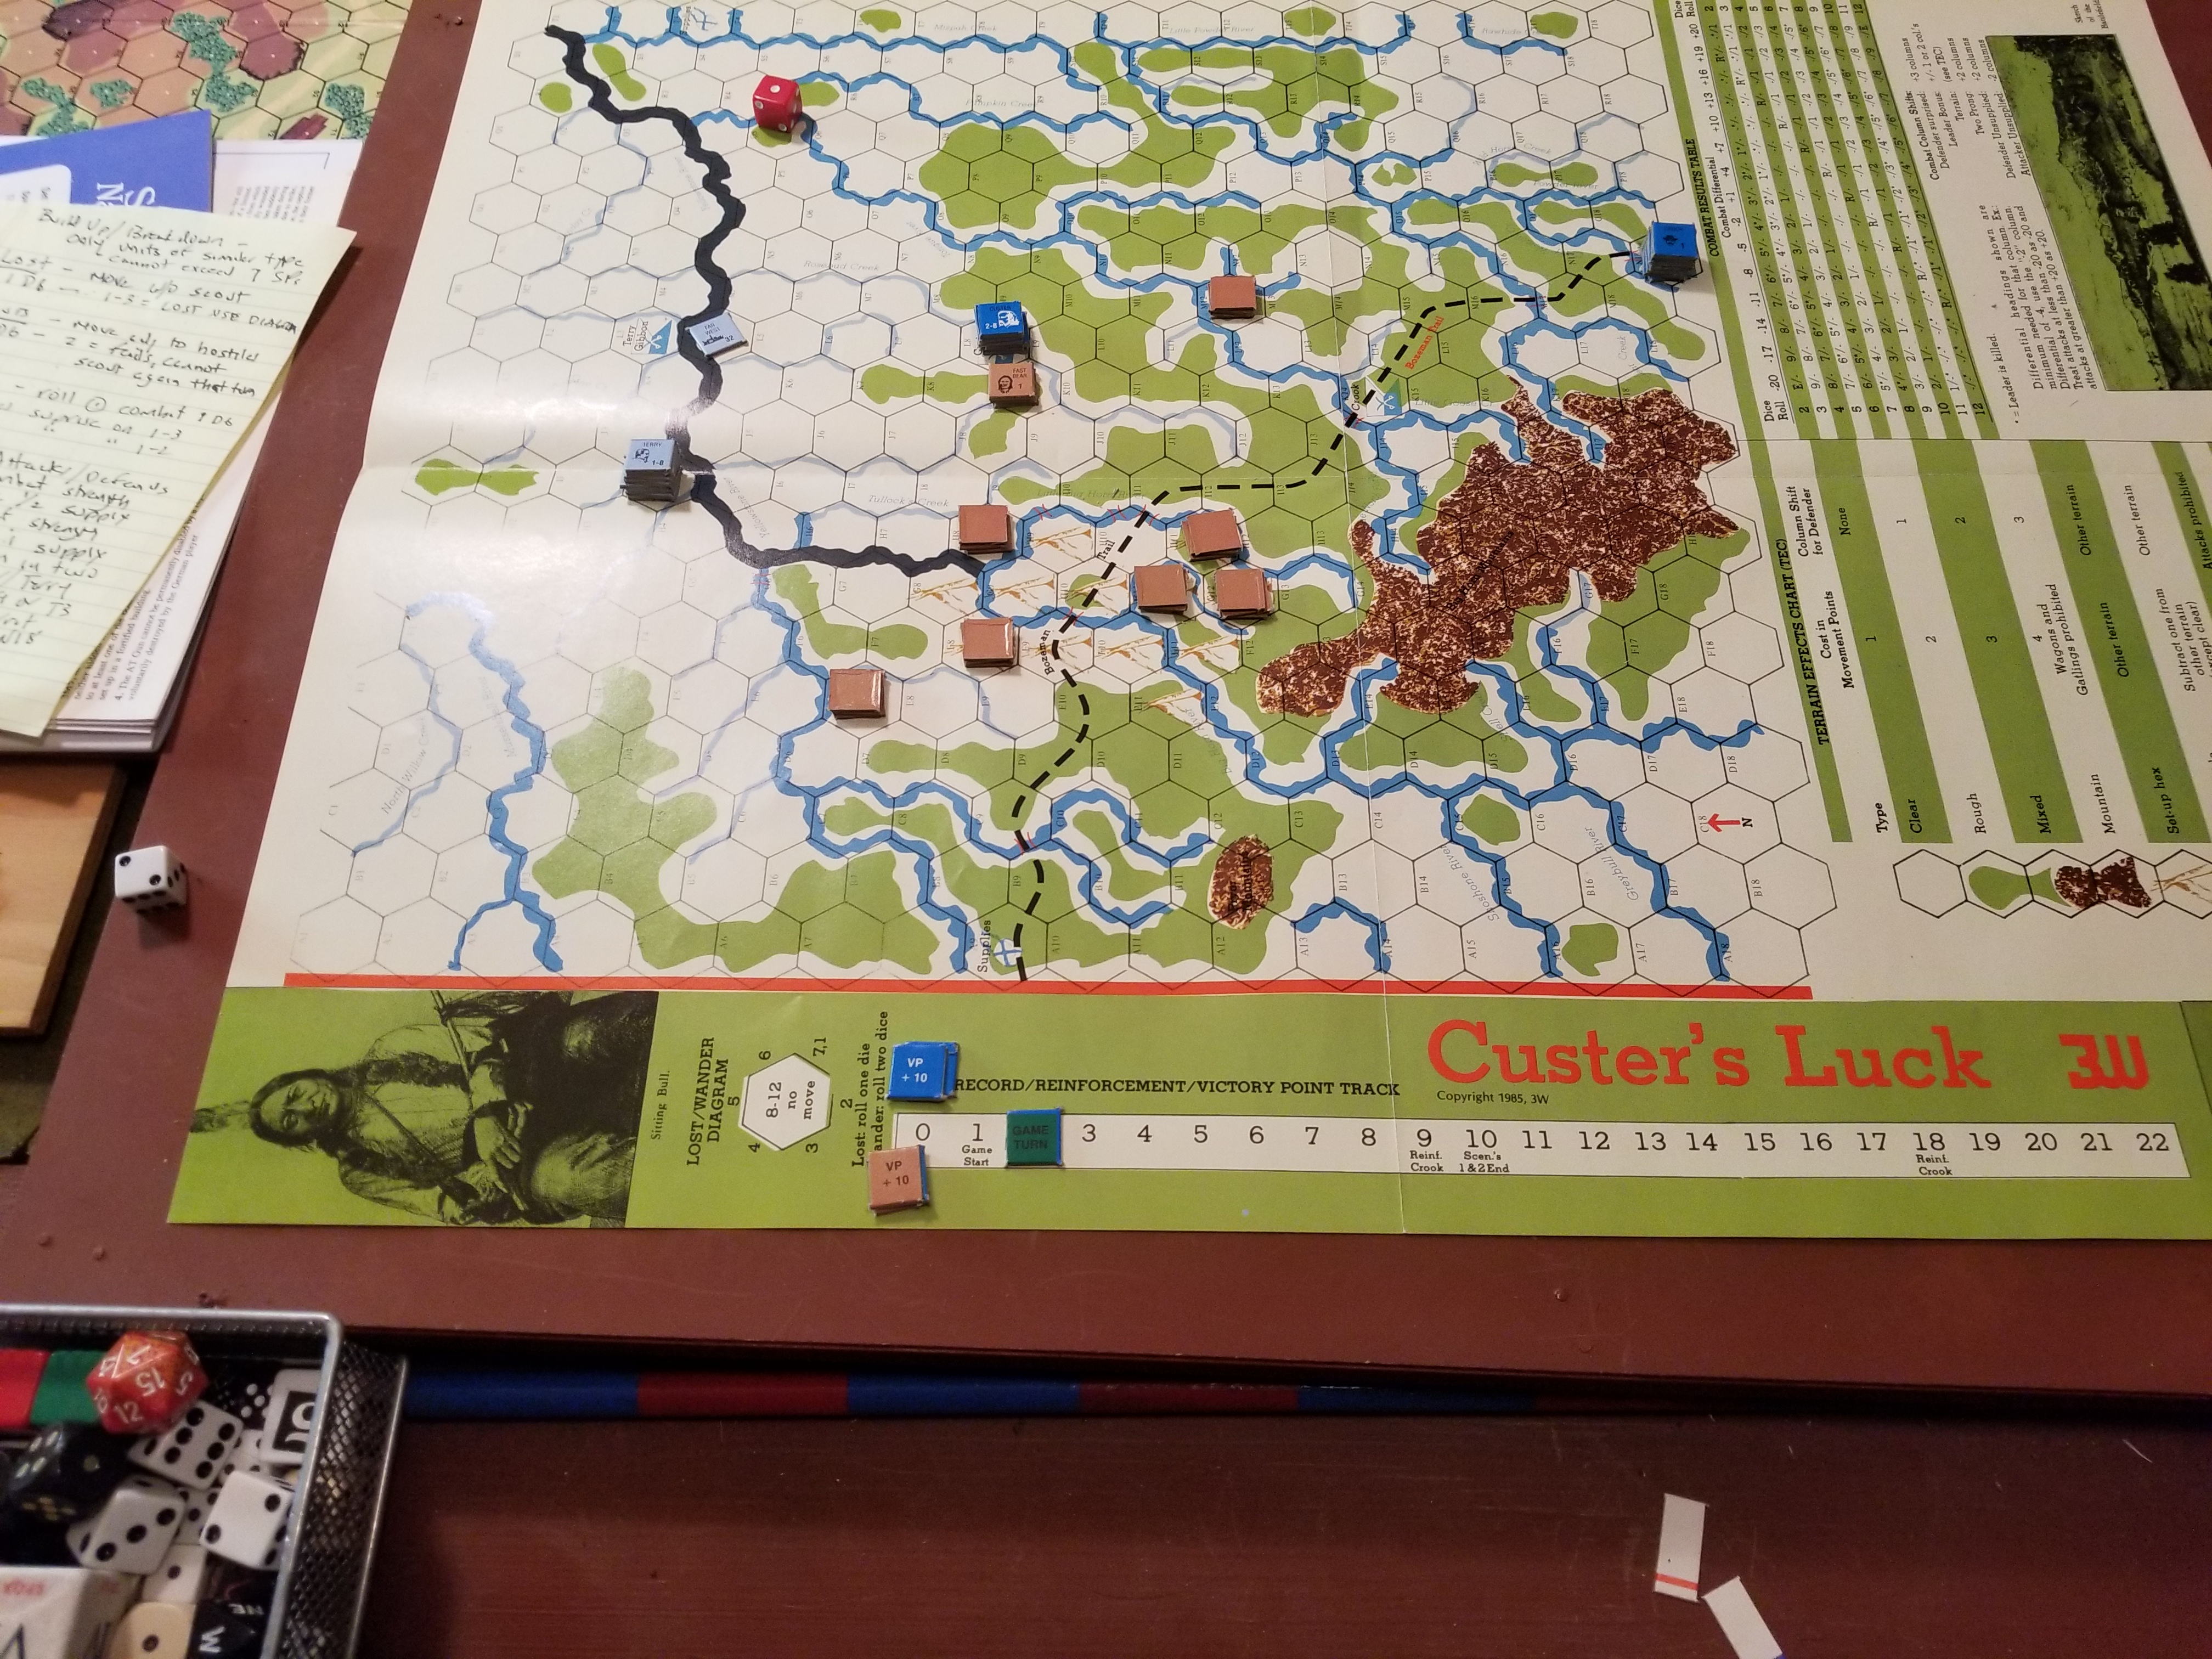
Turn 7 saw Terry/Gibbons’ continued success in the south and a lack of “Custer’s Luck” in the north.
Terry/Gibbons cleared all hostiles south of the Little Bighorn. But, Custer’s force was attacked and mauled by White Bear. Despite this loss, the Army now has 19 VPs, the the hostiles have scattered to the fringes of the map.
White Bear Attacks Custer’s Detached BattalionSituation At The End Of Turn 7
I probably screwed up the rules (shocking!) when it came to the requirement that hostiles retreat after combat (disregarding the 8-12 roles that called for them to remain stationary). Probably cost the hostiles some VPs, but it didn’t intefere with my enjoyment of the game.
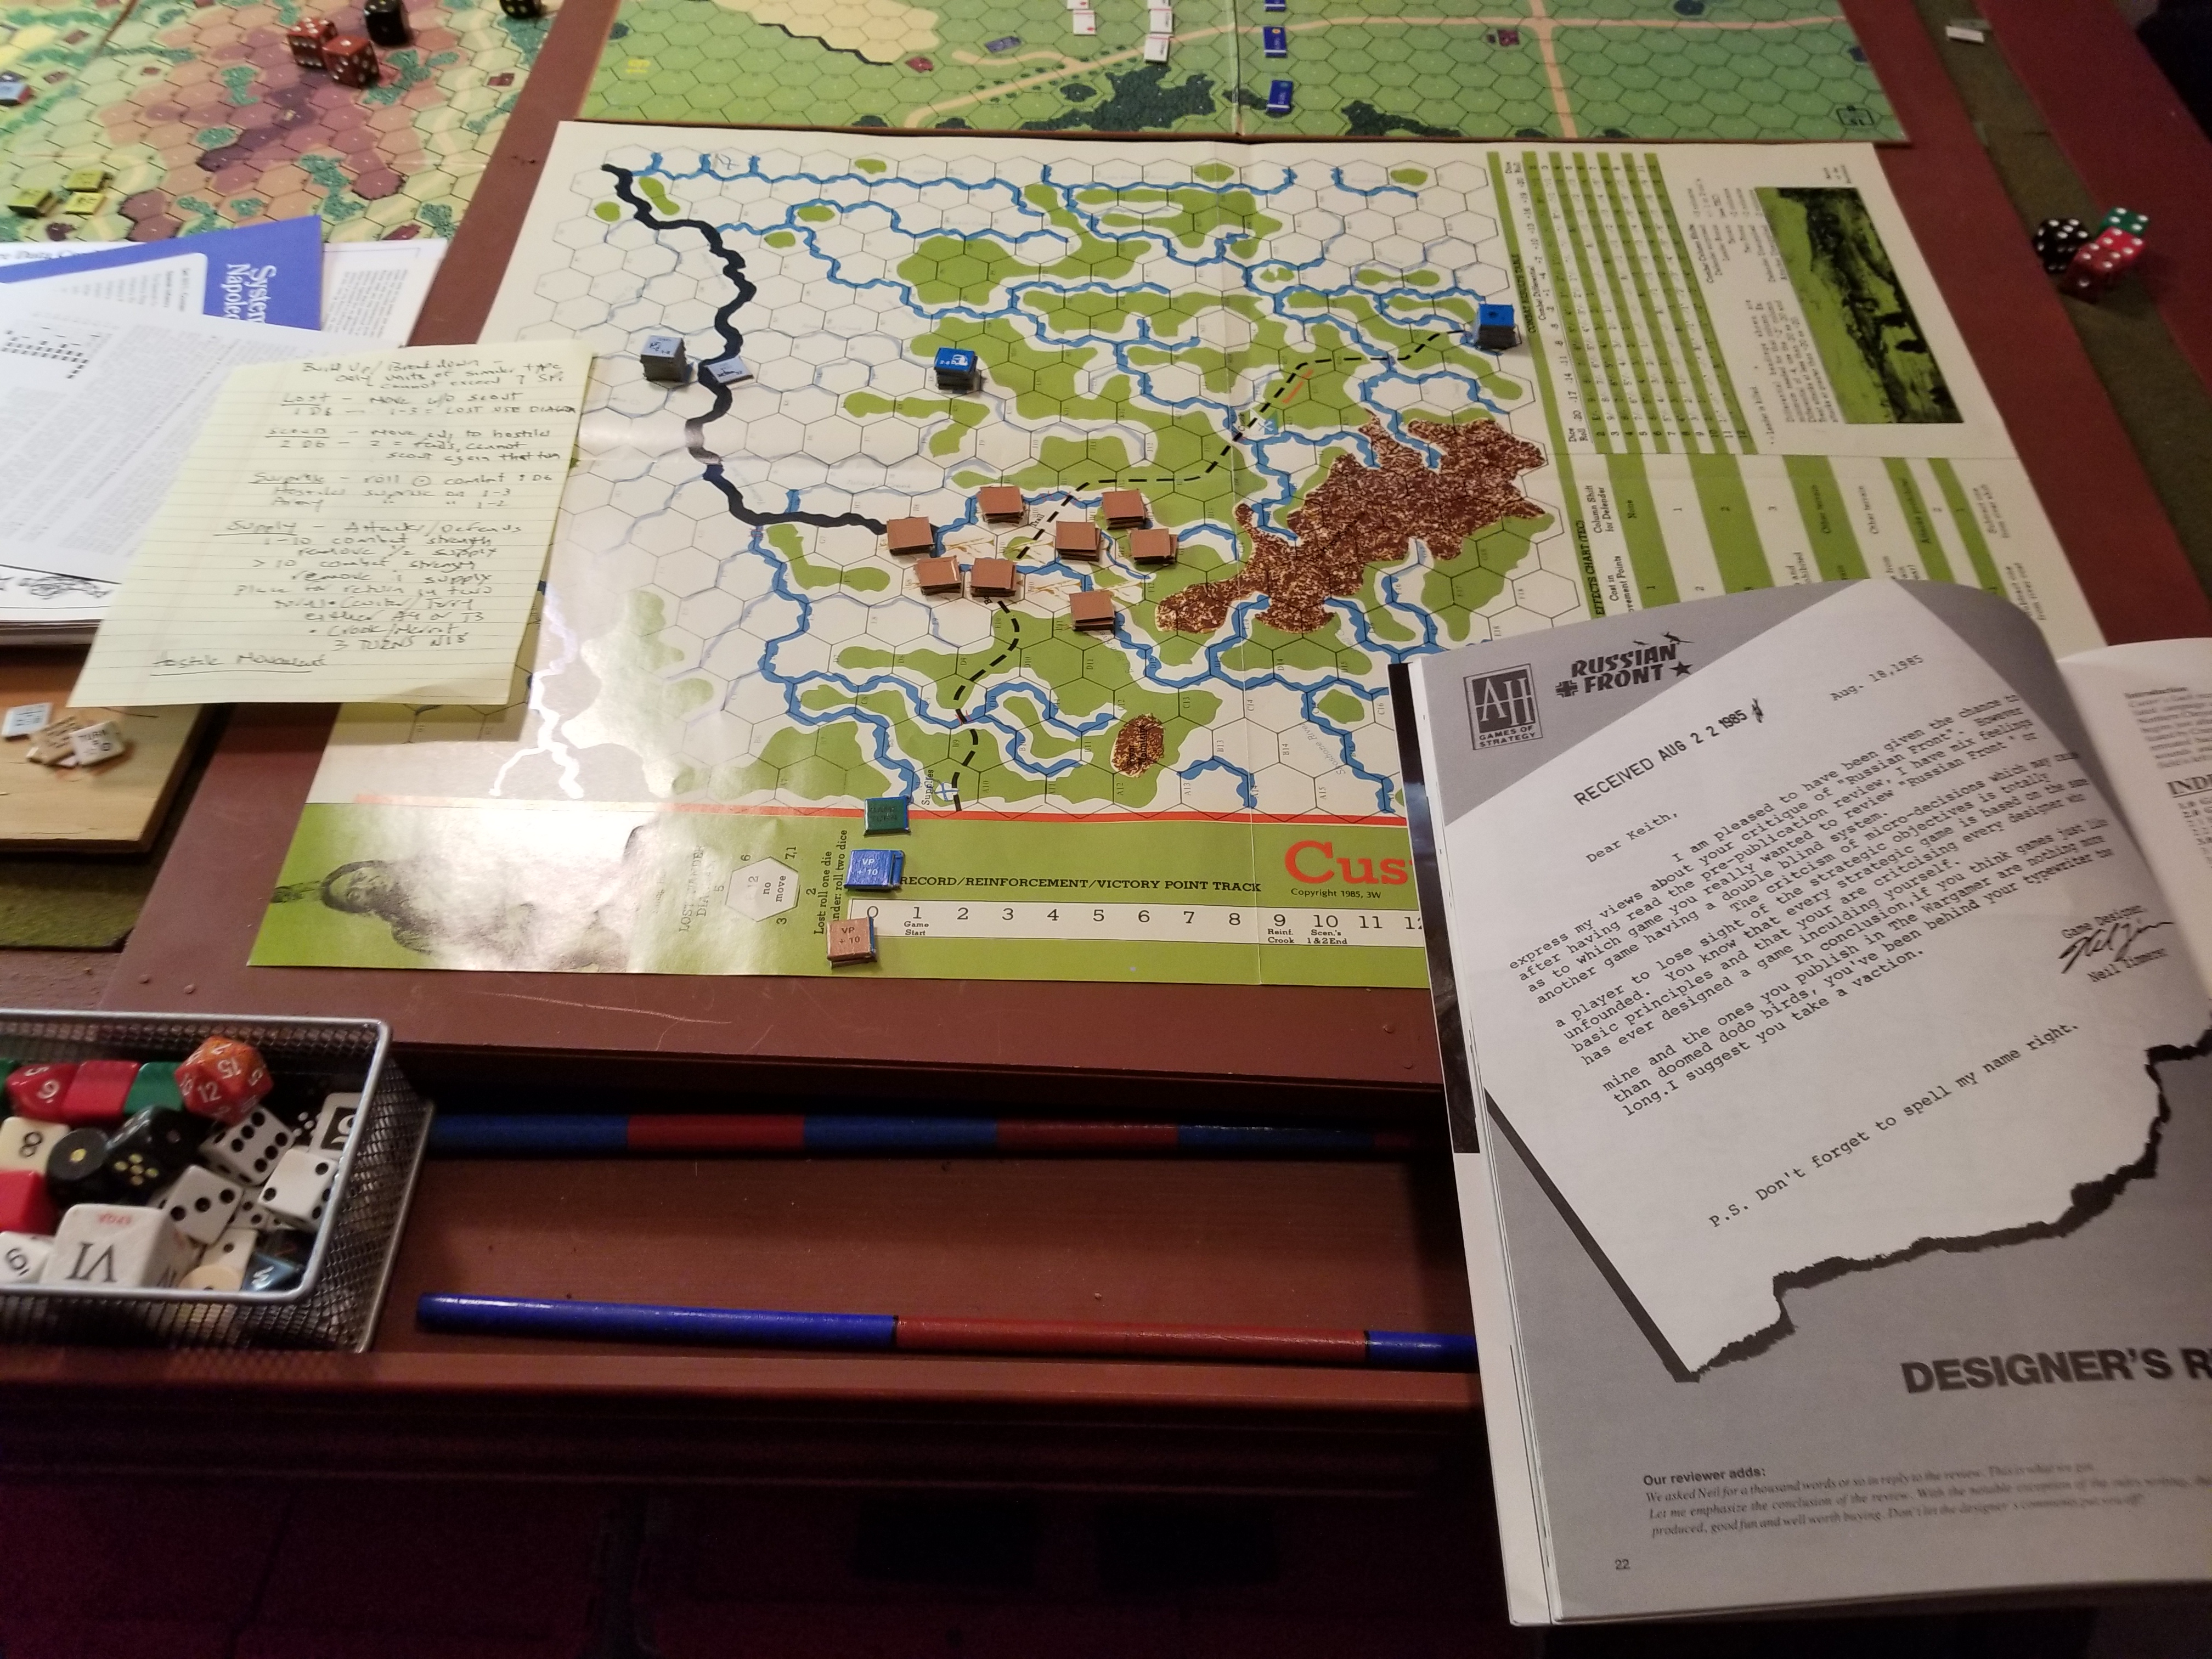
Going to pack this one up to make way for 1942. But, this isn’t because Custer’s Luck is a bad game. It’s fun; a good solo romp that has a quick set-up time, easy rules, and, yes, randomness.
You get a glimpse into the problems faced by the Army during these campaigns. “If only they’d stay still….we could get ’em.”
I’ll play it again.
Tim’s in this weekend for another go at Red Star/White Eagle.
Custer attacks both Fast Bear and White Bull, causing casualties and forcing White Bull to retreat. Which may not be a bad thing.
Terry/Gibbon command keep grinding down their opponents, also killing Lame Deer.
Each command was able to find, maintain contact, use envelopment (in game terms “prong attack”) to attack, and inflict casualties. Doctrine in action (?).
The system’s randomness has created some interesting situations, with plenty of give-and-take. It really is fun, with the “Hostiles” bouncing all over the map.
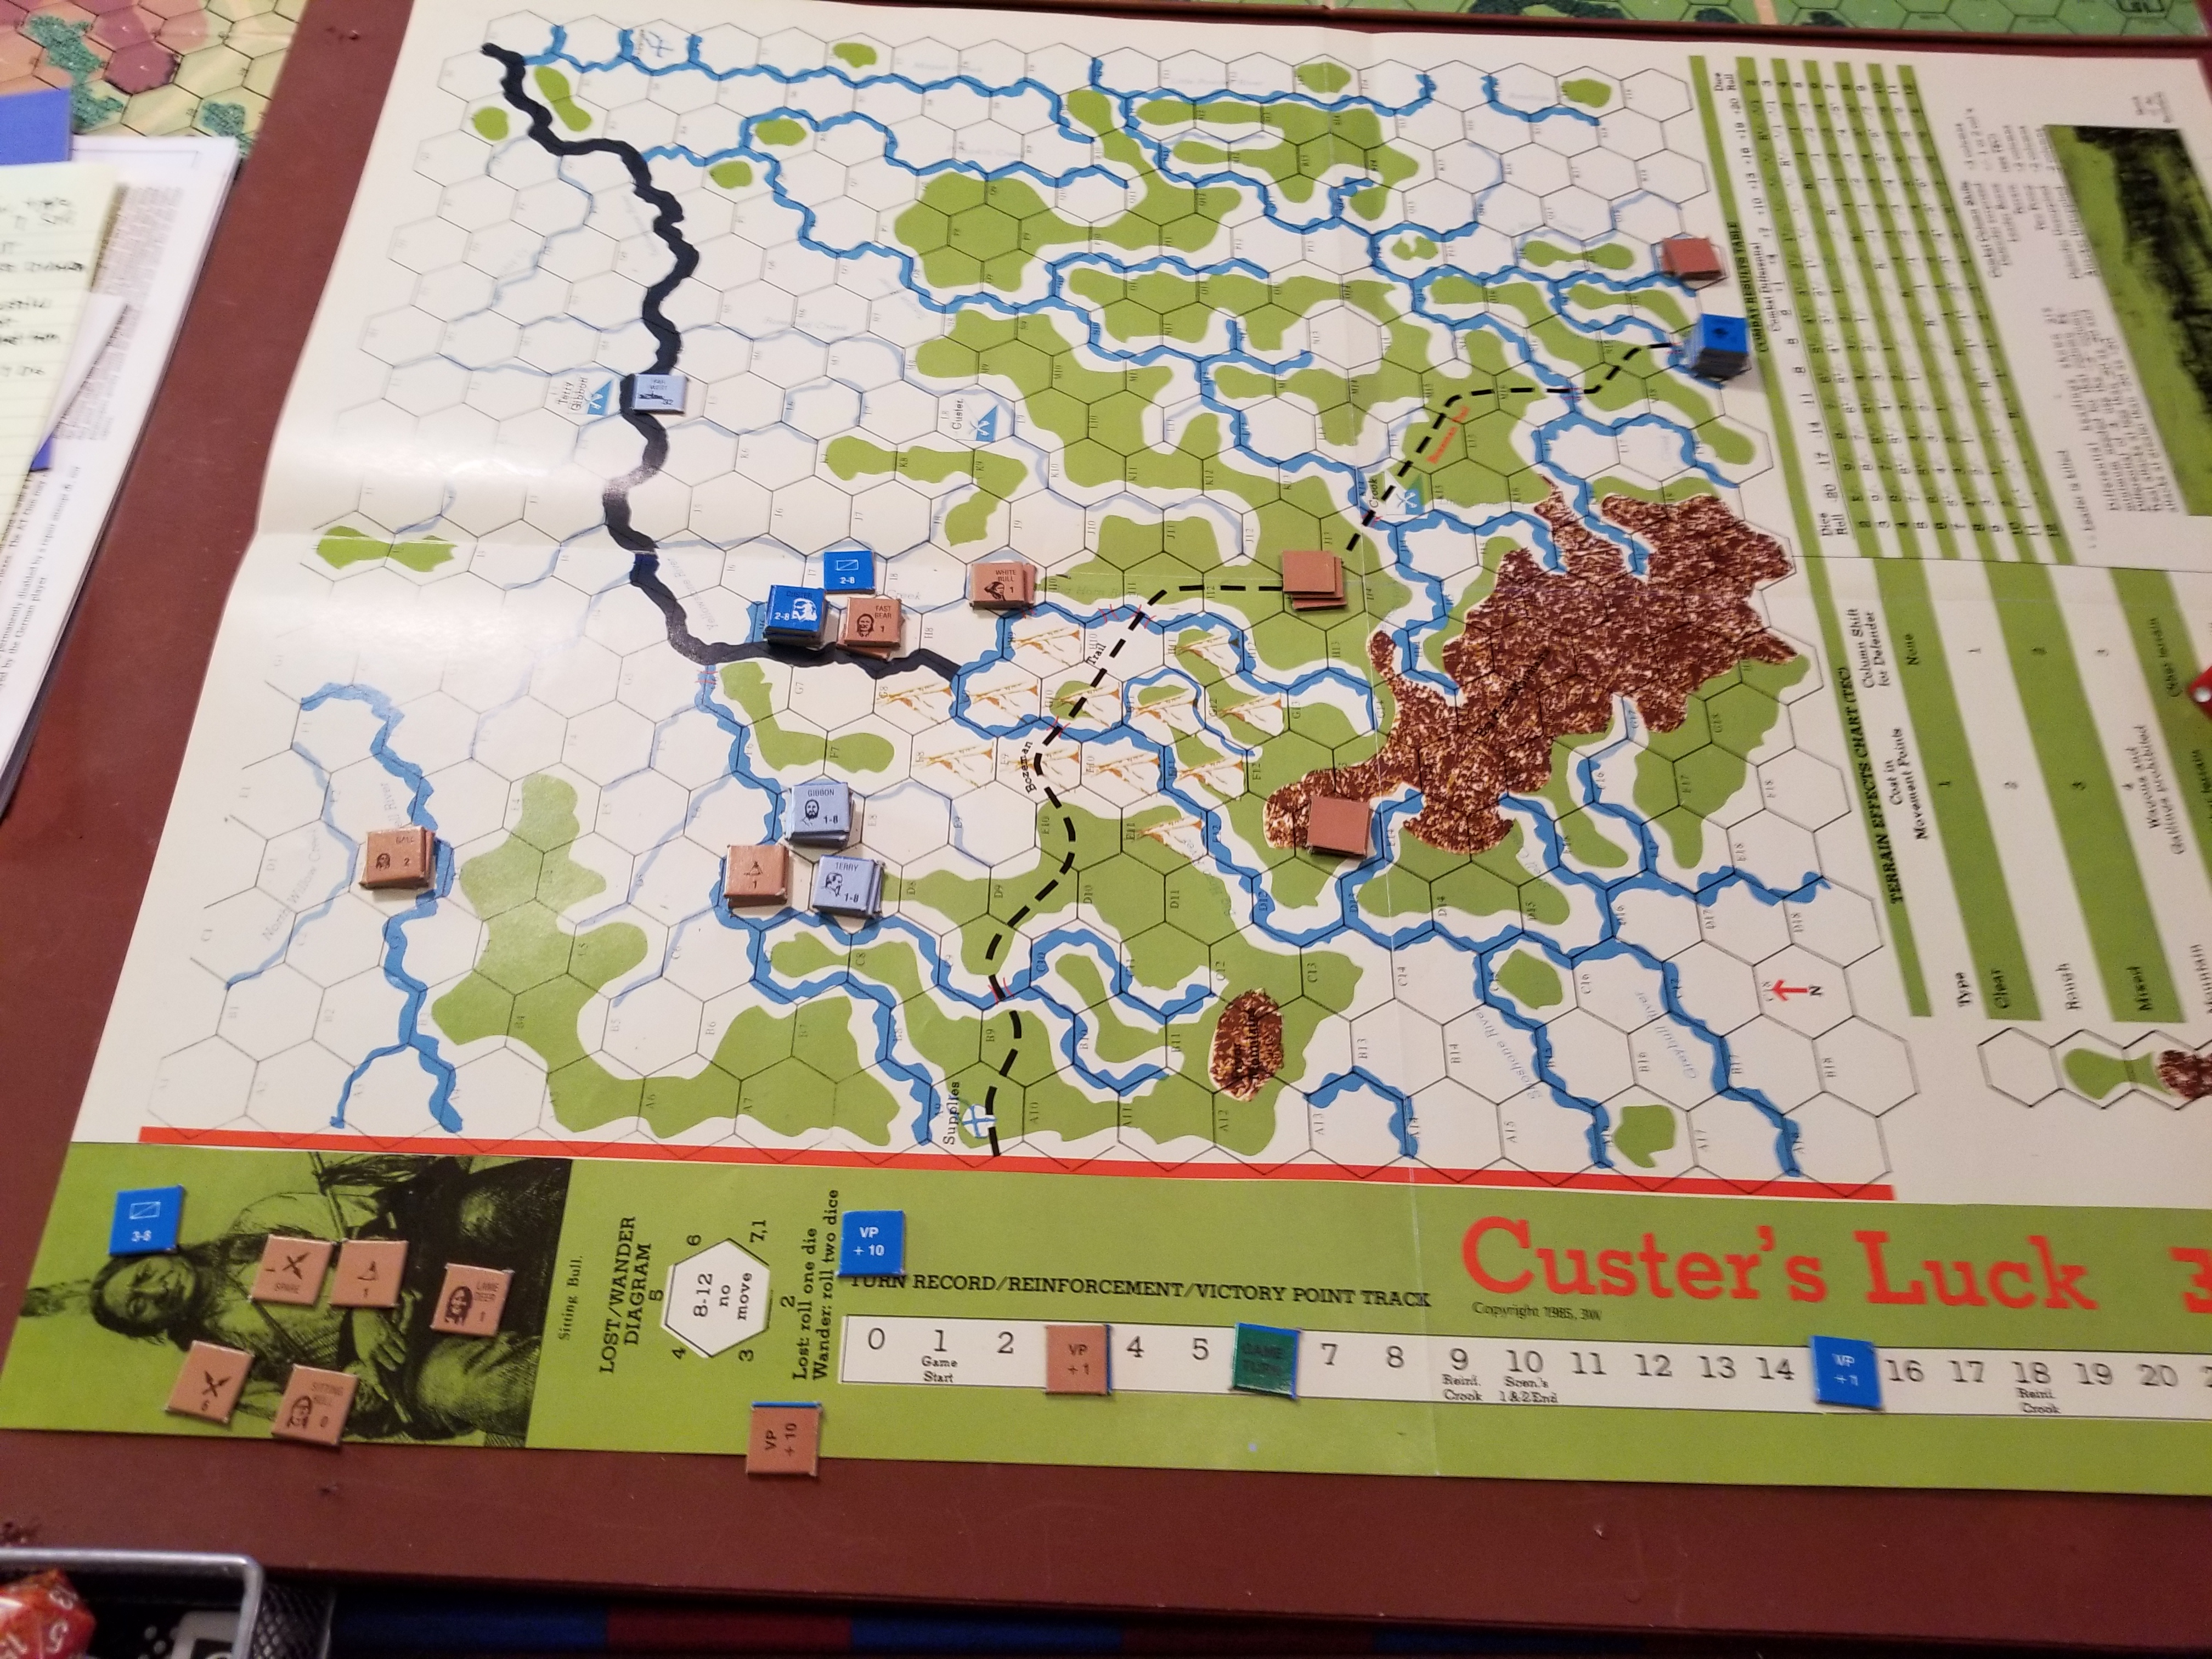
In Turn 4, Sitting Bull’s weak contingent attacks Terry/Gibbon’s combined arms force despite overwhelming odds.
During Turn 5, Terry/Gibbon maintains contact with Sitting Bull, while Custer envelops Little Bear’s force. Sitting Bull’s force is destroyed, and Little Bear takes casualties.
Later in the turn, Custer is attacked by Sioux drawn like moths to the flame of randomness. One of Custer’s battalions is destroyed.
At this point, who knows what the hell will happen. At the end of Turn 5, Army has 9 VPs, Hostiles 3.
Been back at the Pine Cone Lodge for a week. Moved from one work farm to another.
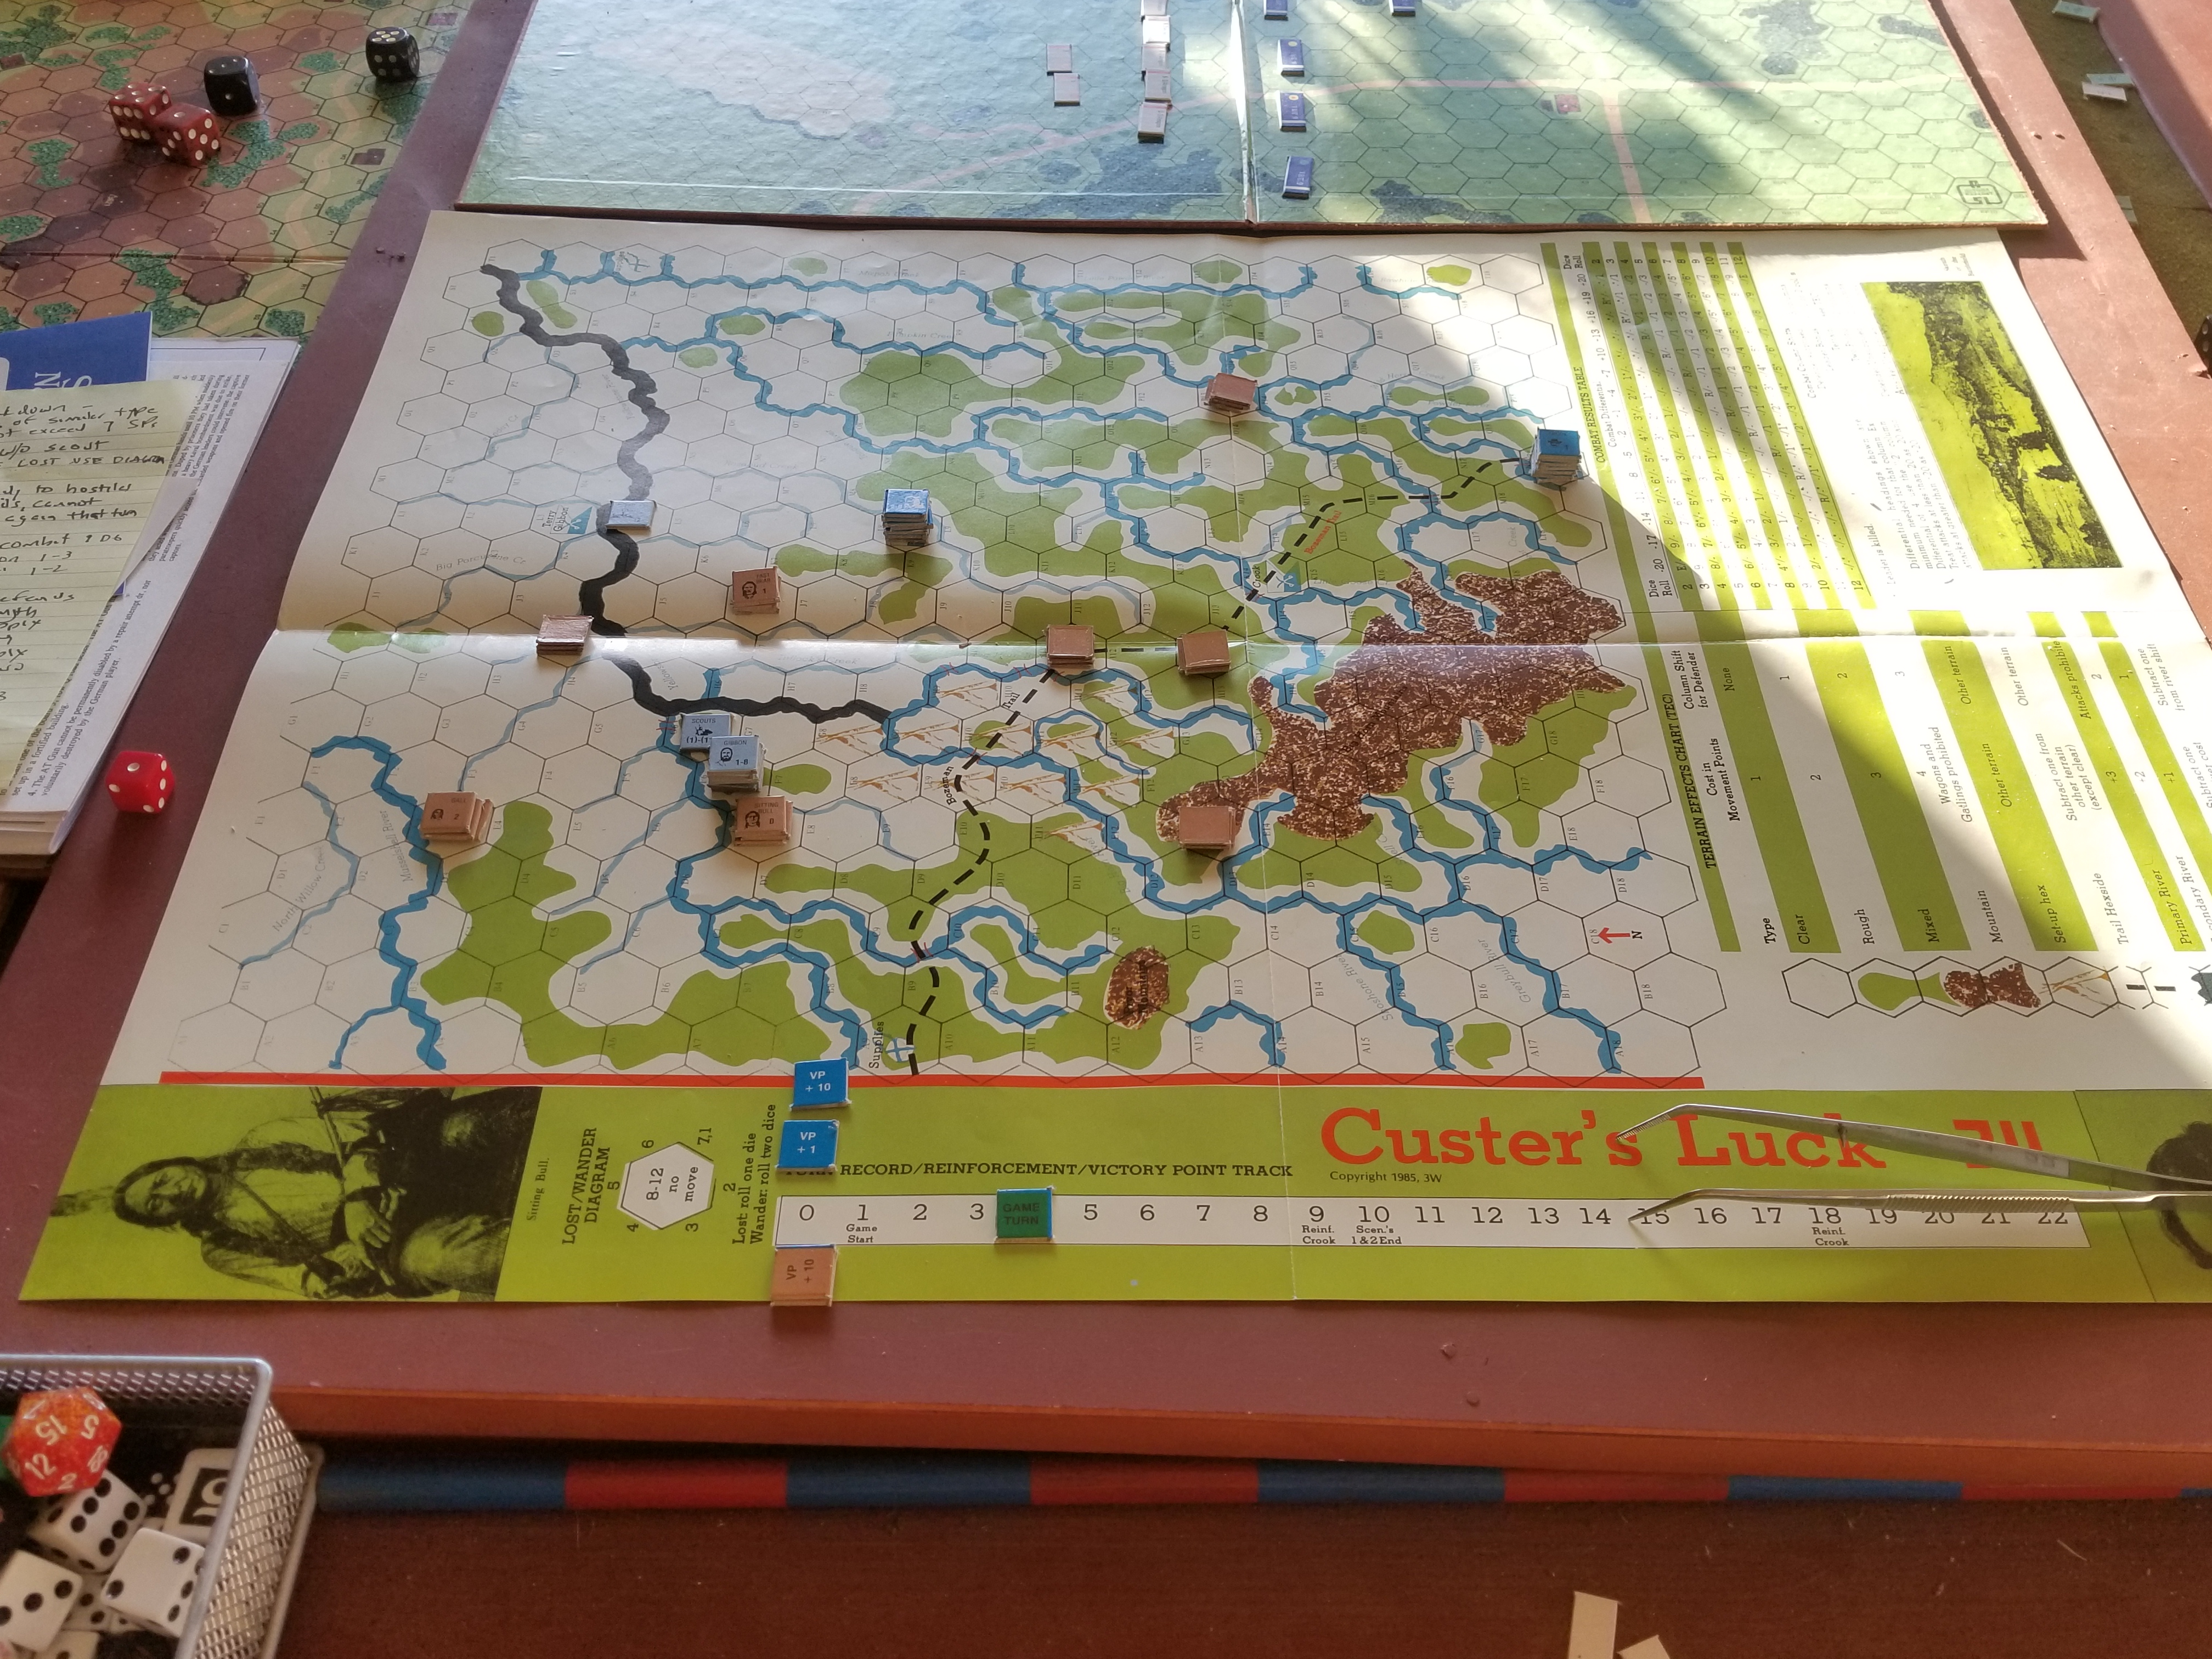
Finally back to wargaming last night with Custer’s Luck. Purchased and wrote about this a few months ago, and was happy to finally get it on the table. Fitting, because I started setting up on the anniversary of the Battle of the Little Bighorn.
This is a solitaire game, with garish map and utilitarian counters. The rules are…..well, let’s just say they provide a framework for playing the game. Lots of minor problems, but they can be pushed through with a little common sense. It’s a magazine game, right? Well, that’s harsh. Always liked The Wargamer, with interesting topics and, at times, interesting take on things.
The game covers the 1876 summer campaign. The Army’s objective is to kill as many Sioux as possible (shocking!). There are three cavalry commands; Terry/Gibbon, Custer, and Crook/Merritt. While it can be played multi-player, the mechanics are oriented for solitaire play. Sequence of play is Custer (move & combat), Terry/Gibbon (m&c), Crook/Merritt (m&c), “Hostiles” (m&c).
The Sioux initially set up face down with each stack having a leader, village and combat unit drawn at random. Rules say 12 stacks, I could only muster up 8. Hostile movement is dictated by a compass chart. They move on a 2D roll of 7 or less, and remain stationary on a roll of 8-12.
Army Scouts can be used to identify a hostile stack. Wagons and Mules are used for supply, with combat reducing supply capabilities. The Far West steamboat stooges around as per the whims/attention span of the US commander.
Combat is straightforward, with leadership, terrain, surprise, envelopment, and supply modifiers effecting column shifts, not unit strengths.
Decided to play the historical scenario. Crook/Merritt command does not move.
Initial Setup. Handwritten Player Aide To Your Left. Rules On Right With Insane Letter To Editor….Zoom In….
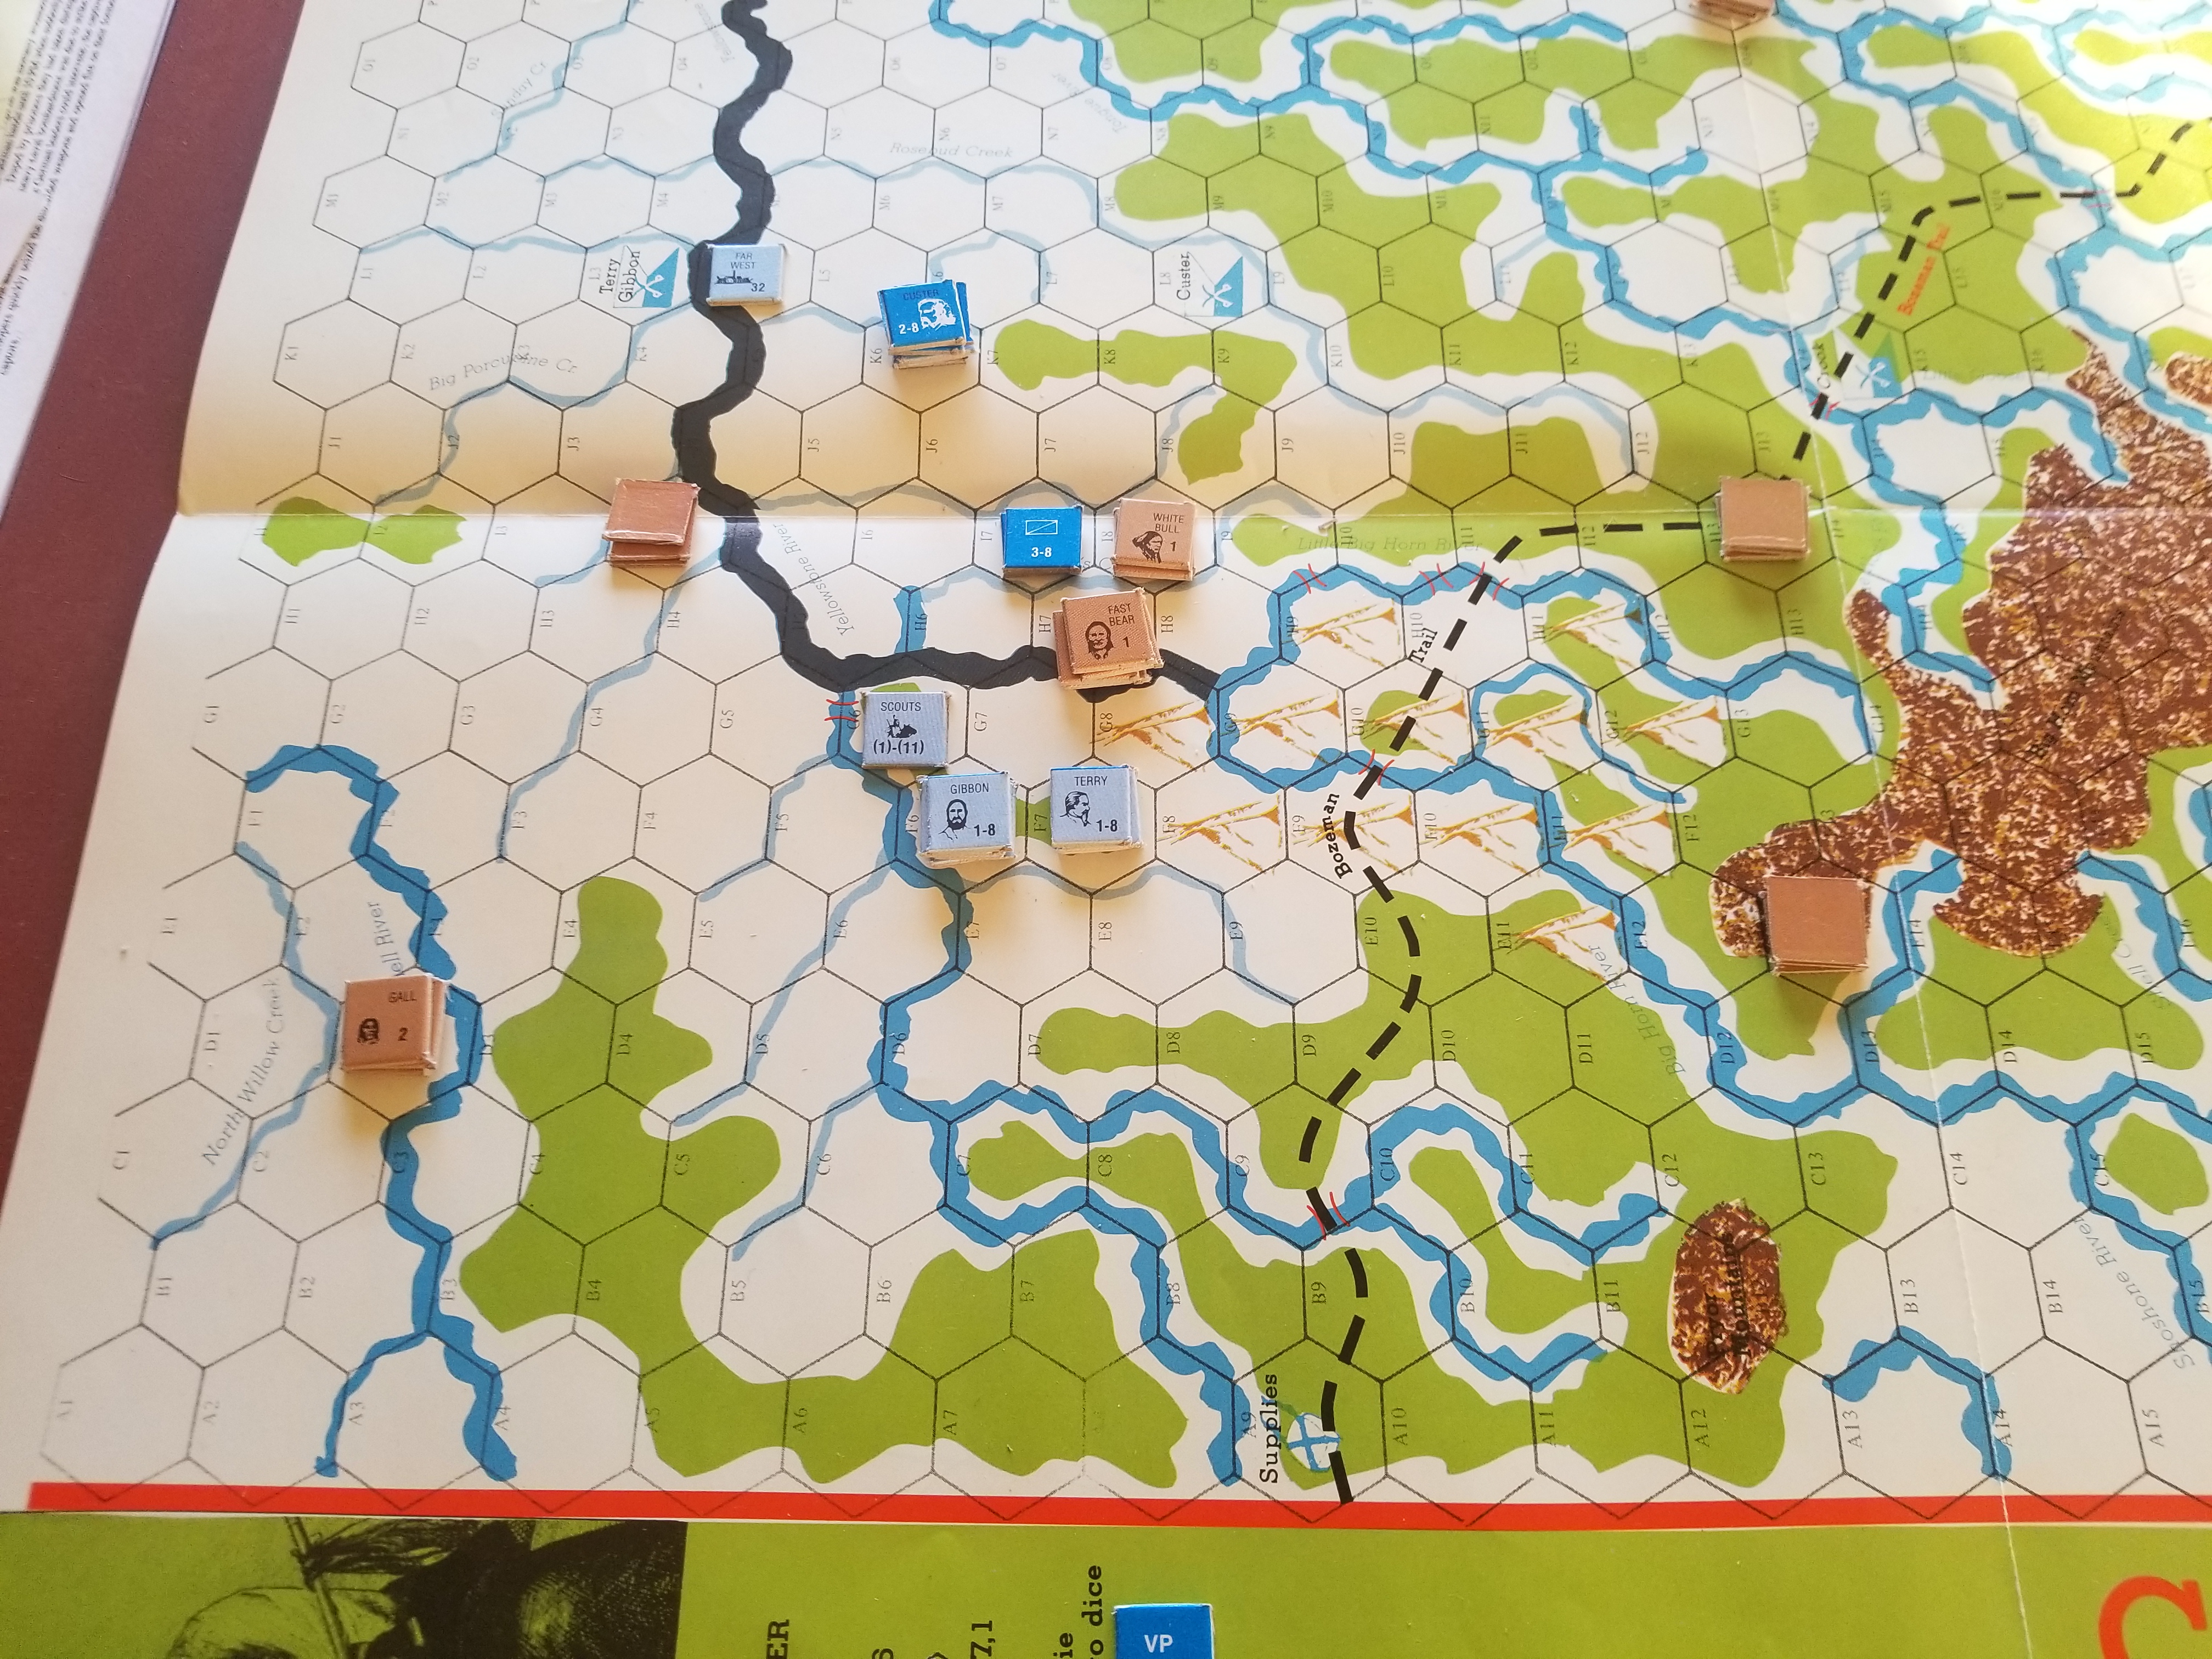
Decided to let Gibbon/Terry move south to pin Hostiles. Custer was ordered to exercise restraint….OK, this is not the (real) historical scenario.
Plodding Forward In The Relentless Summer Glare, Gibbon/Terry Advances (left). Custer Shows Restraint And Is Attacked By Gall.
Hostiles begin random movement. Gall heads straight for Custer. This time, it’s Gall’s Luck. His negative odds attack only results in a retreat. Again, Custer shows ahistorical restrain and does not pursue.
1. Concentrate U-Boats. Downside is that ASW becomes more effective.
2. Concentrate in North Atlantic only if Convoy marker is there (Allied ASW typically concentrated in North Atlantic).
3. Keep Donitz in the Sub Pens (didn’t go into this in my initial review), because his presence reduces chances for ASW capability increases.
Author states that BoAT is a difficult game to win. He offers optional rules to help the Germans (see previous post).
The article includes rules clarifications and references an excellent review from WebGrognards.
Despite using an “aggressive” posture for all submarines, the Germans had a very difficult time attaining the tonnage sunk figures needed to attain victory. And, this is a period when Allied AWS capabilities are relatively low.
Well, maybe that’s just fine. Maybe it would have taken quite a bit of good fortune to win the Battle of the Atlantic (BOAT), just like Barbarossa. Do you want play balance, or something akin to historical conditions? Or, is it playability?
I think Grabner’s BOAT does a nice job of providing solitaire playability with abstract historical conditions. Is it a simulation? No, but it is an interesting way to spend an evening or two.
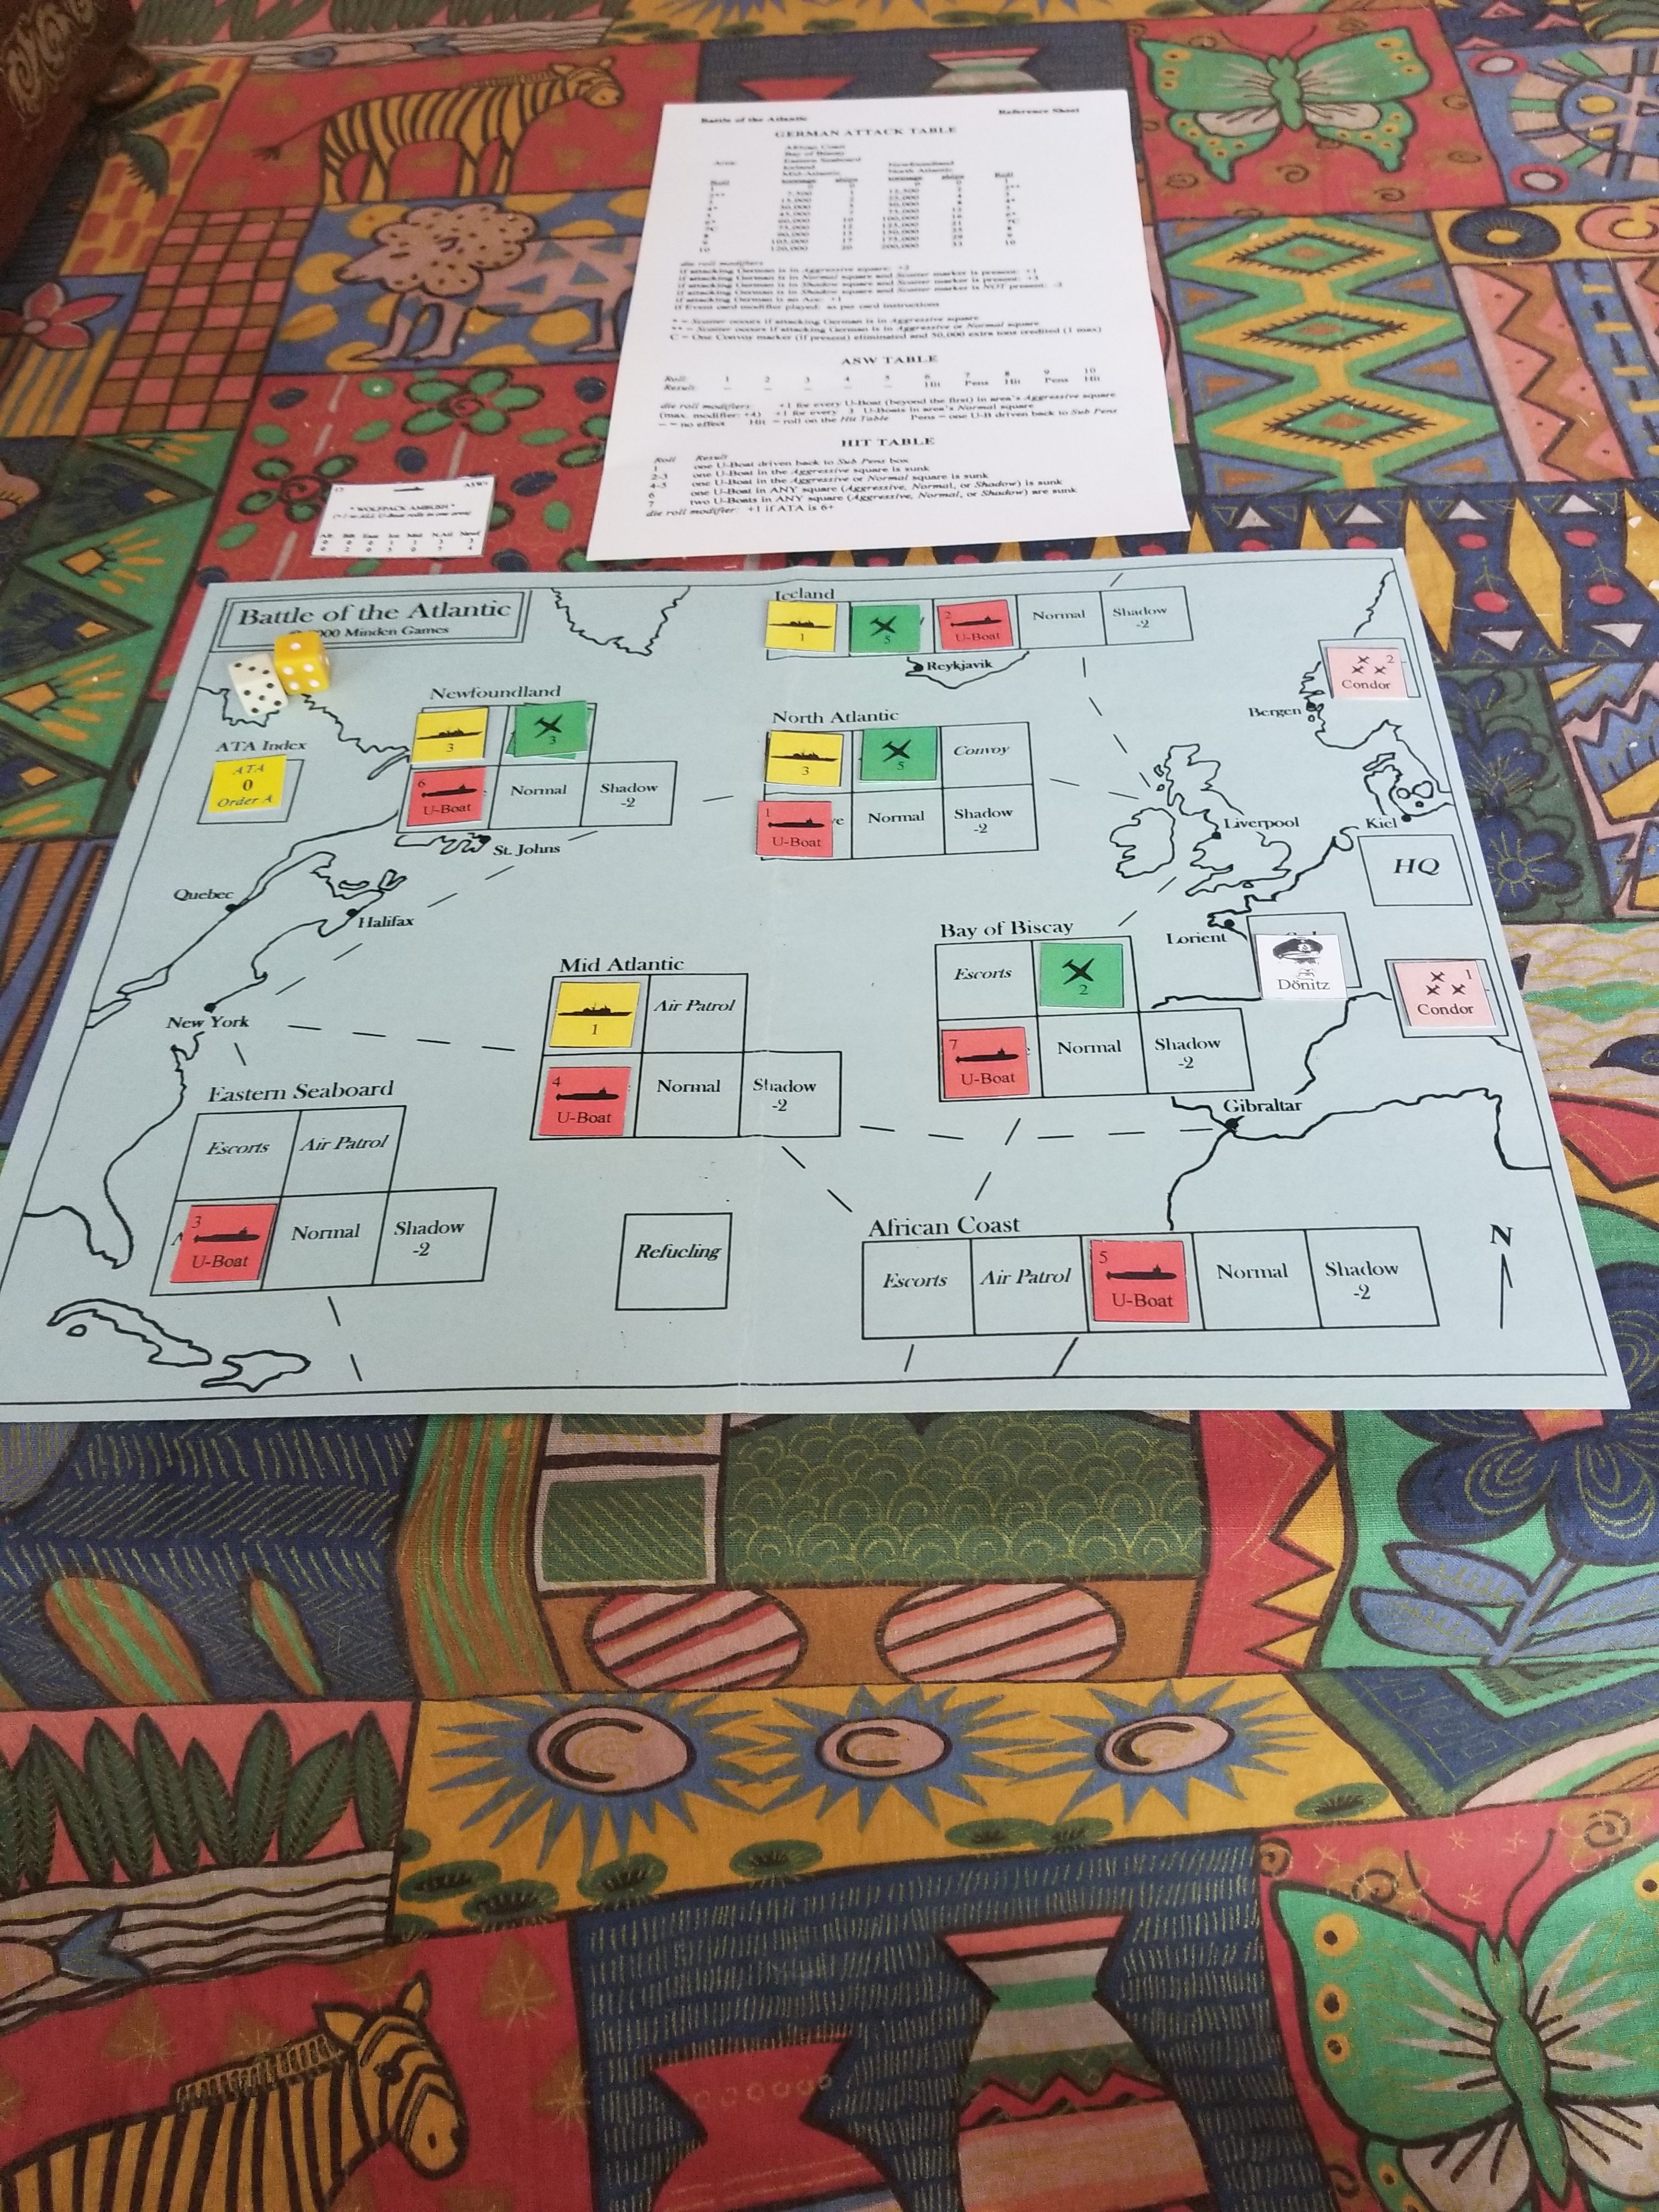
Started playing Battle of the Atlantic last night. The active player controls German U-Boats, Condor aircraft, surface raiders and resupply submarines.
British air and surface ASW asset dispositions in each sea zone are determined by a card draw. Cards also determine German U-Boat production and British technological advances, as well as designating certain combat modifiers for the turn in which they are drawn.
Initial Setup
Technological advances effect the order in which Allied ASW assets, U-Boats and Condor aircraft are placed, as well as which side resolves their combats first. Technological advances (Ultra, HF/DF, Radar) are cumulative, pushing the initiative towards the Allied player. This is critical, since losses are taken immediately.
German objectives are to a) sink as much tonnage as possible, b) maintain at least half their U-Boat fleet at the end of any one turn, and c) prevent the Allies from forming and deploying convoys.
The German commander must determine which sea zones to deploy attack assets, and what posture (aggressive, normal or shadow) they take. Aggressive subs can sink more tonnage, but are easier to destroy.
Play is quick, with straightforward CRT tables for each combatant and asset type.
After my usual stupid misplay during the first turn (roll one die, not two on the German Attack table), the first two “real” turns found the Germans falling short of their victory objectives, but suffering light losses. I’ll find out more this evening.
TAD back in the Midwest. Had visions of getting some gaming in, but small children, erratic weather, poor planning, and nearly catastrophic fall from a boat hoist have rendered these plans moot.
What I have done is read some old issues of Panzerschreck picked up on EBay a couple of weeks ago. The poor planning part was not bringing card and adhesive to use after I cut out counters and markers.
Did get through the rules for both Battle of the Atlantic and Fall of Constantinople. Gary Grabner’s solo games always have a certain level of abstraction, and I mean that in the best way. He always focuses on the simple solution in the cause of playability. Granted, these are truly low-fi games, but many designers would be tempted to overwhelm the player with rules/chrome to compensate for a nearly absolute lack of physical quality.
While it is patently strange to compare games of these topics/periods, there are similarities. Both games use area movement, by turn assignment of units to these areas, and straight-up combats without a whole load of modifiers.
I will play these games during the trip…..well, I need to find the misplaced Battle of The Atlantic issue (no, don’t blame pain meds, not using them). It’s just the problem of finding hobby supplies in a town of 7,000.
I really am looking forward to the Constantinople game. I own and actually tried to play the S&T game. That was before I read about its total lack of development, playtesting and……this is the best…..total ommision of naval rules.