The weather final cooperated, and Tim was able to make his long anticipated – and often delayed – trip to the Pine Cone Lodge.
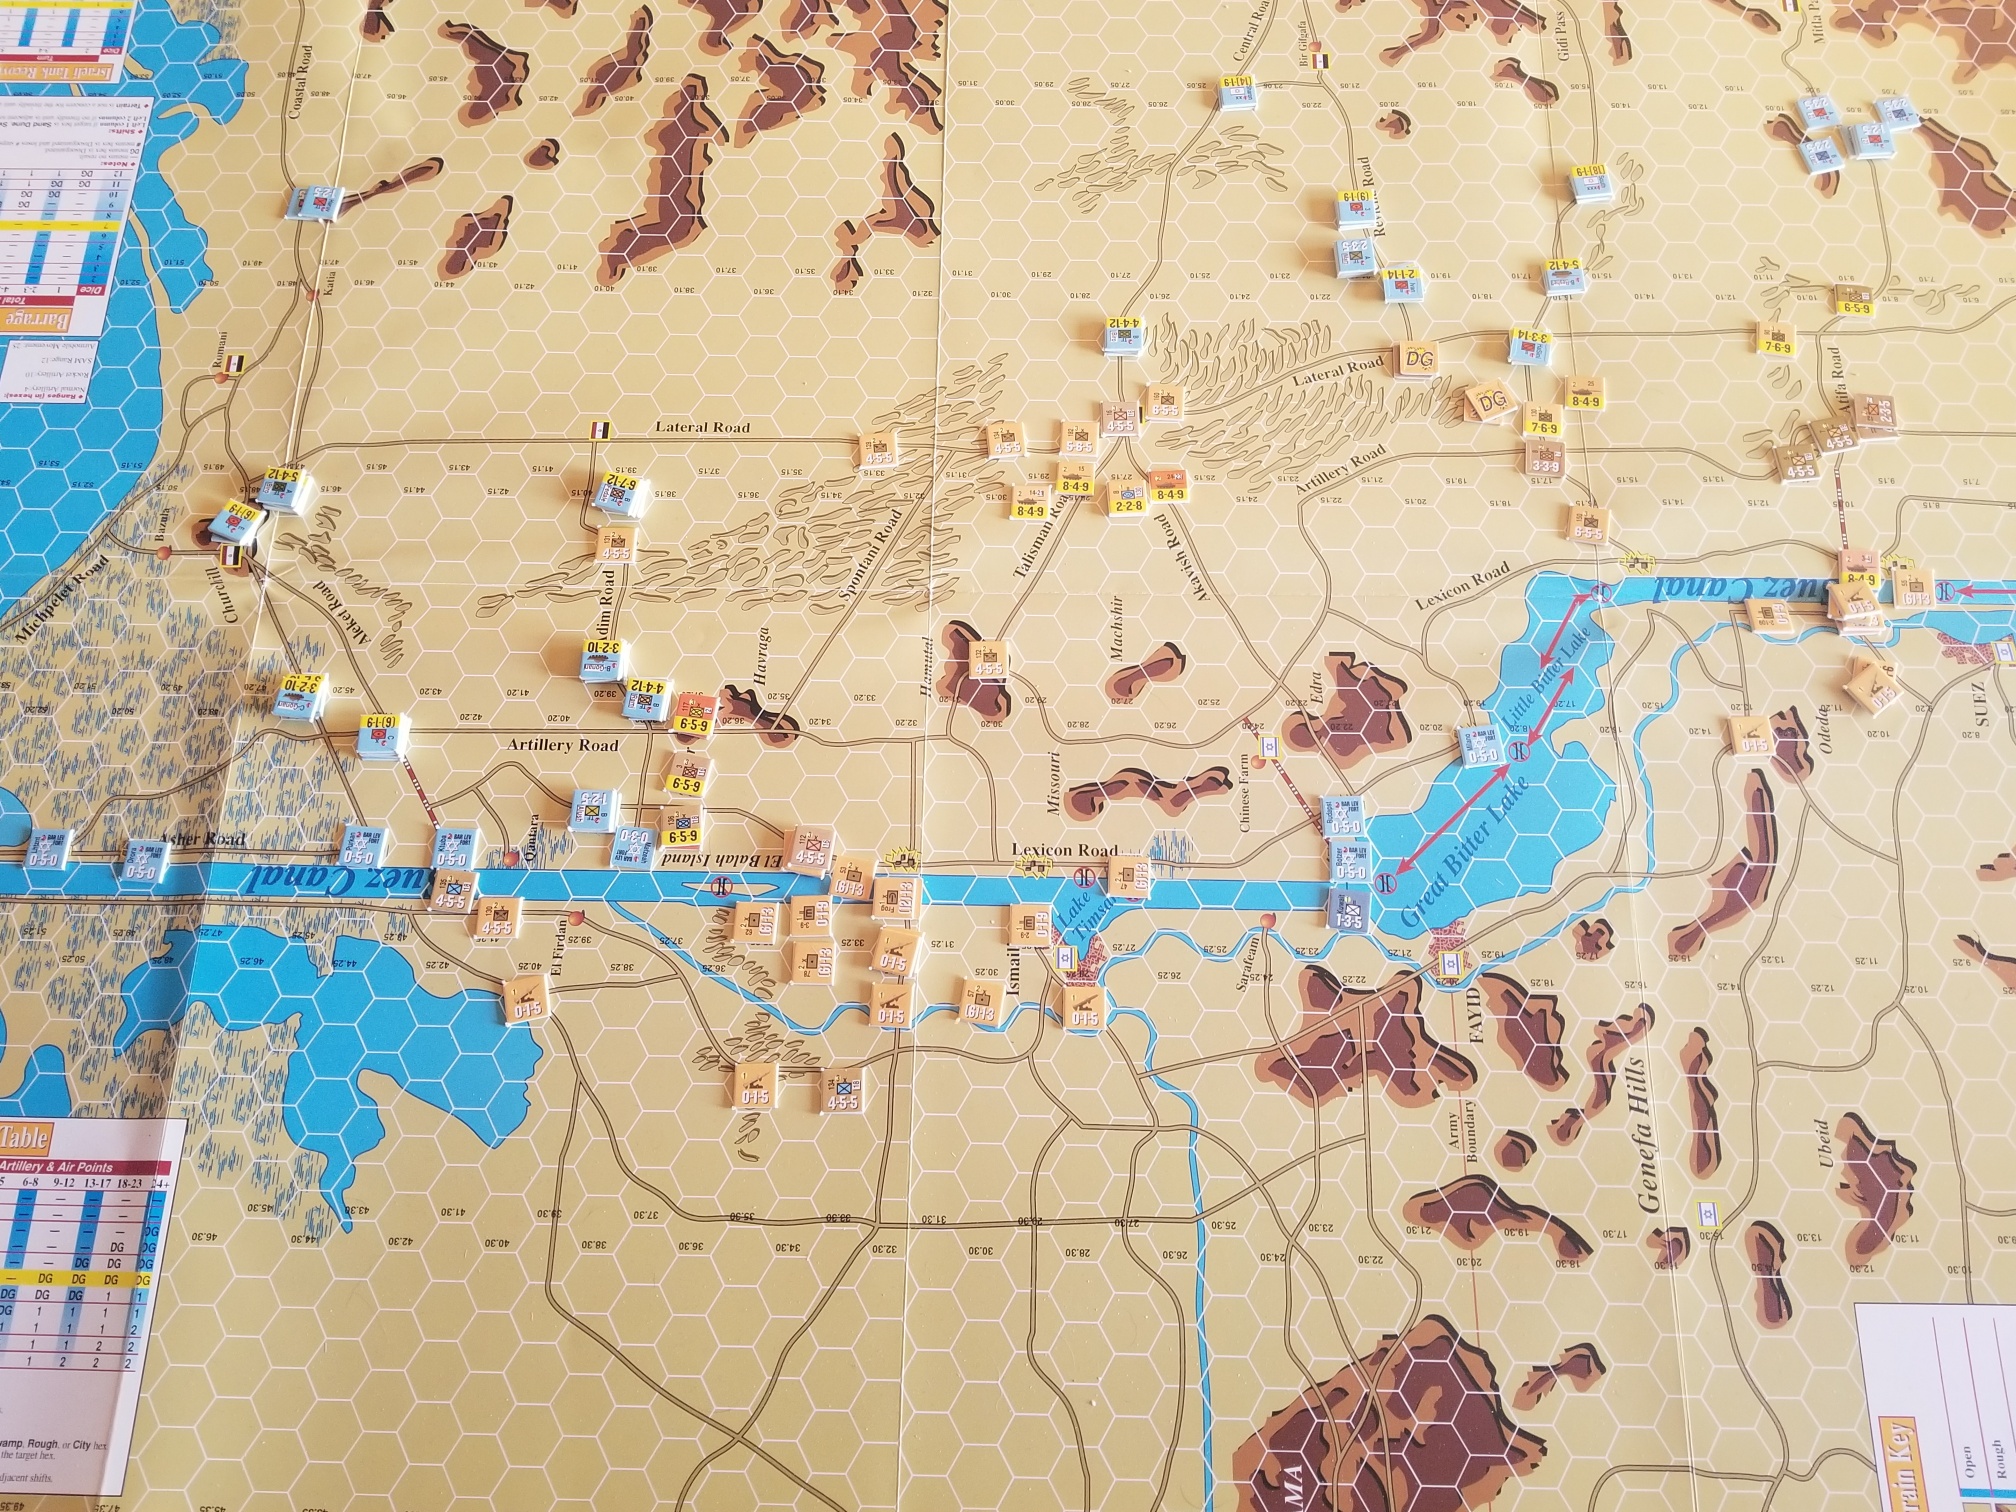
He is a fan of the Standard Combat Series now published by Multiman. I had purchased two of the games some time ago. We decided to play Yom Kippur. The game covers the initial Egyptian assault across the Suez in the October War.
We started and reset about three time. The first was due to a rules knowledge breakdown (shocking!), the second due to Tim’s die rolling breakdown, and the third for “let’s try it again”.
We never made to Turn Four, but had a lot of fun working through several operational approaches.
I also gained an appreciation of why so many like this system and how it has stood the test of time.
The basic concepts are straight-forward for an experienced gamer. The only real adjustment is that you always “round up” for die rolls and an eligible unit cannot move in the Exploitation Phase if it is in an enemy zone of control (ZOC). Each game has its own specific rules, but I found these easy to work with.
Plenty of comments and insights into the system and game at the links posted above.
One thing, though. The map……….BTW that’s the situation at the end of last play-thru. Israelis are Blue. Map is oriented to the East.
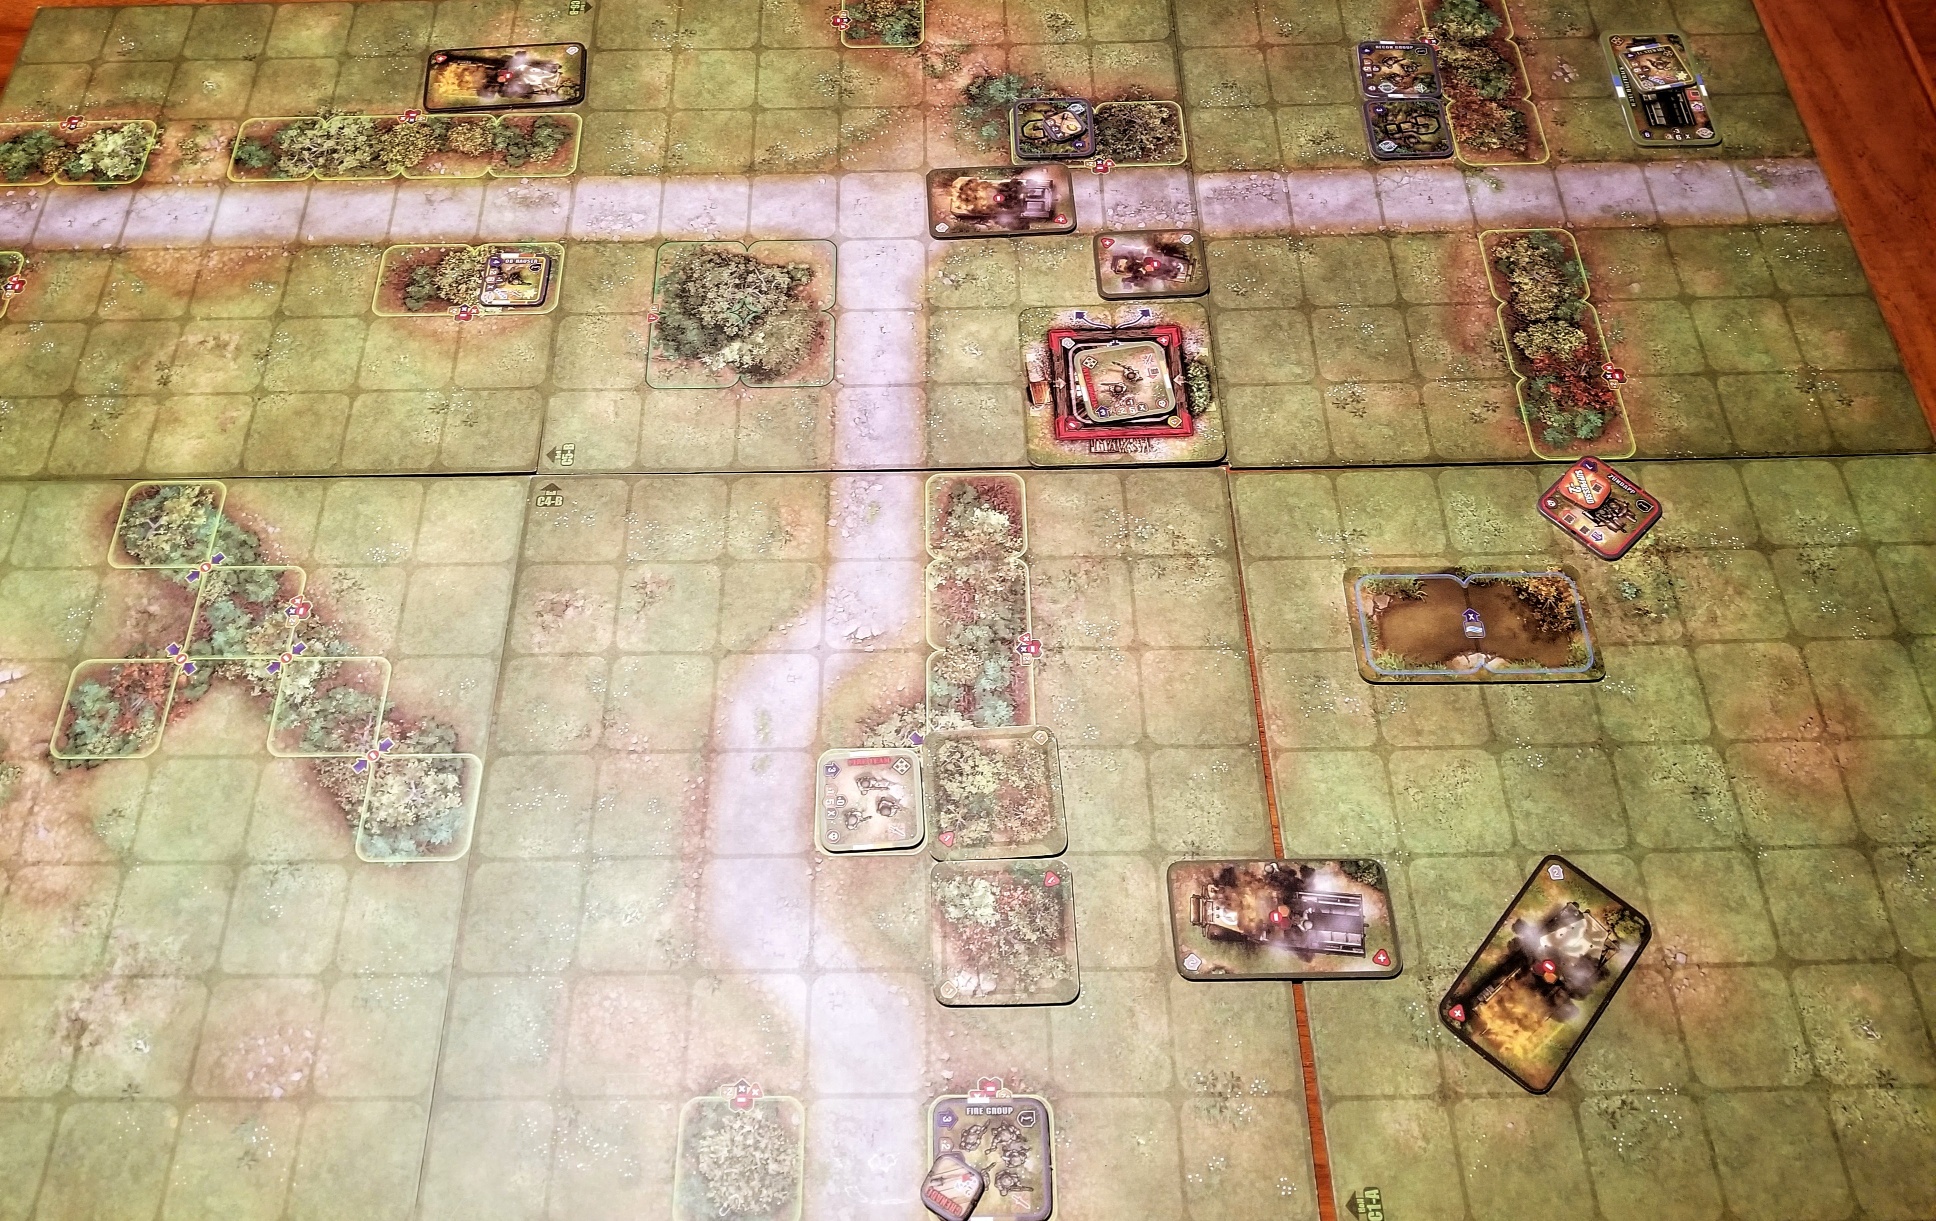
Set up another DIY scenario for Heroes of Normandie (HoN).
A meeting engagement between two reconnaissance forces attempting to secure a crossroads.
Both sides had a mix of reconnaissance sections, along with infantry support in two halftracks. The Germans had a motorcycle/sidecar/machine gun , and panzerschreck section. The US had a Greyhound armored car and Jeep with .50 caliber machine gun.
The scenario length was 8 turns, with turn initiative alternating between sides. Each side entered on opposite sides (east and west) of the map. I used event cards, but did not remove any inappropriate ones from the draw decks. This was a conscious attempt to incorporate them in gameplay, but reduce their possible impact.
It was quite the slugfest both times I played.
If I had set this scenario up in Advanced Squad Leader, my play would be far more constrained, with concerns about doctrine and realism. Not with HoN. The cartoonishness that is off-putting for some, seems liberating to me. I feel encouraged to take more chances; that is within tactical reason. Maybe it’s the straightforward vehicle rules…….
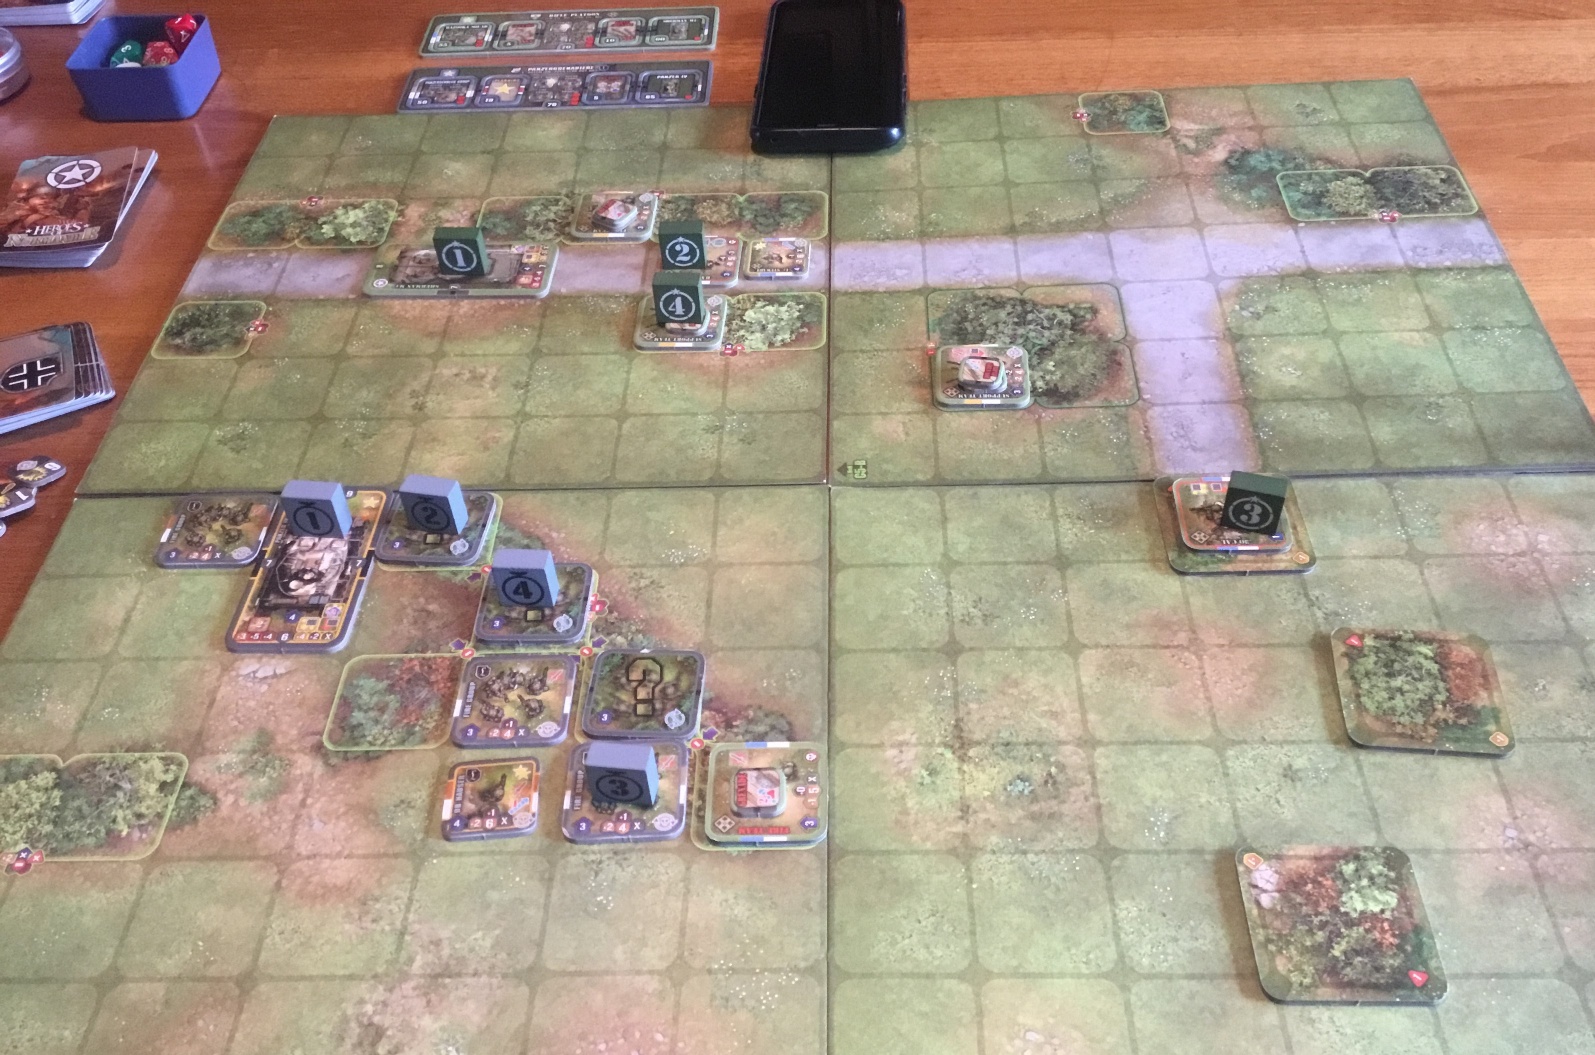
Here’s a photo of what was left after eight turns. Most of the vehicles are wrecks, with units huddled in the hedgerows, or in the house at the crossroads. North at top of photo.
Still having lots of fun with Heroes of Normandie (HoN).
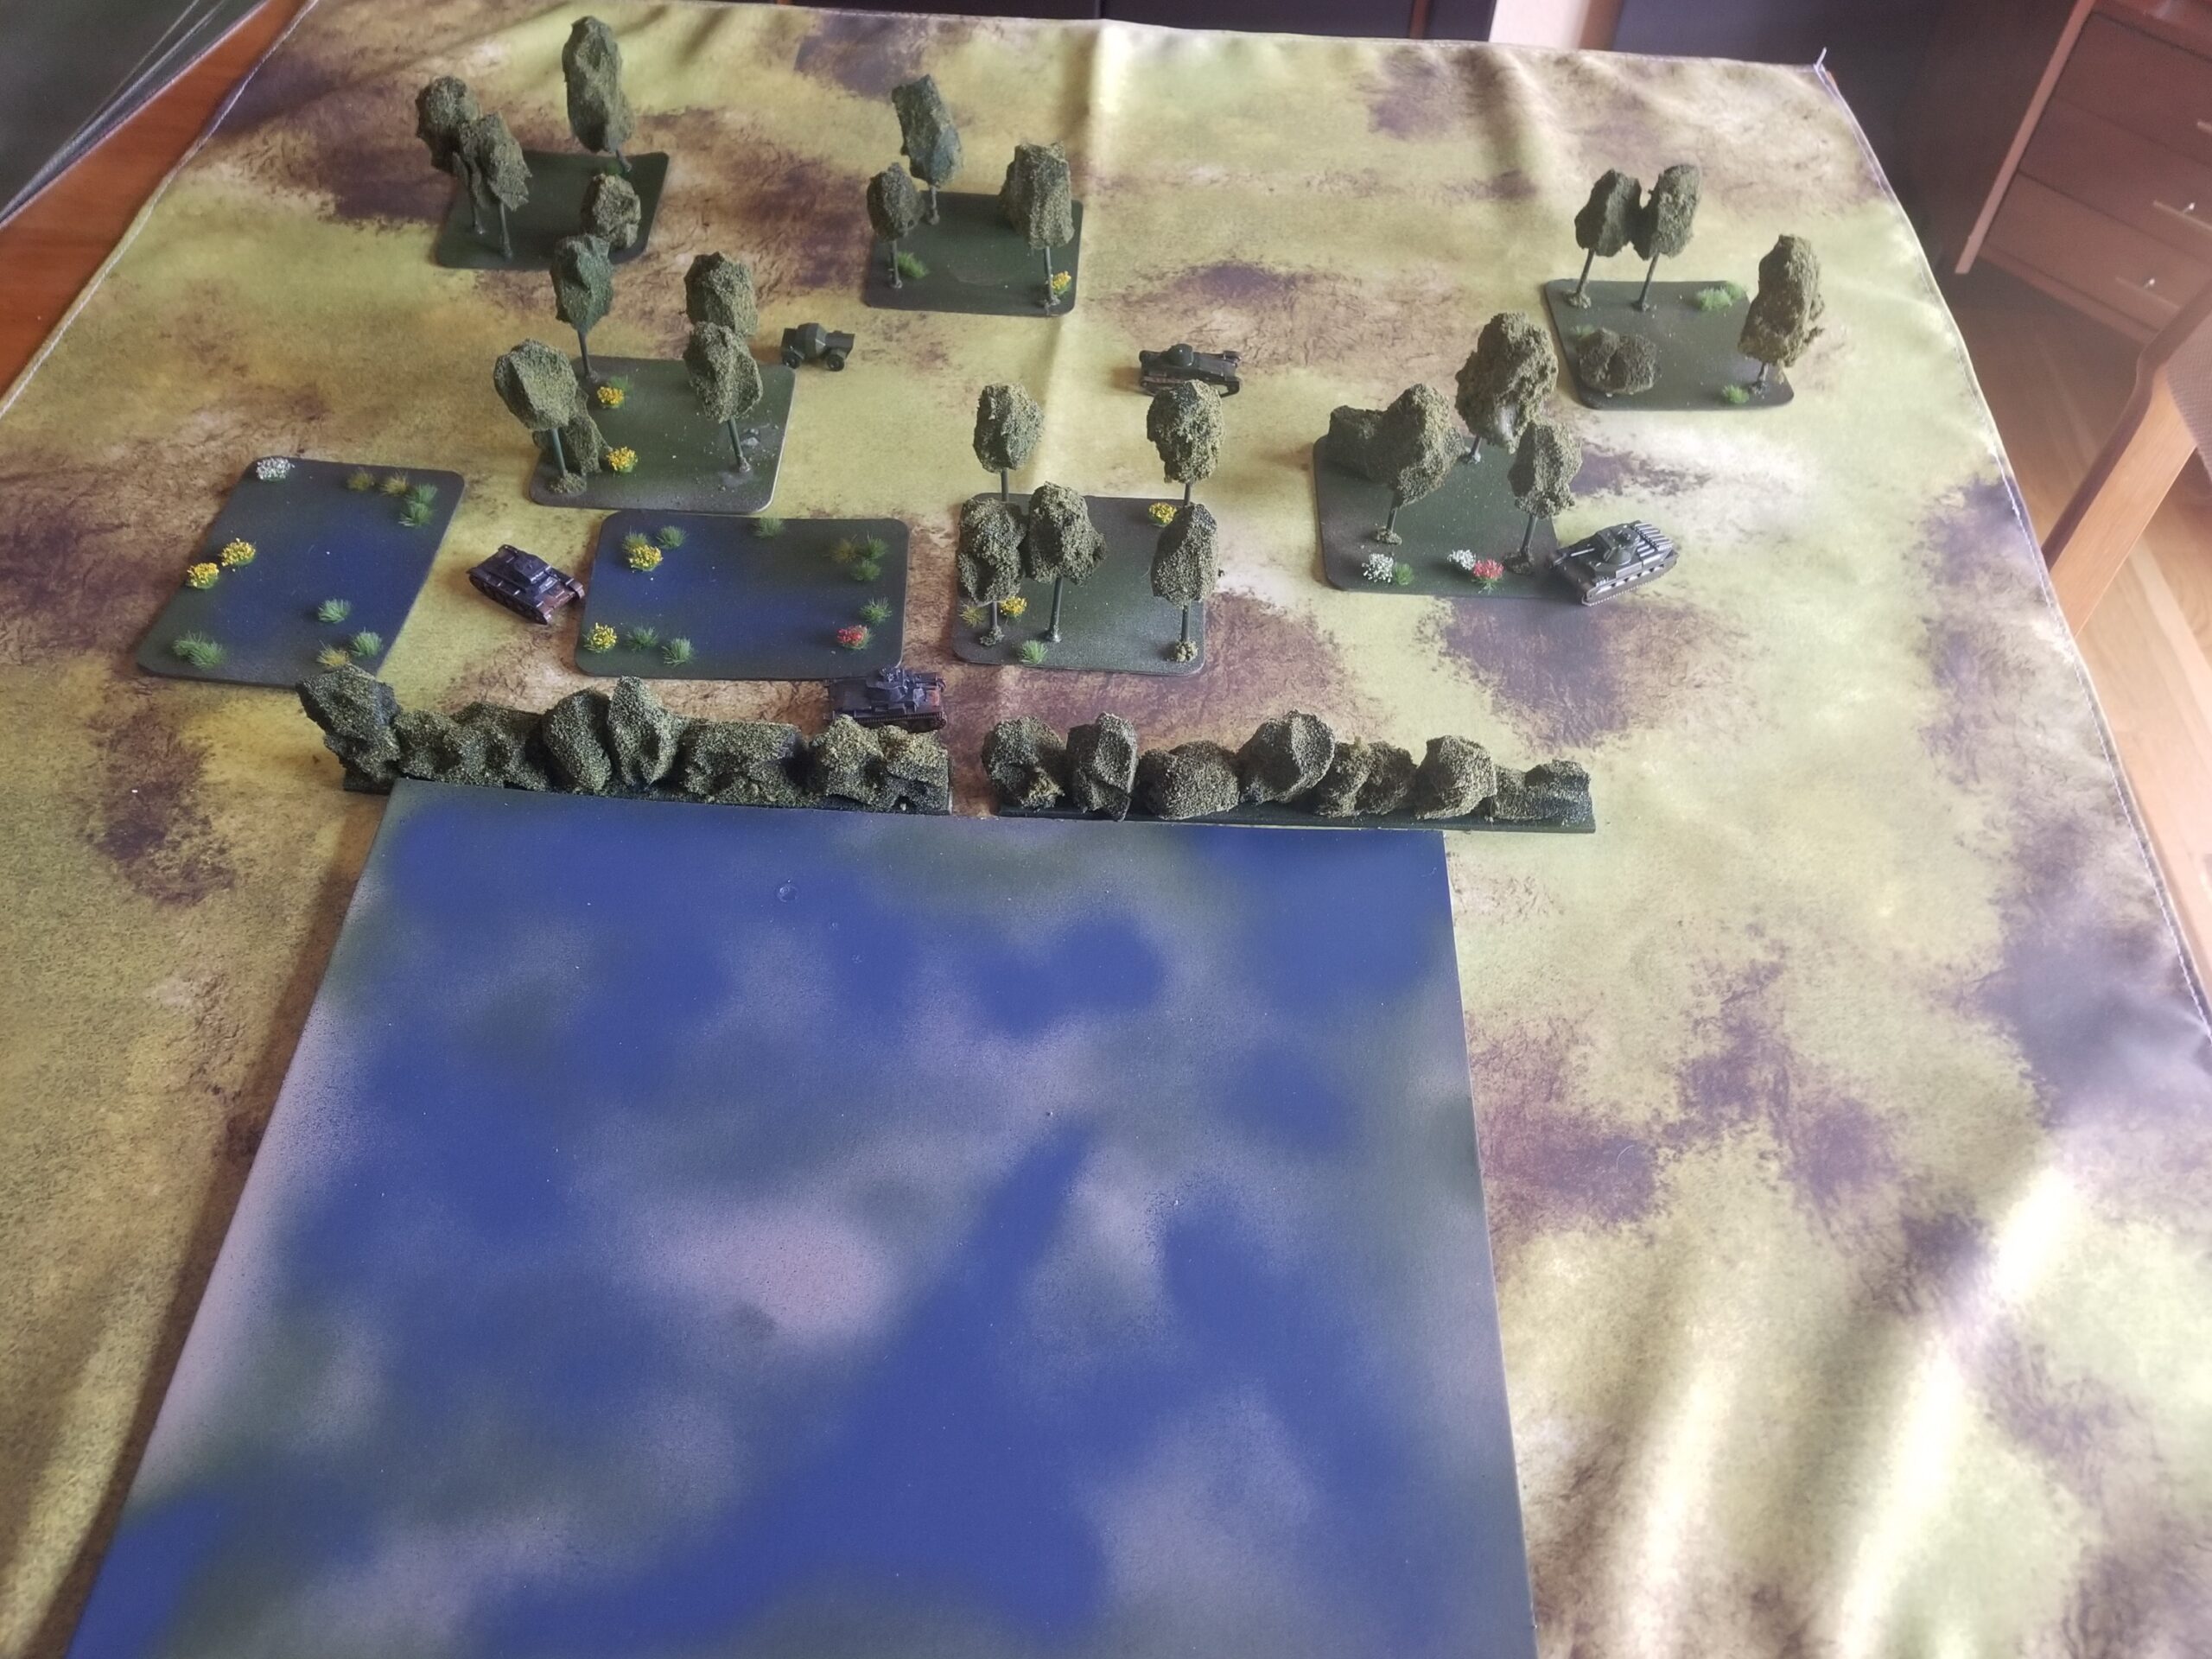
Set up a quick scenario the other night. Simple objective for the Americans; Get your armor across two boards. Six turns, but Germans already in ambush positions. Same basic forces for both sides, except each now has a tank.
Played it through a few times. It all boiled down to the last turn or two. That’s when the German Pz IV and panzerschreck each get a shot at the US M4 Sherman. However, the US advance sequence during the preceding turns is critical in order to get infantry in position to support. To make things even more difficult, I ran a scenario where the US had to also get an infantry unit off-board.
Did not use cards. Drew them, though. What wild outcomes they could have produced! Need to reconcile my need for order with even more possible fun and confusion. I’m not in a hurry to resolve this psychological conundrum. I think a reading of the solitaire rules published on Boardgamegeek may be in order.
Simple, but interesting and fun. Here’s a bad pic taken before the final game turn, with the Germans having initiative and Americans hoping to get to their turn with the tank still operational. Cell phone is holding down a non-compliant map corner.
Back from a fun 2+ week trip to (and recovery from) Joshua Tree NP and Organ Pipe NM. Weather could have been better.
Have started playing Heroes of Normandie (HON)again. I like this game, and I stress the word “game”. Not a simulation, but still a challenge. Beautiful components. Just follow the Tag for my earlier impressions.
I realized during this latest play iteration that understanding the game’s rules and flow was all about the symbols. In a typical hex and counter game, counter symbols are sparse, and aside from attack/defense/movement, provide little information concerning the connection with the rules. In HON, the unit counter is loaded with symbols involving literally every action that unit can take. Understand the symbols, and you just play. Very similar to Kriegsspiel, and makes for a far different learning curve.
I’m using the updated, and cleaned up, rules found in the HON Compendium, as well as the Action Cards. Need to read up on the solitaire guidance concerning the cards as how to handle them has been a little problematic.
Going to enjoy this for another week and then probably shift over to WW2 coastal naval combat.
Watched Dunkirk the other night. Not the new one, the good one.
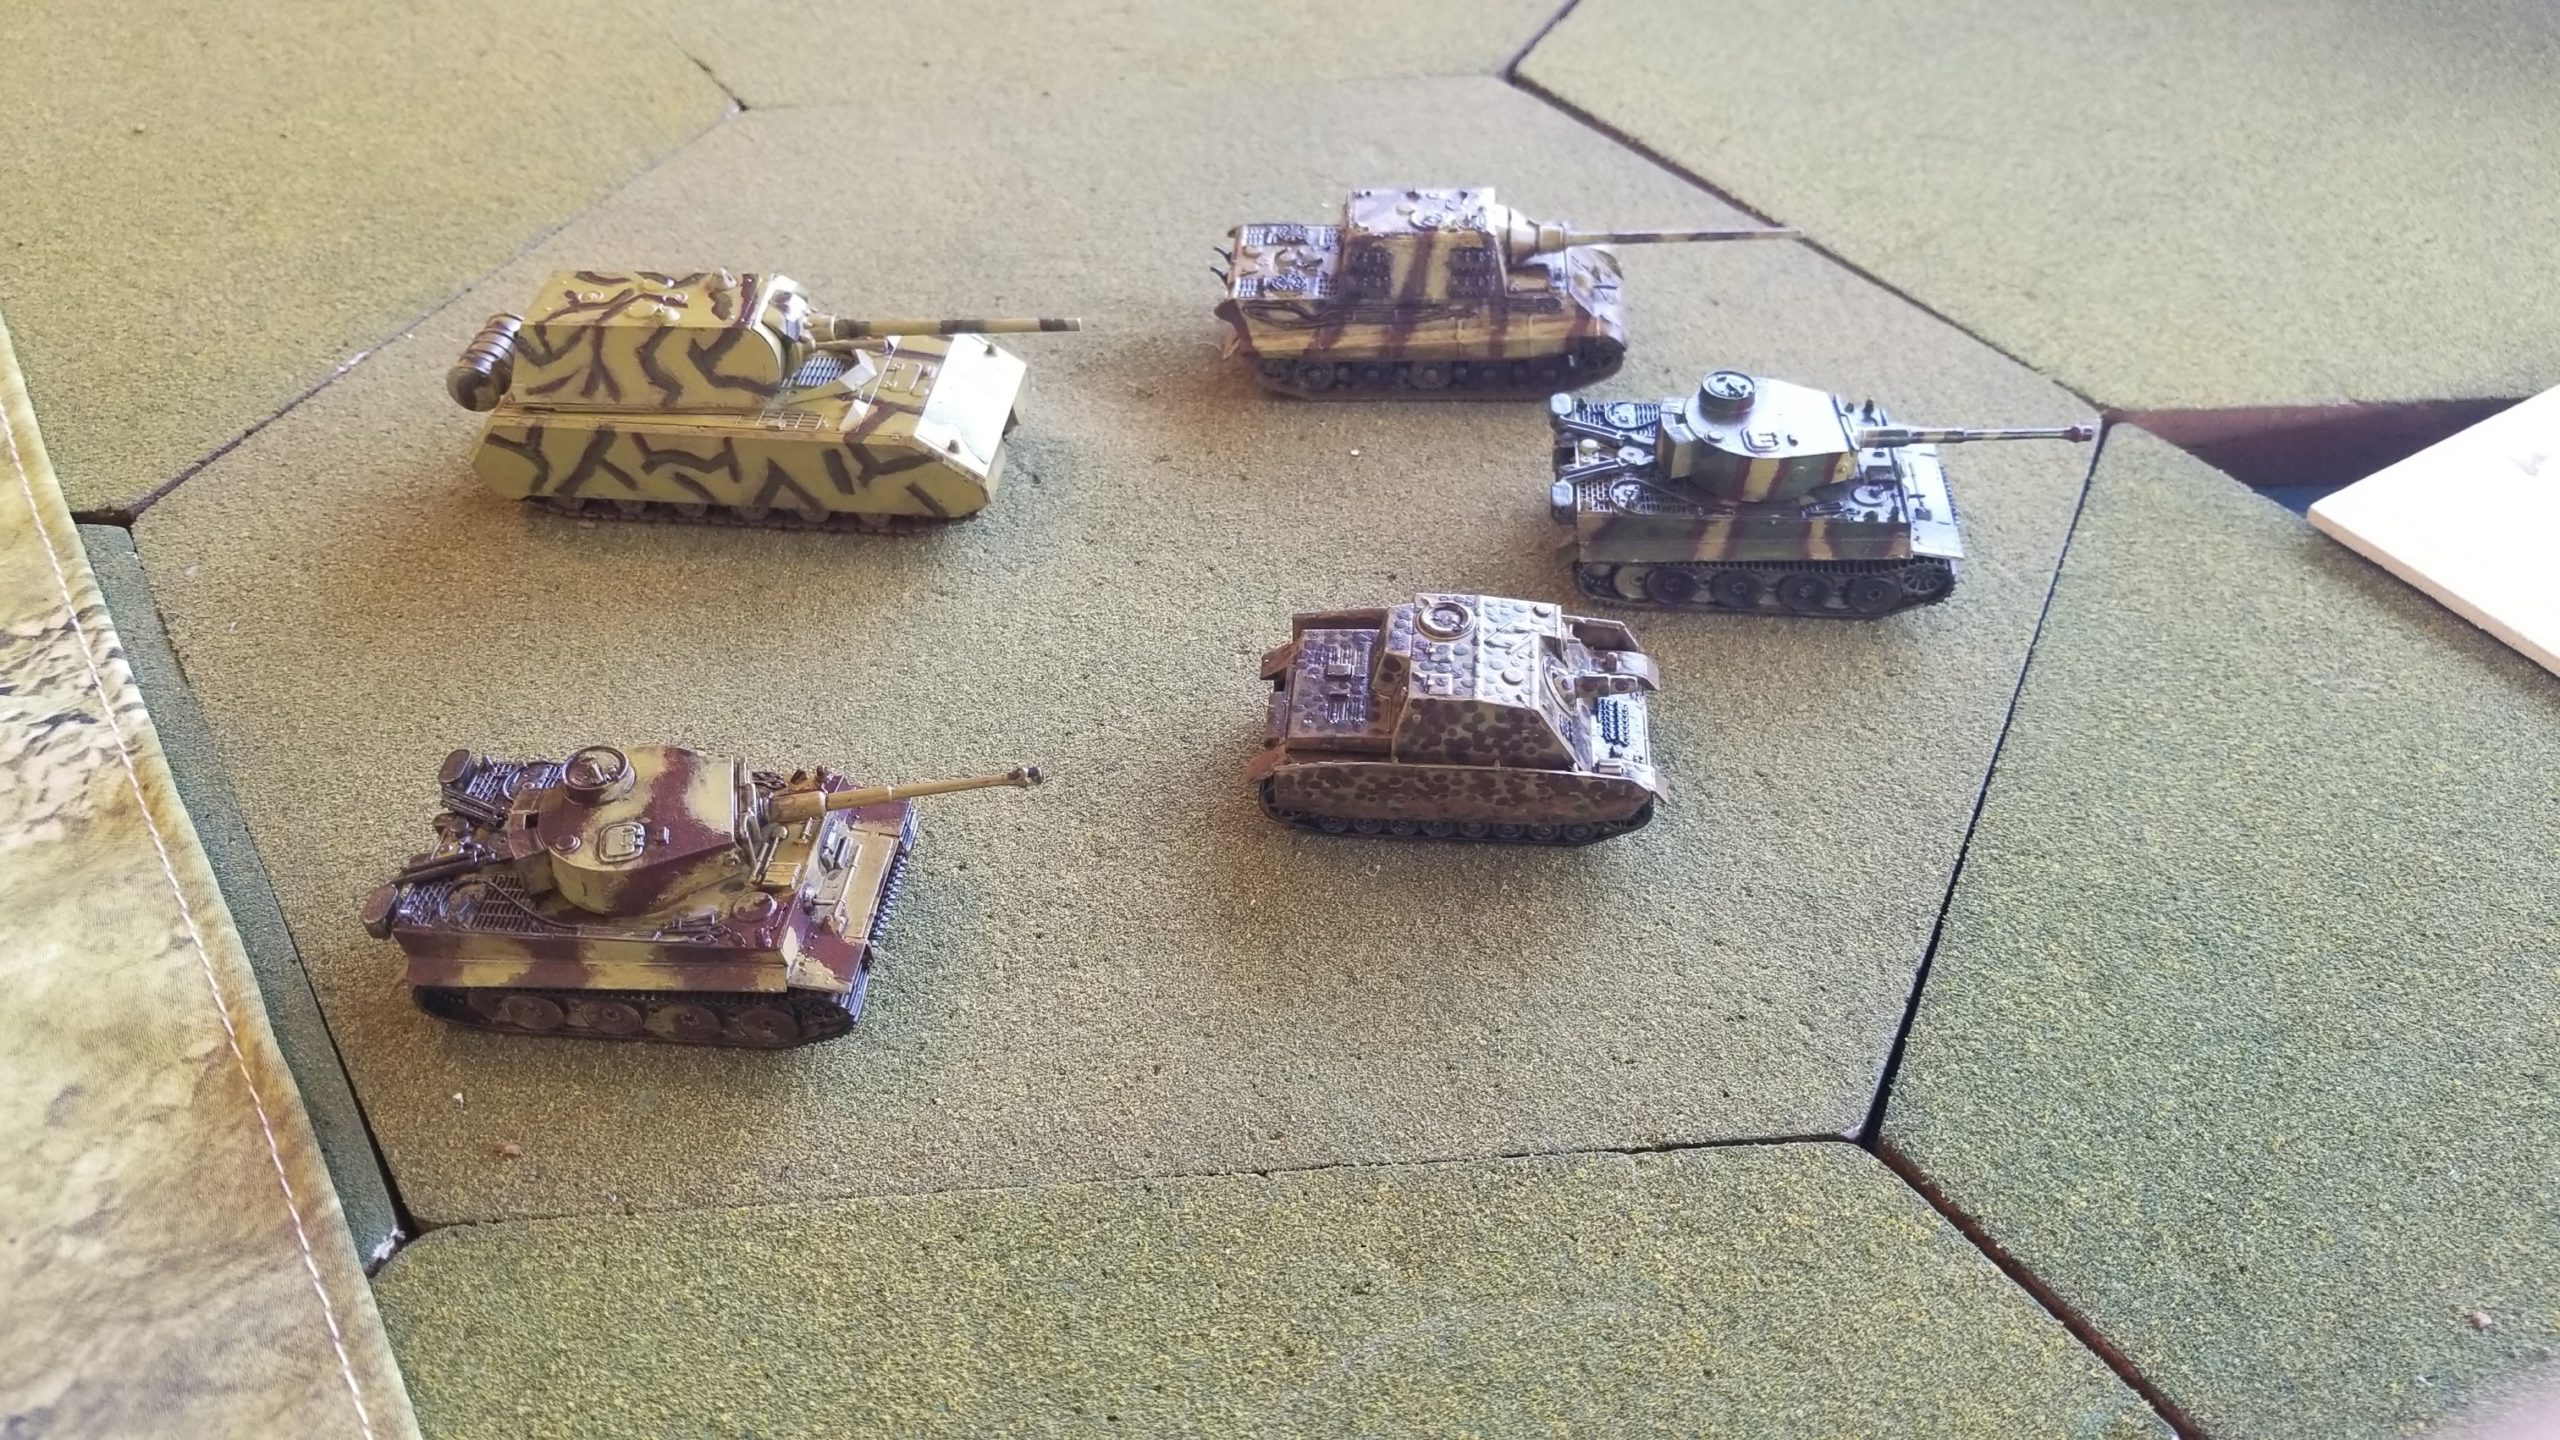
Duly inspired, I dug out my 1/100 armor with accompanying terrain, and set up a mini-campaign for Tanks!.
Basic premise was a pack of misfit British armor, caught up in the backwash of the Arras counterattack, tries to get to the coast. Set up random parameters for German opposition, and British crew capabilities.
Since the campaign was “based on a true story”, the rag-tags had an interesting set of crew skills and helpful equipment. These add-ons provide the abilities to shrug off misfortunes of all kinds. The Germans were faceless, robotic drones.
The tricky part was what each force could see, and if they saw something, how/could that information be communicated. Did some basic research on tank radios and found there is not that much out there. So, just had some fun with it, using yes/no, directional, and other random dice.
The British had an armored car for scouting; an A12 Cruiser, a Mk 1 Matilda and a Mk 2 Matilda. The German mix could include Pz II, III or IVs.
The unintended consequence of all of this was another trip into the world of computer graphic design. I’d designed some Tanks! cards with GIMP in the past, but had lost all of my chops. Downloaded a template over a Boardgamegeek, and floundered. Wound up using my old mock-up cards. Hopefully, I’ll continue to slog away at the new cards.
Again, it’s a real challenge to resist ginning up too many house rules. Sure, I had to make spot judgments on backing up, Matilda frontal armor and others, but resisted the need to codify them. Here’s photos of the first two scenarios. Lots of Hide N’ Seek trying to work through woods along roads/side roads.
Had to pick up this AM. I’m thinking coastal operations later in the week, or Heroes of Normandie.
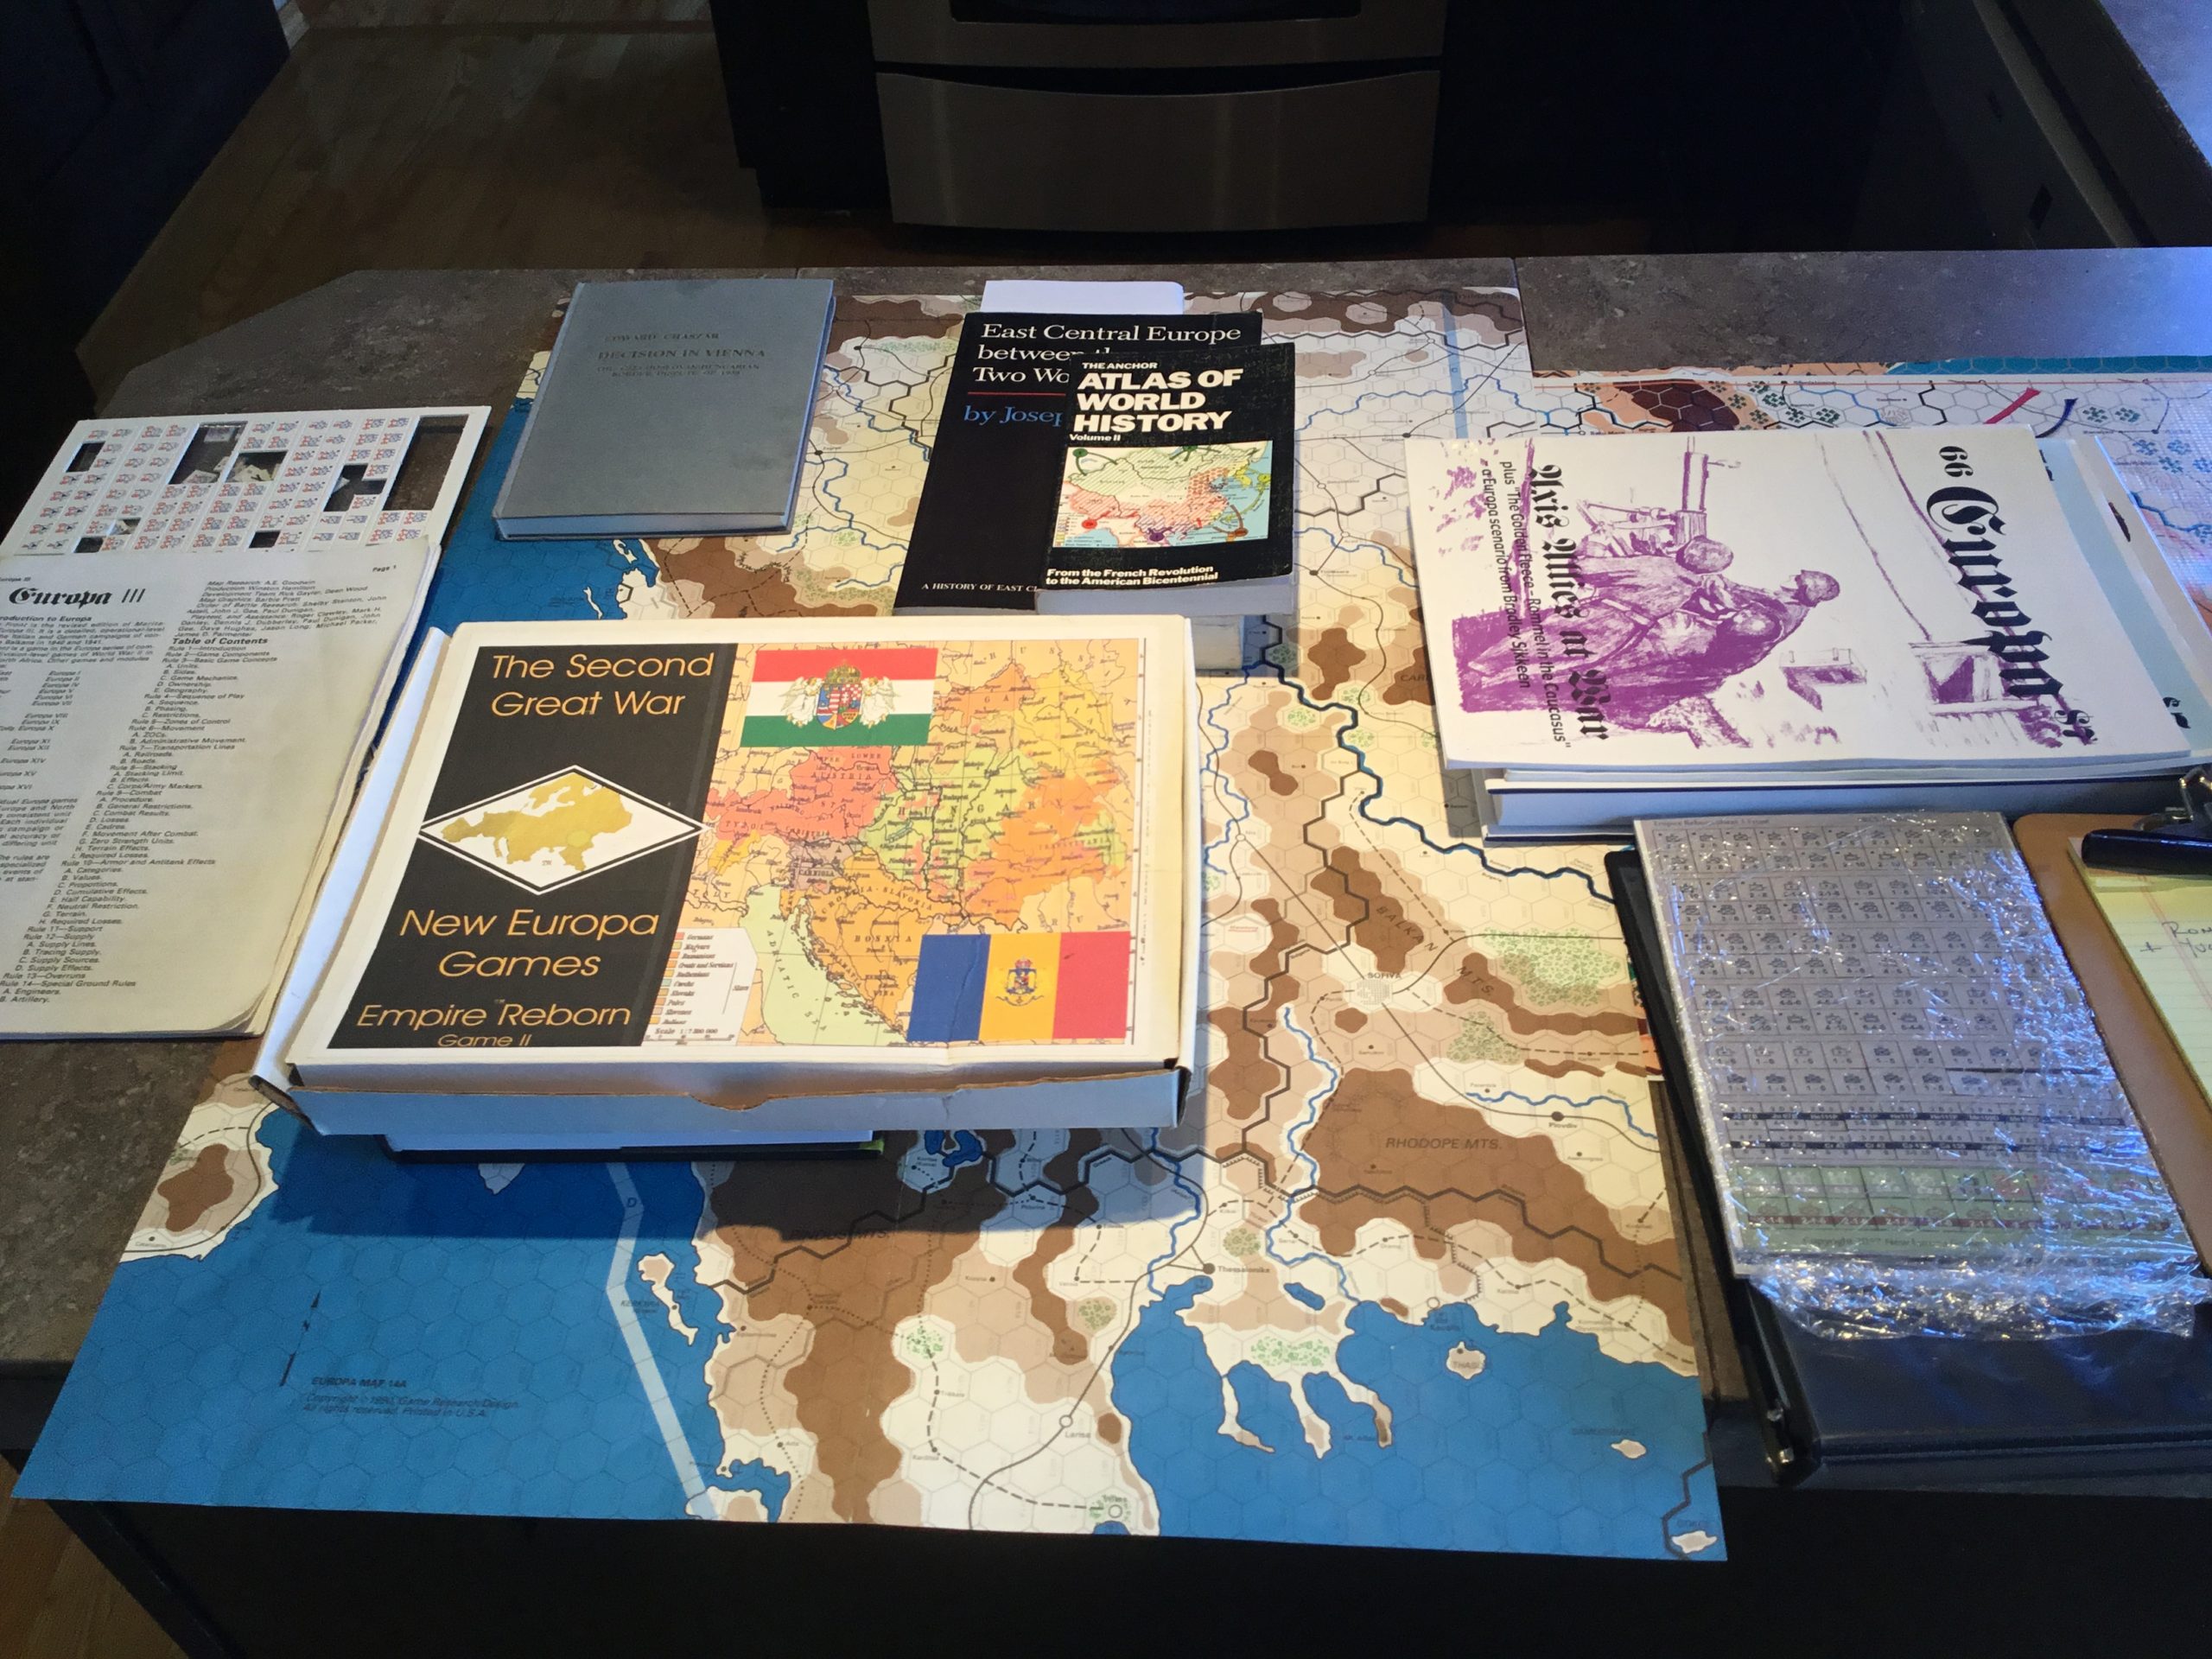
Getting close to covering all household horizontal surfaces with wargame related items.
Europa Purists may not want to read any further.
The is the resource hodge podge assembled for my latest foray into out of kilter Europa scenarios, following in the steps of Fall Gertrude and the “Switzerland Must Be Swallowed” scenario pre-dating this blog.
As with any catastrophe, this one has several causes. They are, in no particular order, an email exchange with Tim Davis, the publisher of Fall Grun and Empire Reborn, a chance encounter with The Europa Magazine (TEM) #57, and glance at my copy of East Central Europe Between The Two World Wars.
Empire Reborn posits a Romanian-Hungarian conflict in the wake of the Munich Pact. TEM #57 contains a Macedonian War scenario developed by Frank Watson, portraying a 1940 Bulgarian invasion of Yugoslavia.
Both scenarios are based on ethnic/cultural/geographic grievances which (although centuries old) were the immediate products of the Balkan Wars and World War I. It is a long and twisted story resulting – as best I can figure – in the following.
Hungary wanted to regain Transylvania from Roumania, and the Backa and Prekmurje regions from newly created Yugoslavia. Bulgaria wanted much,if not all, of Macedonia from Yugoslavia, and to regain Dobruja from Roumania.
Hungarian revanchism was a result of the Treaty of Trianon (1920), which stripped the country of land, ethnic Hungarians and resources. This desire to regain what was lost led to the creation of the Little Entente between Czechoslovakia, Yugoslovia and Roumania.
Greece, Turkey, Roumania and Yugoslavia reacted to Bulgaria’s territorial grievances by signing the Balkan Pact (1934). The Pact was intended to maintain the region’s territorial status quo and peacefully solve any differences.
So, I am now ready to begin what Mr. Watson characterized as “wandering in the Balkan darkness….” in explaining why he limited the scope of his Macedonian scenario.
I will, however, take his guidance and set my scenario in 1940, as “(it) provides a convenient way to do away with great power meddling.”
The shortest distance between two points is to assume a Hungarian and Bulgarian alliance (whatever form that might take) aimed at Yugoslavia and Roumania, all that was left of the Little Entente.
Most available order of battle information begins in 1941, but there are enough fragmentary sources to take a pretty good guess at 1940. In each case, the combatants were modernizing and reorganizing their armed forces.
German armor sweeps past the weak ad-hoc French defenses and advances towards the Marne. Also, the German commander turns loose “Ants” to disrupt the Allied rear areas. To the north, German forces grind up the Dutch and Belgians, advancing to the Dyle Line.
The Allies rush armored/mechanized units to contain the Ardennes penetration, while withdrawing from the Dyle line, using Belgian forces in support. The Dutch attempt to consolidate their defense in order to tie down German forces for as long as possible.
I’ve bitched about my Fall of France (FoF) game with Tim, but I am now compelled to report it.
As usual with this site, the graphics will be less than ideal, a condition due in equal parts to my ambivalence towards pushing the boundaries of computer literacy and reliving a wargaming hell.
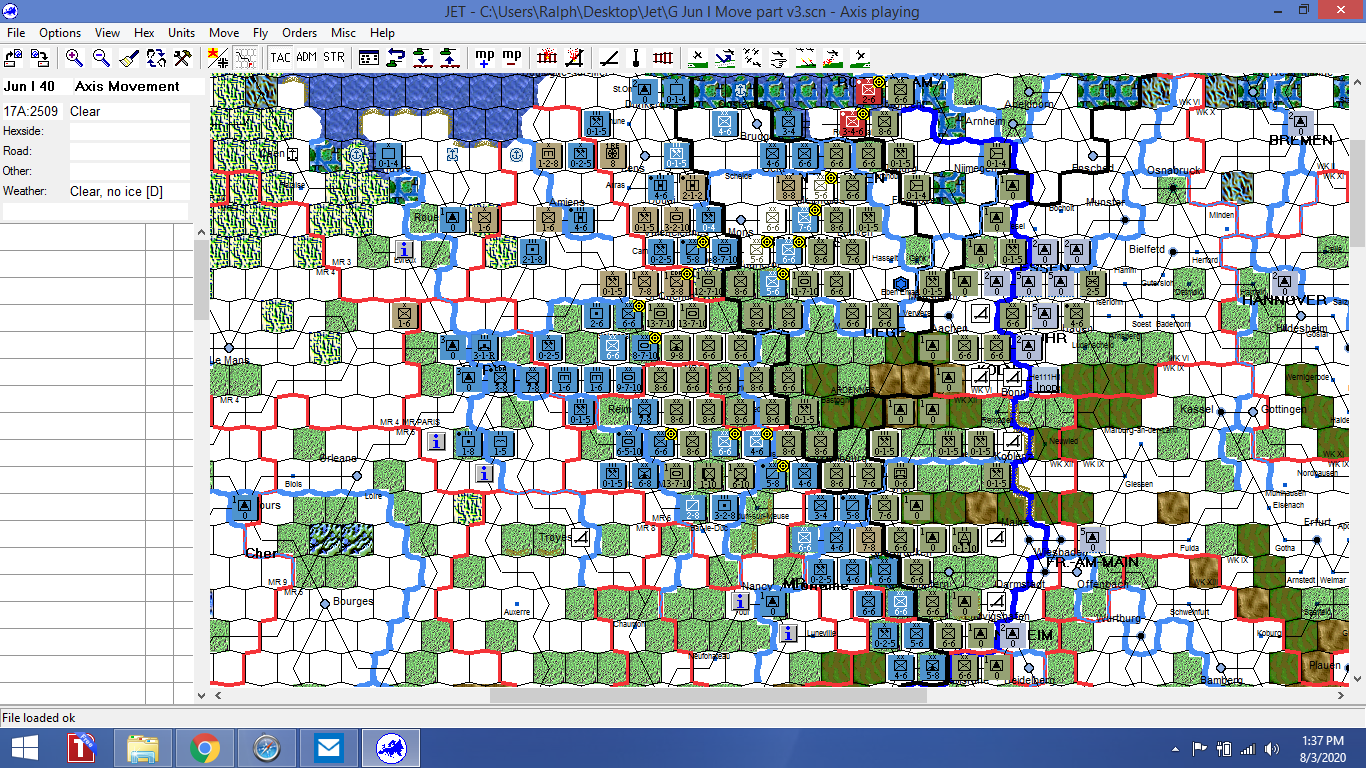
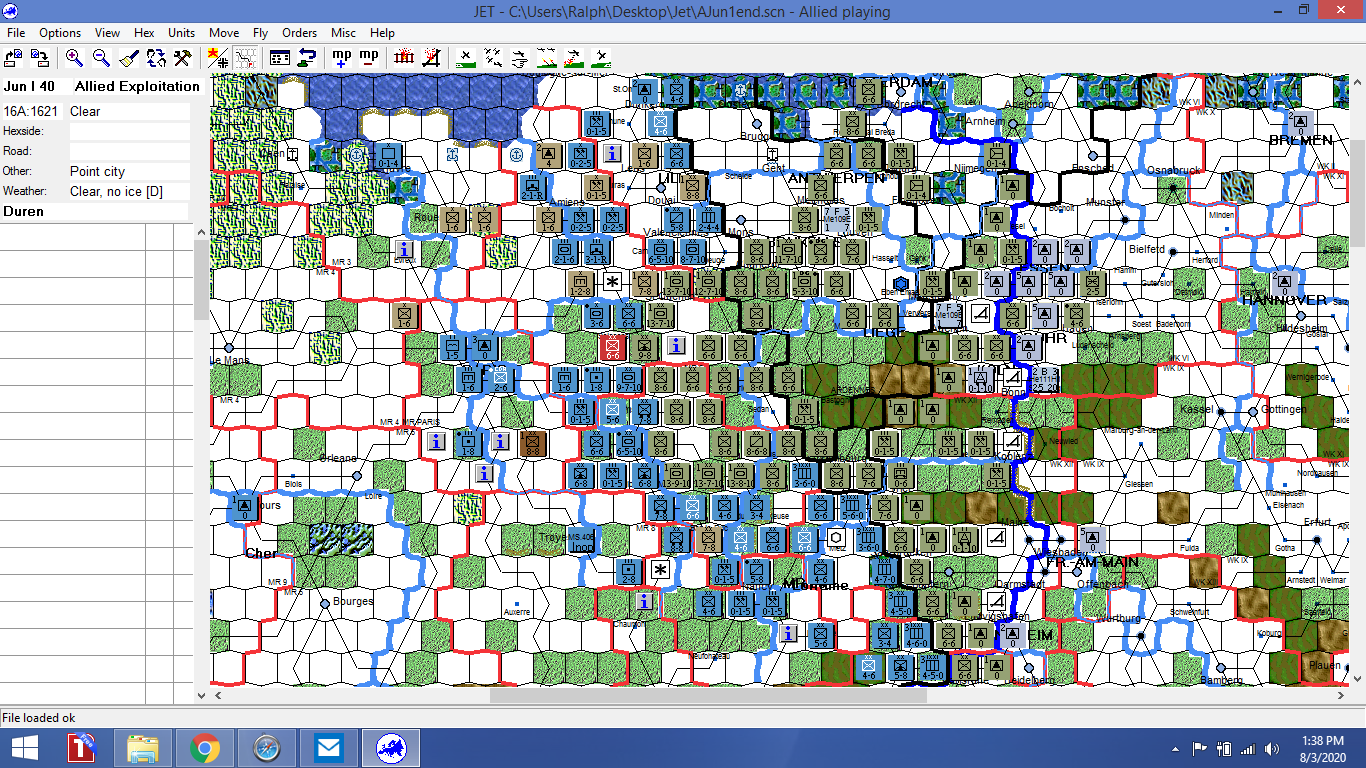
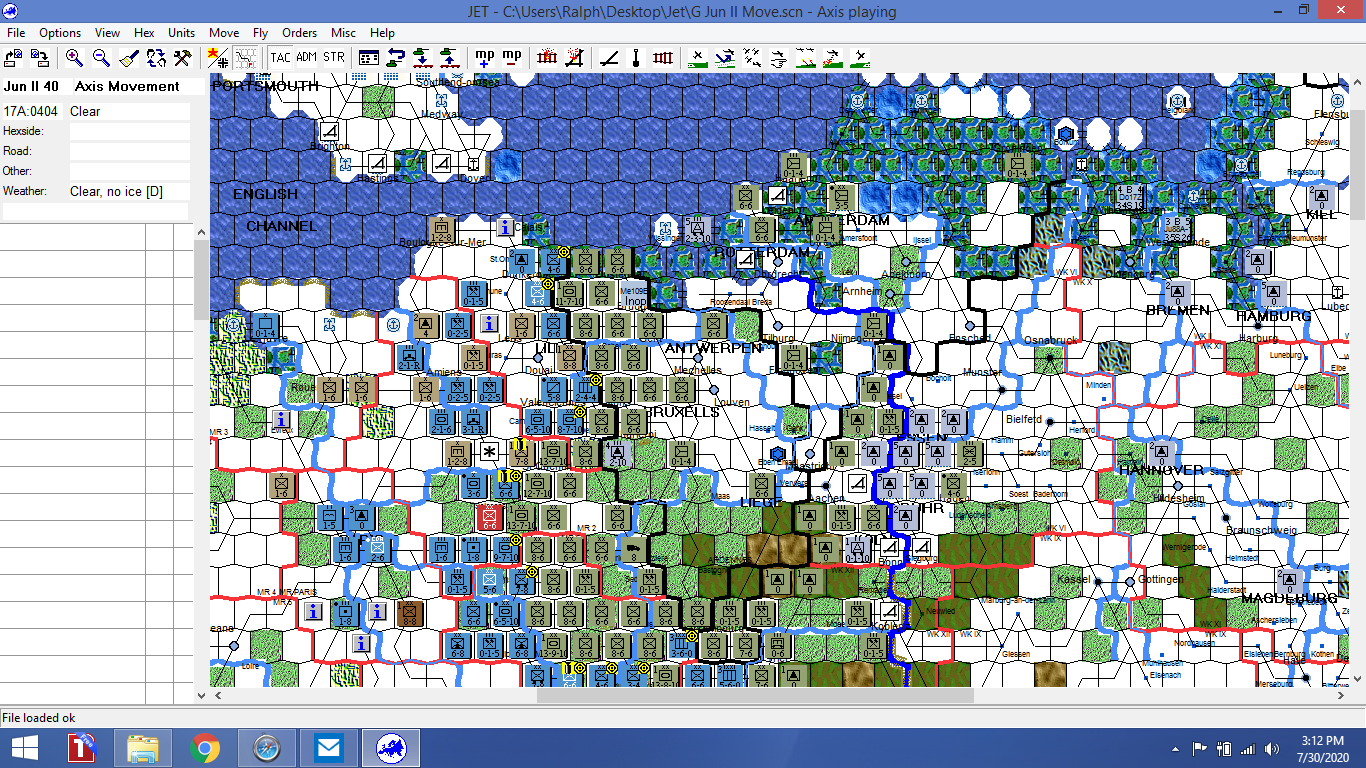
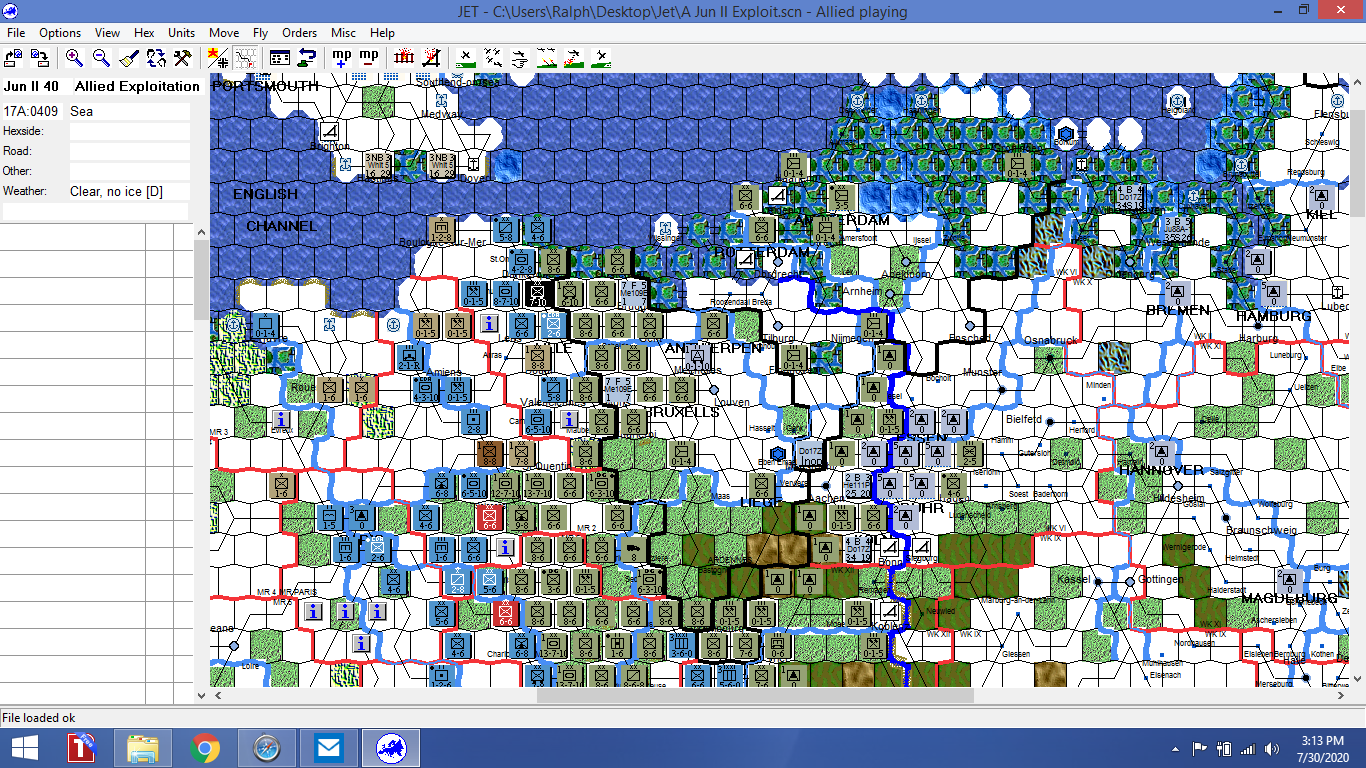
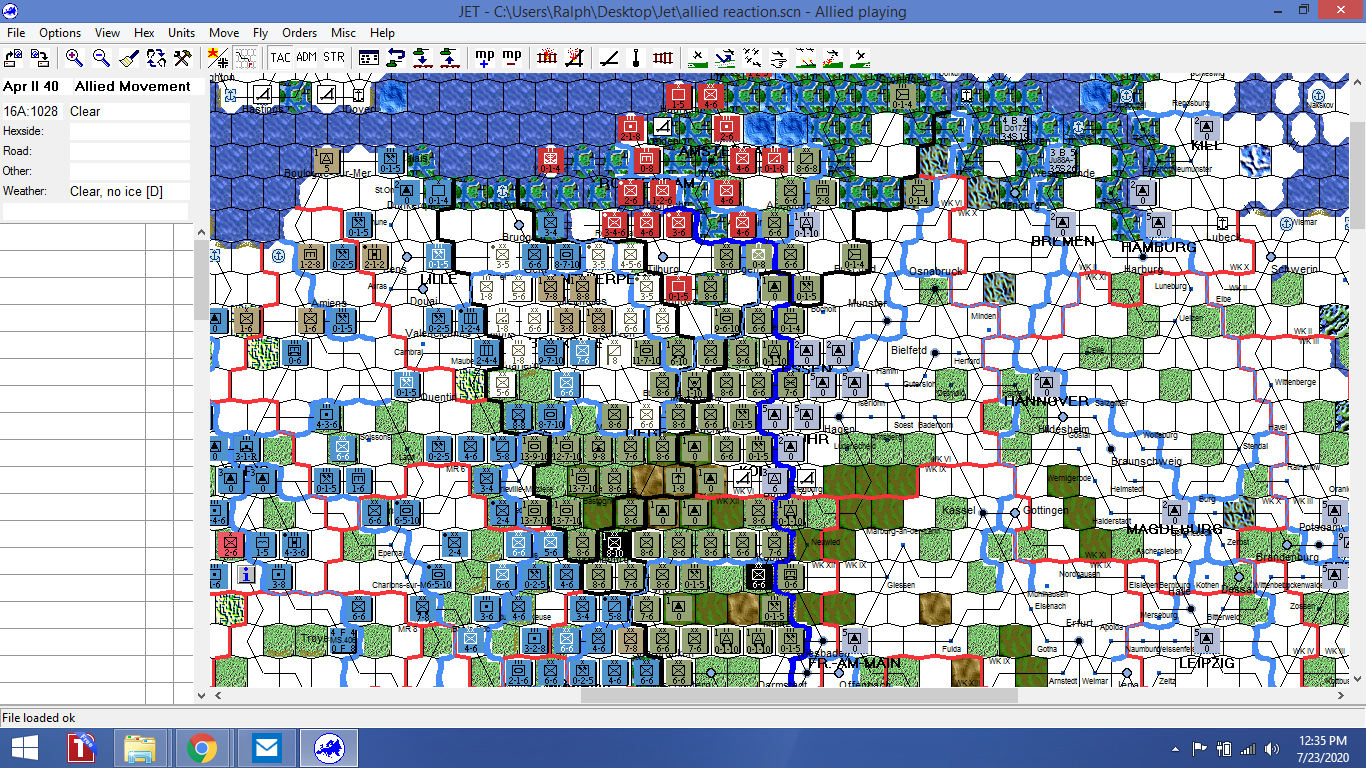
I was able to figure out how to get screenshots on my ancient Dell Windows 8 machine. However, the screen shots of the JET board are just that; a shot of what is on the screen. The JET mapboard takes up more than the screen, so the graphic evidence of this debacle will be from north of Frankfurt. That’s OK, because that it is where most of the carnage occured and is continuing to occur. We are now in the Allies Jun II turn, and things are looking very grim for the Allies. But….. we must start at the beginning.
The Germans have extremely powerful air and ground units. The screenshots show only the top unit in the hex. But, below that scary surface, lies even more panzer divisions, supported by motorized units, lots of motorized flak and artillery.
One revelation was how tough the German infantry stacks were. Three 8-8 infantry, paired with artillery represents a lot of combat power.
Allied units are solid, but lack mobility, flak and supporting units.I shudder when I think about the German’s powerful ground attack air assets used to support these armored and infantry forces.
Then, there are the historically based operational rules. They create a difficult framework for the Allies to work within.
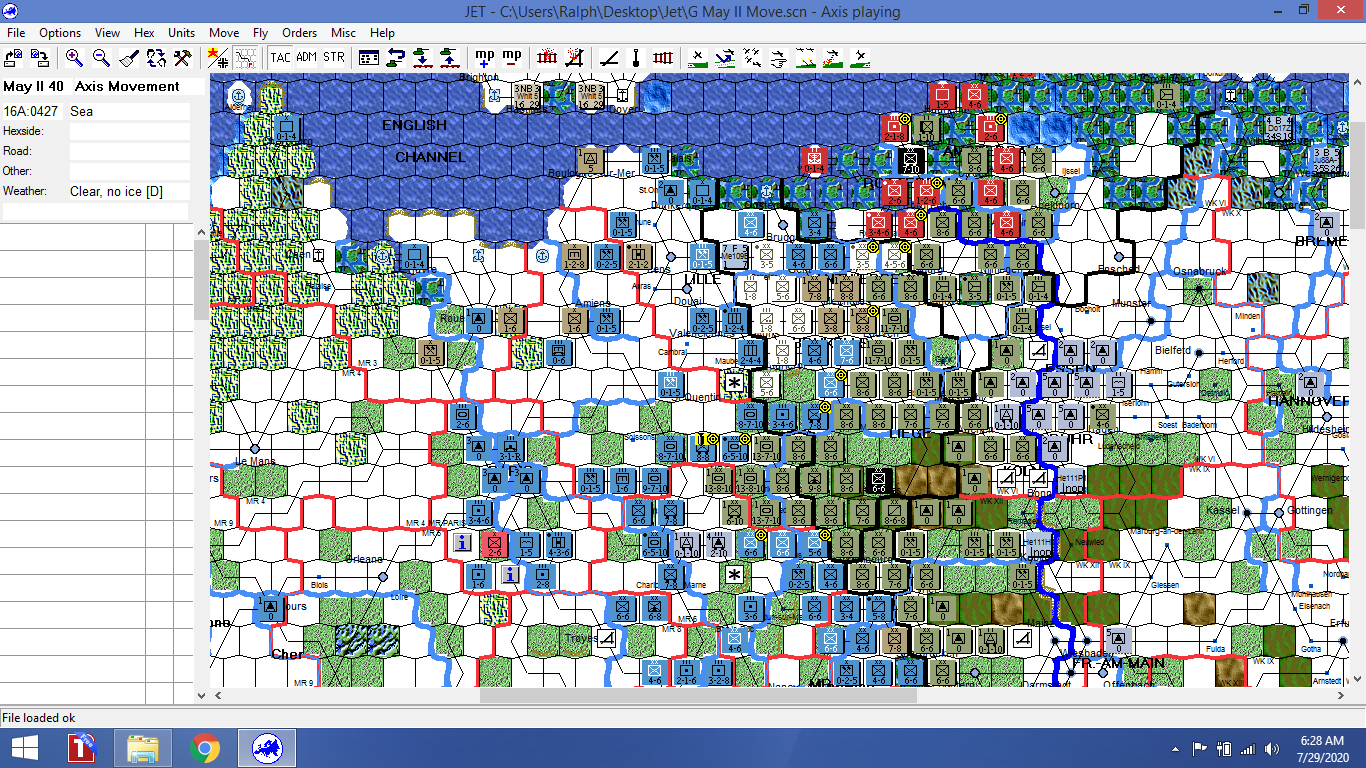
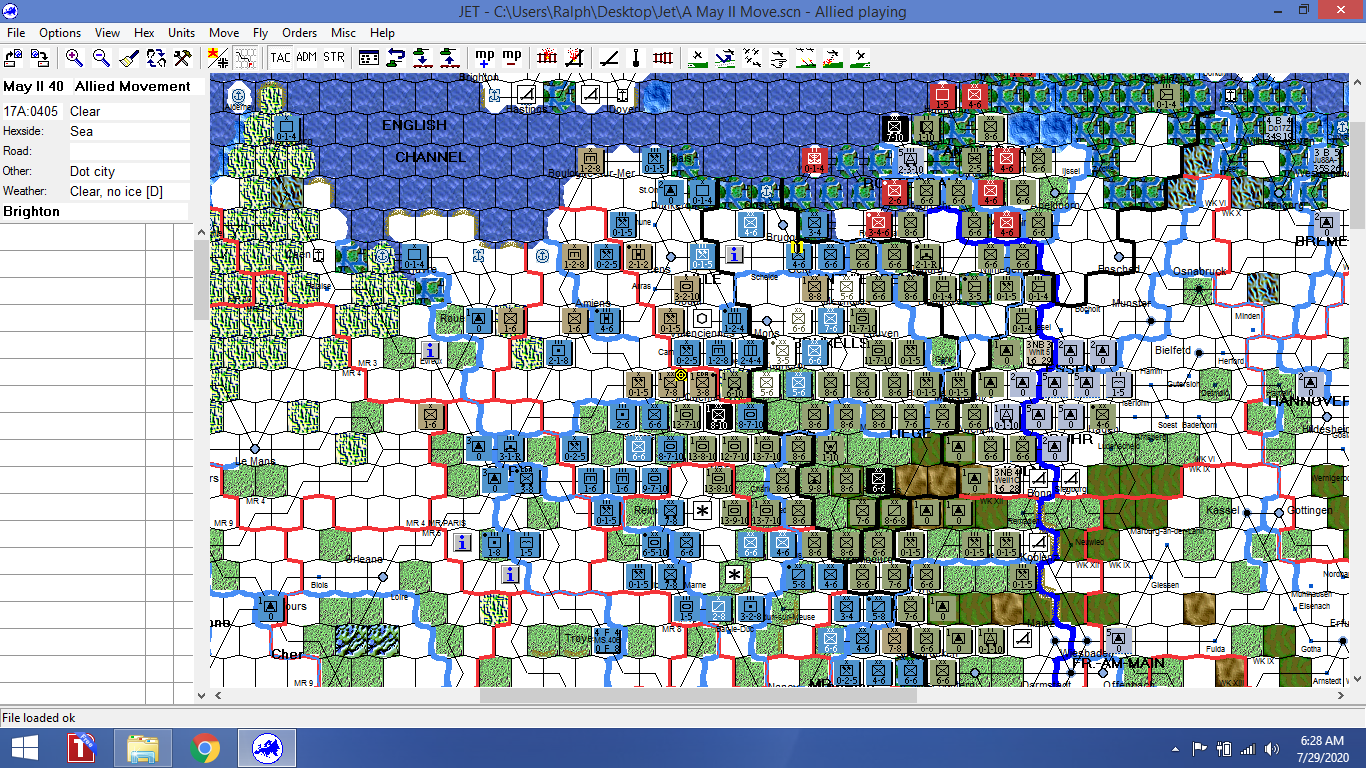
The Germans start off with an invasion turn, which includes all normal Europa turn phases except the exploitation phase.
The Allies do have a reaction phase. However, this is scripted because most northern French units and those of the BEF must enter Belgium to occupy the Dyle River Line, setting up the historical “Sickle Cut”.
While Dutch and Belgian units can move during this Allied reaction phase, they cannot enter enemy zones of control.
With the Allies sucked into Belgium, the Germans start the regular May I turn.During the Allied player May I turn, no unit in an enemy ZOC (Zone of Control) can move, and all British or French units have their movement factors halved.
The Allies are further hampered by the inability of their combat / motorized units to attack a full-strength or move using full movement during their exploitation phase until the beginning of the June I turn. This reflects a lack of mechanized doctrine.
To make things even worse, during the May I turn any French non-mech/motorized unit has to retreat two hexes rather than one if it has fought an attacking German force with at least one panzer division.
One other note about the graphics. As I mentioned, JET is a real marvel. However, it cannot do several things within the rules as written Europa framework. The result is that you have to tweak things, and the file you forward may have a heading (found in the upper left hand corner of the screen) that isn’t quite accurate. An example: You cannot fly CAP (Combat Air Patrol) during the Initial Phase. You have to cheat, and “fool” the machine by forwarding to your Movement Phase, where it is allowed. So, on the files shown, the heading on the screen may show “German Movement Phase”, when in fact the file really reflects the Allied Initial Phase. Confused….good…..misery needs company…..and the weight of Tim’s advance has had me in a daze since early May.
Allied Setup
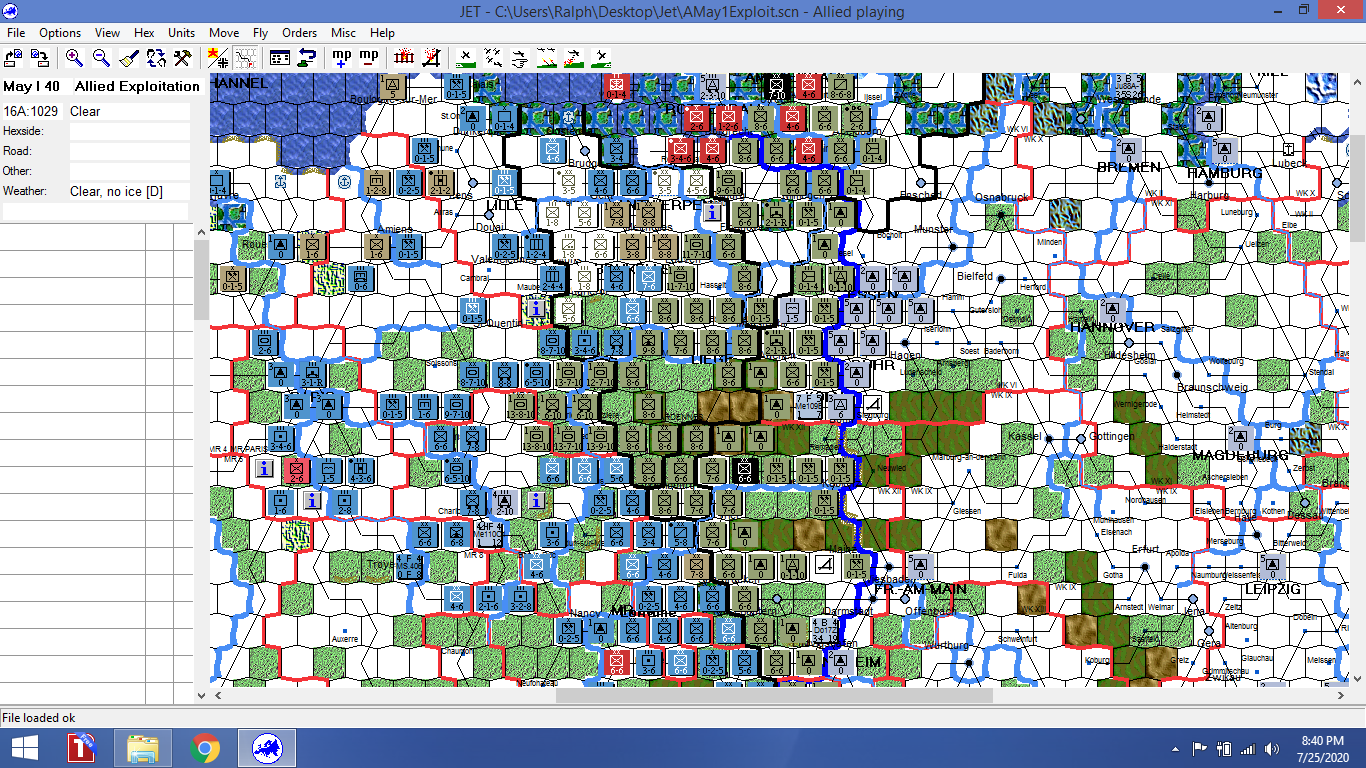
Allied Exploit – Move To The Dyle Line
You can see the German penetration through the Ardennes. Now, the Allies must avoid being enveloped. Will post up later with more carnage….after I do a better job of figuring out the screen shot sequence.
The good news is that this isn’t another relationship situation. The bad news is that it looks like the Tanks! franchise has been discontinued. No posts in quite a while and no merchandise in the store.
While I use the less expensive Zvezda models, I did enjoy checking out the site for scenarios and information. I guess I will go over to Flames of War for news updates.
Meanwhile, I continue to build up my late war Germans in anticipation of creating some urban combat scenarios. Here’s the latest additions. One more traunch of kits to finish up for a representative set of both German and Soviet AFVs.