Shredding

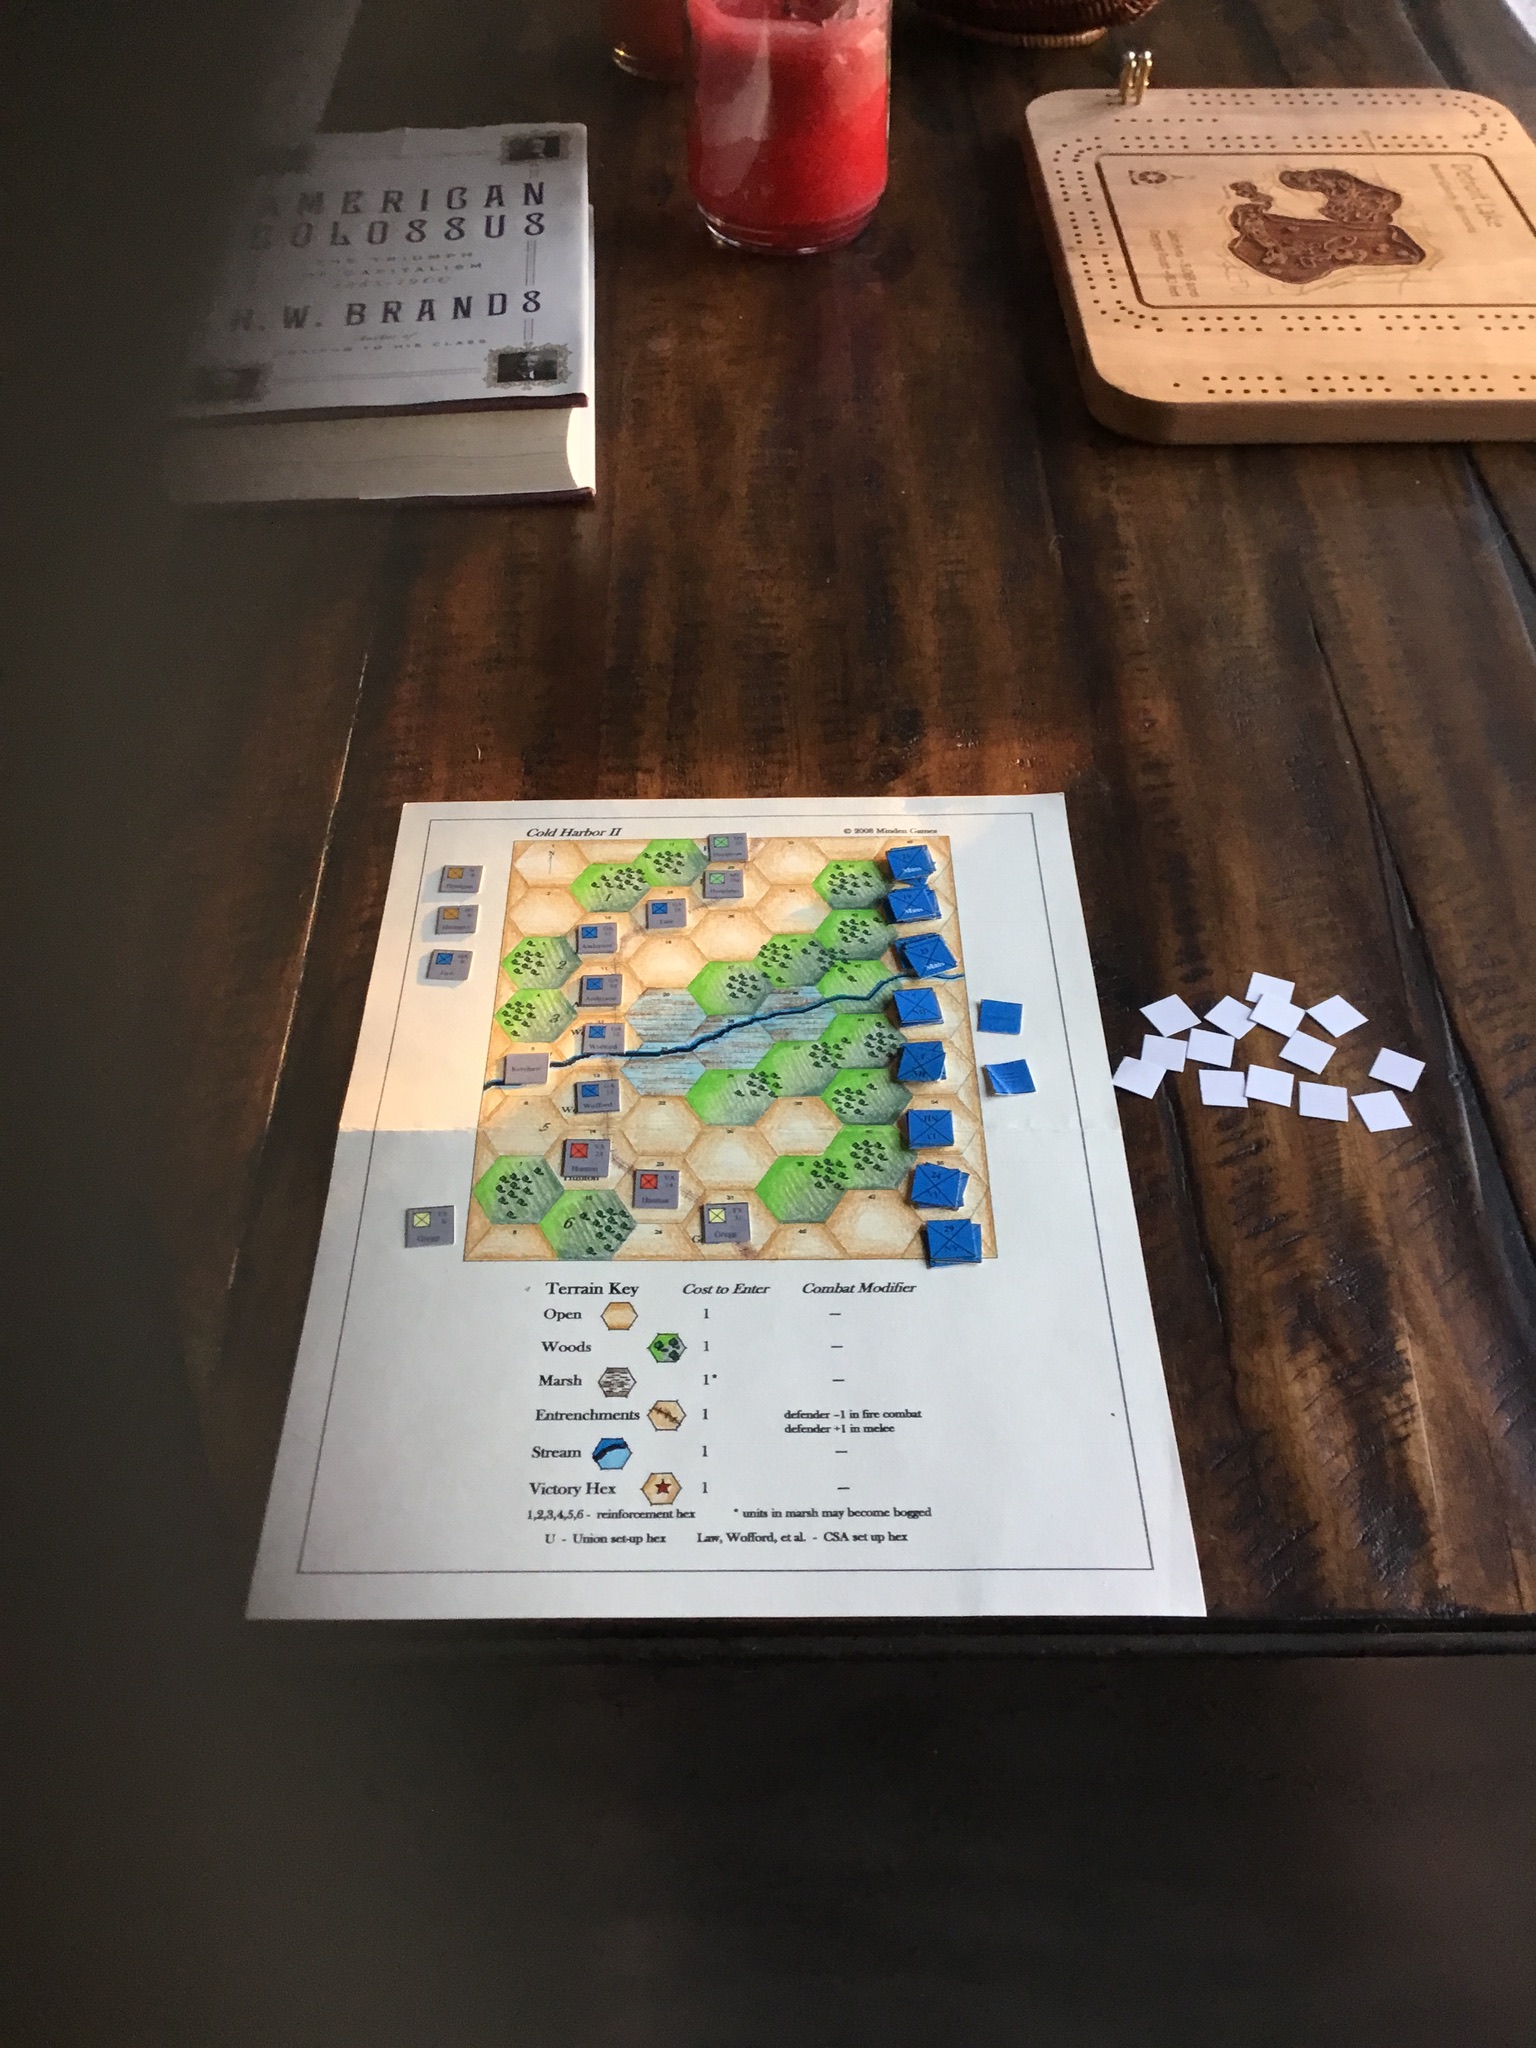
Felt rather bloody minded yesterday, so I set up Cold Harbor II. This is the folio update of a game originally published in Panzerschrek magazine.

Just like the real battle, the Union attack has little chance of success. The game mechanics are simple, but simulate the entrenched Confederates’ devastating cannon and rifle fire. Each turn, the attackers are subjected to separate cannon and rifle attacks before they even have a chance to move. There are no step losses. Units are straight eliminated. Yikes! Movement rates are slow, and can be slowed even more by random events.

To win, the Union troops have to capture just one of the designated entrenchment hexes. The problem is getting there, and if they get lucky, holding it during an (almost) inevitable counterattack.

The big variable in the game is the Confederate artillery. There are a number of “dummy” cannon counters. The real and dummy counters are pooled face down, and then randomly selected and one each is placed in an entrenchment hex. If, for some reason, one section of the line has a few dummy counters, then the Union has a chance. If not……..My try didn’t even make it to the entrenchment.

Here’s a photo of the map and initial setup. Rhonda did a great job of coloring the black and white map that came with the game.

Ready To Pick And Place Artillery Counters

Will I play this again in the near future? No. Sometime?  Probably when I get in that bloody minded mood again.

Swordfish at Taranto

Back in Sunfish Capital of The World. The 1942 game is on hold for the next week or so.

Set up and played Swordfish at Taranto. This is another of Gary Grabner’s solitaire designs published by Minden Games.

The game mechanics are straightforward and, as with most/all solitaire games, involves significant wristage. The player commands the 21 Swordfish torpedo bombers that took part in the mission. Playing time is 30-45 minutes, with much of it allocated to the preliminary Mission Planning and Harbor Readiness steps.

In the Planning step, the player uses a pre-printed log to assign which of the two attack waves each plane is in, its payload (bomb/flare or torpedo), its approach towards the ships anchored at Taranto, and target (anchorage, shore facilities) to be attacked. This log has each pilot and plane’s identification number already filled in.

Next, the player rolls to determine the harbor’s alert, anti-torpedo net and barrage balloon status. These can create DRMs during the Approach step.

Each of the two attack waves follows a series of steps, with each aircraft rolling a six sided die for outcomes.

The Take Off and Outward Flight step determines if any of the aircraft suffers mechanical or navigation issues, which may abort their mission or cause problems later.

Flares are deployed in the next step. The failure to deploy flares effects attack results.

The next phase is the Approach step, followed by Target Acquisition and, finally, Attack step. A series of tables determines any damage to each aircraft, which ship it attacks, and results of the attack.

The Homeward Flight and Landing step determines which of the surviving aircraft land safely. Damage incurred during take off, approach or attack can effect this outcome.

Victory points are awarded for minor damage, major damage or sinking a capital ship, as well as damage to smaller craft and land installations.

Despite the laundry list of actions required for each aircraft, the game plays quickly. The charts are embedded in the rules (as is the Log), but are not spread out and organized sequentially by phase. You can literally work through the rules/charts while playing.

The map is small, with rudimentary graphics. I would recommend using a copier to increase its size to allow more room to place individual aircraft counters.

First Wave Approaches.  Aircraft/Mission Roster in Background.


I lost two planes during the attack, and one on landing. The two waves sank three battleships and inflicted other damage. This resulted in a win exceeding the historical result. I was lucky, just like the actual attack force. I decided to quit winners.

Swordfish is a fun little game, worth a play or two when time and space is tight.


1942 – Opening Moves

Decided to go with the historical Japanese invasion plans as outlined in Christopher Shore’s Bloody Shambles.  His account of the air campaign is one of the most harrowing tales of military history I’ve read.

The Japanese landed on the west coast of Malaysia and the northern Philippines.  Each landing area was outside of the (Turn 0) reduced Allied air umbrella.

Both Japanese beachhead assaults resulted in D6 roles of six, with the defeated Allied forces captured (with accompanying victory points).  Each assault was supported by naval aviation assets.

In the following first phase of Turn 1, the Allies counterattacked.  The American attack disrupted one of the Japanese beachheads, while the Japanese in Malaysia were forced to retreat.


1942 – Setup

1942 is a simulation of the opening months of WW2 in the Pacific.  Published in 1978, it is one of GDW’s Series 120 games ,all of which were designed to be finished in two hours.  I’ve played a couple of the tactical games, but have always been intrigued by the three strategic games (1940, 1941 and 1942) in the series.  For me, 1942 is a more interesting topic than the already over-published Fall of France and Barbarossa campaigns.  I picked up a used folio version on EBay.

As you can imagine, it is a highly abstracted game.

Land units have a single strength rating, and all can move five hexes per turn.

There are no naval counters or combat.  Land units simply move across sea hexes.  A designated number of units can move (NMPs) by sea each turn.  Additional NMPs are expended for amphibious landings, and to keep an invasion beach open as a source of supply.  Some Japanese units have inherent naval movement capabilities.

Land based air units have an “umbrella” extending four hexes from base.  Air units either attack units moving by sea, or assist in land combats within their “umbrella”.  Air units may displace eight hexes and still maintain their “umbrella”. Japanese naval air units move by sea, but must be reconstituted (taken off board) for two turns after use.

Cities provide supply points to support units.  Ground units out of supply cannot attack, and air units cannot function.  Once a city is captured, it no longer provides supply to either side.

My initial impression is…… this is going to be really good, or really marginal.

Small Package! Initial Setup. Green – US, Blue – GB, Light Gray – Dutch.


Red Star/White Eagle – Tim’s Take

Tim forward these comments.  I give him full marks for having the psychological health to even remember the traumatic experience………….You can read his comments on our earlier game, here.

Man, what a weird game…You could probably tell, but I was mentally off balance after my atrocious dice rolling…I think what frustrated me is that I knew that you would be getting many, many replacements and reinforcements and that I needed to hit you hard when I had the chance, so the poor results from my opening attacks blew up my strategy.  Then, I didn’t fall back far enough…

I think the Poles after the opening attacks should fall back quite a ways, at least far enough where it takes a while for Russian replacements/reinforcements to get to the front.  That also helps to shorten the line and free up troops for counterattacks.  I wonder if it would be the Poles’ while to knock out the Lithuanians during the period when they can’t attack in the North.  I’m not sure, but it would be good to be actually doing something in the North….

Red Star/White Eagle – Holiday Weekend Edition

Tim came over for part of the Fourth of July weekend . Our game of choice was not really in the spirit of the holiday.   While we have played Red Star/White Eagles Eagle before, this weekend was an entirely new experience . Once again, Tim took the Poles.

 Here’s a summary of the important rules/characteristics of the game.

  •  Bloody Combat Results Table (more on this later).
  • Extended Movement After Combat (both advance and retreat).
  • Strong Zones of Control for many Polish units (these can limit advances after combat and attrit defeated units retreating through the ZOC).
  • Soviet Fronts cannot cooperate.
  • Lack of traditional strong defensive positions (only forest and river lines that have exploitable gaps).River defensive positions lose their modifier if one attacking unit is not attacking across the river.
  • Fronts separated by Pripet Marshes
  • High reinforcement and replacements, especially for the Soviets.
  • Four turns per month.
  • Victory points awarded for capture of specific cities, only.

 Tim arrived Friday afternoon having fought early holiday traffic and drivers of marginal capabilities . After sucking down three Henrys (each….I had to show solidarity), we set up and played three turns .

Play resumed the next morning. Right after we sat down Tim muttered , “You are going to hate me.” The initial set up was all wrong . Some might say alcohol had been involved , but the real culprit was the horrifically flawed set up diagram . Yes, it’s covered in the errata………

***Important Disclaimer***  I have absolutely no idea why all the photographs are canted.  I am unaware of any body/head/eye bias that might have caused this.  Also, the level of drinking was reasonable.  May need tests.

The Set Up Diagram. Note Handwritten Annotations For Errata…..They Didn’t Help.
Initial Setup Mk II. I Think We Got It Right This Time

After we reset, things went from bad to worse for Tim. His southern front offensive staggered due to a series of D6 rolls of one. In this game a D6 role of one is not simply an exchange based on the defenders strength, it is an exchange where the attacker loses one half of its attacking force. At odds of 5:1 to 8:1 this is a staggering loss . In the past we assumed that the CRT was the same as that for Europa – after all the game’s mechanics are very similar to that system.  The result was high levels of anxiety when rolling for an attack.

Tim’s Nightmare

Tim’s rolls were so bad I gave him three Mulligans . While this might seem overly generous, I realized that this results table could cut both ways .

Despite this bad luck the Poles took Kiev . 

Poles Take Kiev.

Early in the game almost all of the action occurs in the south . Both players are limited in their options in the north due to a mandated Red Army stand down . 

The other defining aspect of the campaign game is the arrival in the south of the Konarmiya Cavalry Army on the May IV turn. This is a powerful force made even more dangerous due to a charge bonus which increases the value of its cavalry’s by fifty percent .  A combination of the early stand down and appearance of the Konarmiya puts the Soviet player in the position to launch very strong offensives on both fronts beginning with the June I turn.

Anticipating this, the Poles began a series delay/defend actions covering the withdrawal of both fronts to more favorable defensive positions. He skillfully took advantage of the ZOC control of of withdrawals, using some units for the delay/defense.

Favorable is a subjective term in this game as there is very little rough or mountainous terrain on either side of the Pripet marshes . The river lines while affording some defensive bonuses have significant gaps which can be flanked . 

The Poles were subjected to a number of aggressive attacks, with the Soviets focused on flanking Polish units. The Soviet player can afford to be aggressive due to a very high rate of both reinforcements and replacements. And, yes, I had use those Mulligans.

We called it quits after the July II turn. The Poles’ only hope was to hold on for another ten turns, when the Konarmiya must withdraw. Any destroyed Konarmiya units have to be replaced by other units, which could significantly attrit the Soviet forces. At that point, the Poles have only one turn to advance and grab as many cities as possible.

July II. End Game

The terms Tim and used most often when playing were “weird” and “crazy”.  The CRT is a little different, the die rolling was crazy, but it was an interesting game.


Little Bighorn: End Game

Turn 7 saw Terry/Gibbons’ continued success in the south and a lack of “Custer’s Luck” in the north.

Terry/Gibbons cleared all  hostiles south of the Little Bighorn. But, Custer’s force was attacked and mauled by White Bear.   Despite this loss, the Army now has 19 VPs,  the the hostiles have scattered to the fringes of the map.

White Bear Attacks Custer’s Detached Battalion
Situation At The End Of Turn 7

I probably screwed up the rules (shocking!) when it came to the requirement that hostiles retreat after combat (disregarding the 8-12 roles that called for them to remain stationary).  Probably cost the hostiles some VPs, but it didn’t intefere with my enjoyment of the game.

Going to pack this one up to make way for 1942.  But, this isn’t because Custer’s Luck is a bad game.  It’s fun;  a good solo romp that has a quick set-up time, easy rules, and, yes, randomness.

You get a glimpse into the problems faced by the Army during these campaigns.  “If only they’d stay still….we could get ’em.”

I’ll play it again.

Tim’s in this weekend for another go at Red Star/White Eagle.


Little Bighorn: Still Slugging

Turn 6:

Custer attacks both Fast Bear and White Bull, causing casualties and forcing White Bull to retreat.  Which may not be a bad thing.

Terry/Gibbon command keep grinding down their opponents, also killing Lame Deer.

Each command was able to find, maintain contact, use envelopment (in game terms “prong attack”) to attack, and inflict casualties.  Doctrine in action (?).

US now has a significant lead in VPs at 19-3.

Here’s the situation at end of turn.


Little Bighorn: Slug Fest or Victims of Randomness?

The system’s randomness has created some interesting situations,  with plenty of give-and-take.  It really is fun, with the “Hostiles” bouncing all over the map.

In Turn 4, Sitting Bull’s weak contingent attacks Terry/Gibbon’s combined arms force despite overwhelming odds.

During Turn 5, Terry/Gibbon maintains contact with Sitting Bull, while Custer envelops Little Bear’s force.  Sitting Bull’s force is  destroyed, and Little Bear takes casualties.

Later in the turn, Custer is attacked by Sioux drawn like moths to the flame of randomness.  One of Custer’s battalions is destroyed.

At this point, who knows what the hell will happen.  At the end of Turn 5, Army has 9 VPs, Hostiles 3.


Tanks! Book To Get

Borrowed Steven Zaloga’s “Armored Champion” book from Tim.  Subtitled “The Top Tanks of World War II”, it is a fantastic overview of  tanks development from 1919 to 1945.

While the author’s selection of “Top Tank” for specific eras/years at first seems  gimmicky, it is actually an interesting exercise, as he takes both Commander’s and Tank Crew’s perspective.

Zaloga’s criteria focuses on the “Holy Trinity” of tank design; armor, firepower and mobility.

Chapter 1 explores “What Makes a Great Tank.”  In addition to the “Trinity”, Zaloga also addresses communications, crew layout/tasks, durability, crew capabilities and cost.  These criteria are used throughout the book.

Later chapters examine pre-war developments, and a by-year analysis of tank development and combat, with selections made at the end of each chapter.

Easily appreciated charts help illustrate his criteria and support his conclusions.  The photographs are of excellent quality.

Indispensable!