Category Archives: Sessions

Learning Curve Continues

Finished up ASLSK’s Scenario S2, War of the Rats.

I thought it would be an easy mopping up after the early punishments meted out by the Germans.  But, the Soviets were surprisingly resilient.  It all came down to a climatic melee in the last German turn, in the last hex, of the last building.

Given the weapon mix (demolition charges and flamethrowers), unit types (conscripts and elite) and urban terrain, the scenario is a great introduction/review of the system’s first infantry-oriented iteration.  As I’ve posted  before, ordnance and especially armored fighting vehicles slow things down.

Well, why not another play?  I’m curious if my “overload tactics” will work again.  And, if so, can I finish off the Soviets quickly?  As a teaching colleague used to say “Repetition is the key to knowledge.”  Then, perhaps, something with ordnance…..

Bits And Pieces

Continuing to fiddle with the Balkan/Central Europe 1938 scenario.

Latest bit of information is a Wikipedia article on the Yugoslavian army, particularly the interwar section.  I know…thin stuff, but there isn’t a whole lot of pre-April War information out there.

Yugoslavia had sixteen (16) infantry divisions, one (1) alpine division, as well as two (2) cavalry divisions in 1935. Mobilization would create another eight (8) infantry, one (1) alpine and one (1) cavalry division within 30 days.

Well, it’s something to work with.

The  mobilization parameters need to be refined, especially for the less-than-reliable Croat units.  My instinct is to stay with random die roles for the Croats, and, since Europa uses two-week turns, having those mobilizing units attaining cadre status at the end of Turn 1, and divisional status at the end of Turn 2 if they do not move or are involved in combat.

Why not?

Vaporized

Over to Tim’s earlier this week for Up Front.

We’d played it once before a long time ago.  Was surprised, but happy,  when he suggested this for my July visit; especially since I had played it recently.

We set up the first scenario.  Since it does use all of the infantry rules it was perfect for our levels of (in) aptitude.

Since we weren’t using the Flanking Fire or Melee rules, the game became a lengthy positional gunfight.  The only incentive for moving forward was to increase each group’s firepower.

It took over two and one-half decks (scenario ends after the card deck has been played three times) for Tim to break my Americans with fifty percent casualties.

Emboldened by our “success” (which I define as an enjoyable experience without the mind aching turmoil that accompanies, let’s say, Pursuit Of Glory), we set up the same scenario with the  French fighting Italians somewhere in The Alps.  Both these crews have some real limitations when it comes to card draw and discard.  However, I didn’t realize my Italians also have some real weapon deficiencies.  They have to get to Relative Range 2 before their bolt-action rifles have any effect.

It was a short and violent.  I dutifully advanced, he fired, and my two groups were vaporized.  It took only three “hands” and the Italians (who will break at 40 percent casualties) were done.  Here’s a bad pic of the battlefield after it was over.  Notice the Italian casualties (cards) at the bottom left of the photo.

The cards with figures were those that panicked.  The others were KIA.

Regardless, it was a lot of fun and should be more fun using the advanced infantry rules.  Despite my focus on ASLSK, I think Up Front will be on the table quite a few times in the upcoming months.

Learning Curve

Continuing to work on my ASLSK skills with a reset on Scenario S2, this time using my own German dispositions, with a rough approximation of the Soviet dispositions used in the Basic Training magazine’s replay discussed in an earlier post.

I loaded up the west side of the board with German units.  It seemed to work.  The Soviet Conscript units melted away due to some really bad morale die rolls.  Aggressive German advances kept the broken units under Desperation Morale with the very tough -4 modifier to any rally dice rolls.    Here’s an impaired pic taken at the end of Turn 2.

In theory, the DM units have little or no chance to rally and should be destroyed, or at least suffer Casualty Reduction, by German Prep Fires at the beginning of Turn 3.  But, this is ASLSK and anything can happen.

Slow Going

Taking my time with the  1938 Balkans/Central Europe scenario.  I’m using both regional names as they overlap – just ask Google.

Decided to start things off  with a Bulgarian invasion of Romania, with Hungary and Yugoslavia content to wait and watch.

While Bulgaria can commit almost all their assets to the invasion, Romania has to keep several units on their borders with Hungary.  In this battle of “Ants” (where 4-4s and 3-4s are few and far between), a handful of units can make a big difference.

The Bulgarians have already seized both of their territorial objectives, but are bogged down in front of Bucharest.  On the other hand, the Romanians are hard-pressed to defend their capital, much less launch any kind of offensive to retake their occupied cities. Here’s a quick snap.  Bucharest lies below the blue Romanian air units.

Despite the low counter density, it’s just not an infantry and artillery fight.

Both countries do have limited air assets.  The Bulgarians have a mixed bombing unit (one tactical and two strategic bombing factors), while the Romanians have a fighter unit and two bombing (one tactical and one strategic bombing factor) units.  The Romanian fighters returned the first sorties by the Bulgarian bombers and destroyed it in a subsequent attack. The bomber units have supplemented Bucharest’s defense.

Each country has only one engineer unit, but each is active. The Bulgarian engineers constructed an airfield within range of Bucharest, while the Romanians have built a fort to buttress the capital’s defenses.

Armored battalions have also been involved in the combats around Bucharest.

This is a pretty vanilla scenario so far.  I need to spend some time working on the mechanics for triggering Yugoslavian and Hungarian involvement.

Another Hiatus Ends

As usual, lots of plans to game at the Sunfish Capital Of The World, but little accomplished.

Back home digging out from a prolonged absence, but I have had time to get ASLSK back on the small table (as well as my 1938 Europa Scenario on the large table).

Impetus is my receipt of the “Basic Training” publication from MMP.  Mark Pitcavage provides his usual excellent coverage over at Desperation Morale.

I’m working my way through the War Of The Rats scenario replay.  This replay provides an opportunity to review the rules as well as see how experts play the game.  I’ve never played face-to-face, so this type of replay is very welcome despite, as Mark points out, the number of pages devoted to it.  A bit of a slog, but worthwhile.

For extras, “Basic” comes with handy charts, and a counter sheet with German and Minor units, plus a few tanks and guns.

Still having my on-going conflicted thoughts about ASL/ASLSK.  I really like the system, but after ordnance, the increased level of complexity for tanks and the Pacific Theater of Operations (PTO-ASLSK #4) gives me The Willies.

Once Again

Back after another long hiatus involving travel and toil.

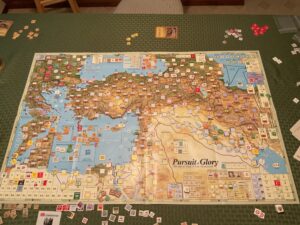
Drove over to Tim’s for another grind through Pursuit of Glory.  Grind?  Yes.  As posted before, the game is a brain twister, but very enjoyable.

As always, too much fun chatter and perhaps not enough serious gaming.  But, we were able to get into 1916, with Tim’s Allies having a decided advantage.

We agreed this session was different than the others.  Fewer casualties, with more activity in Sinai/Palestine/Syria than usual, with less in Persia and “The Back of Beyond”.

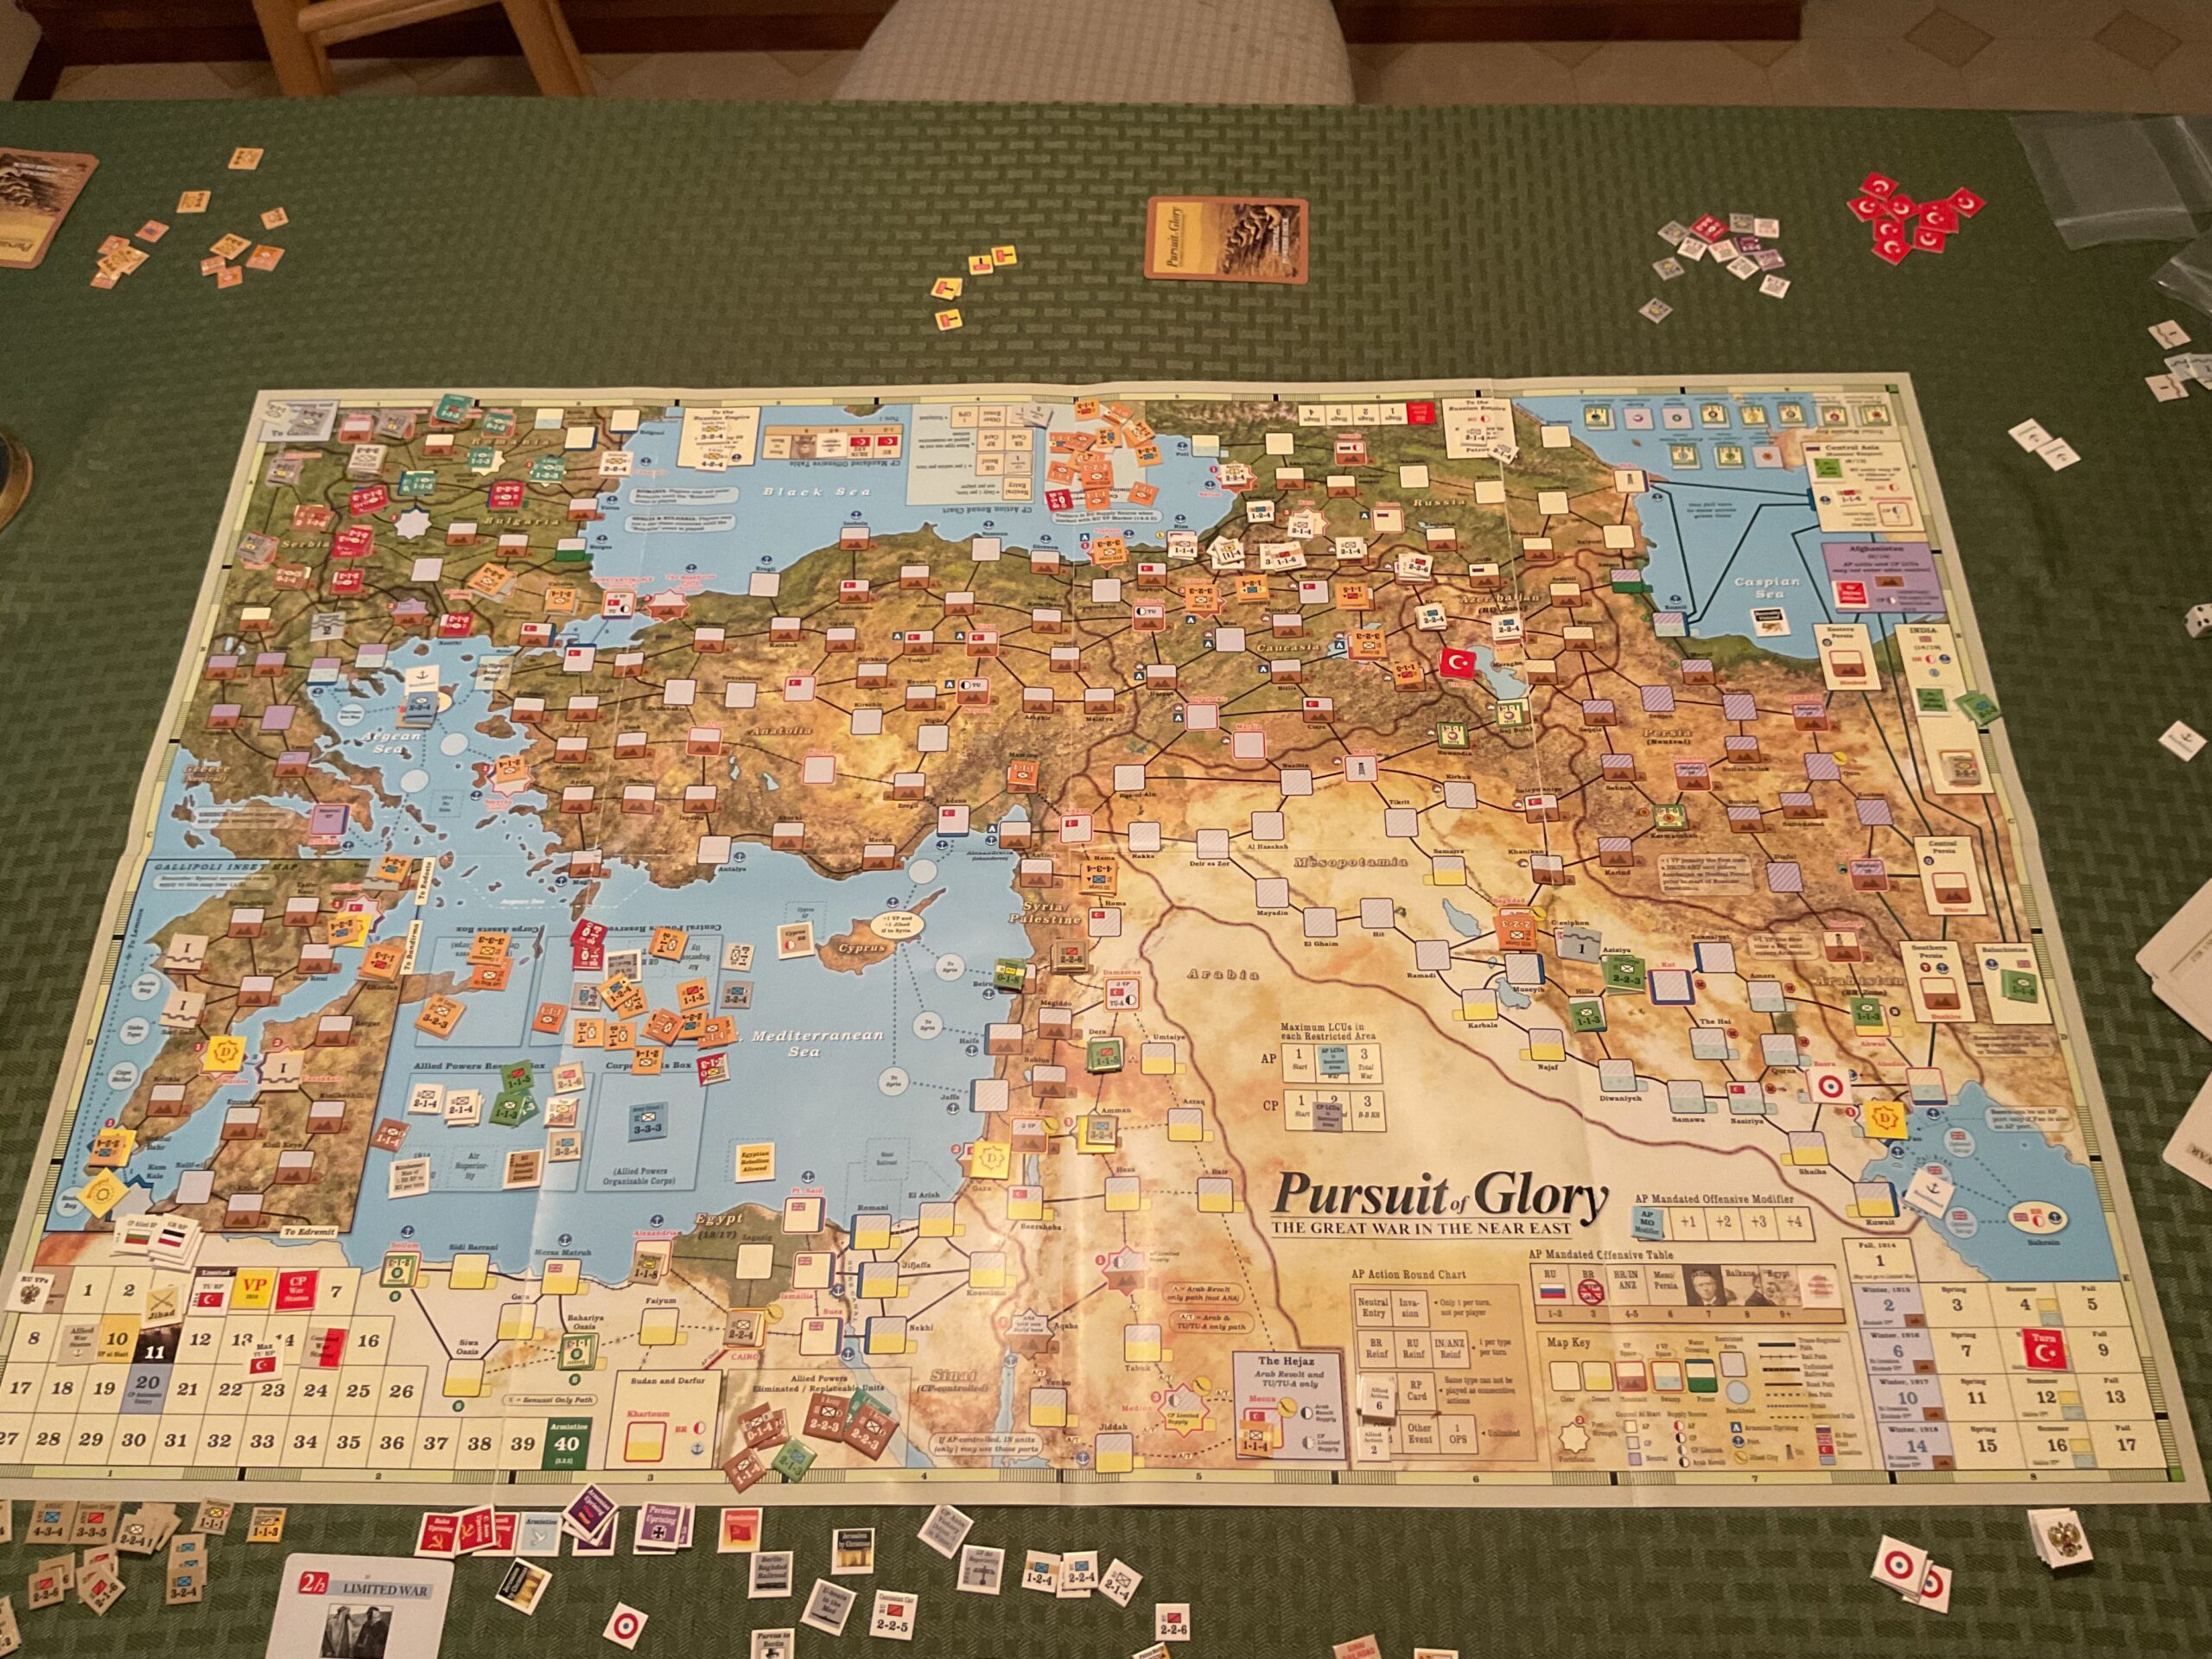
Here’s a breakdown of action by region.

Sinai/Palestine/Syria:  The Turks actually made it across the Suez Canal,  but were quickly forced back by British/ANZAC/Indian units.  Tim continued placing pressure on the Turks, taking Jerusalem and Damascus.  He correctly pointed out that I should have built a corps in Damascus.  Corps building is a real challenge for the Ottomans.  They do not receive corps as reinforcements, just divisions.  So, corps (which have increased fighting and staying power) must be assembled from two (for reduced corps) or three (full strength) divisions.  This means using operations points move them to a common location and/or to assemble them.

Mesopotamia:  The Allies steadily advanced from Basra towards Baghdad.  Here, I was able to assemble two corps, which stopped the Allies just short of the city.  The Central Powers had difficulties generating tribal resistance, which can be very effective  stopping/delaying an Allied advance.

Caucasus:  Not the usual bloodbath.  I attribute this to the few mandated offensives for either side, as well as no dreaded “Enver” offensives that can be devastating to the Turks, especially in the Winter when combat odds are very unfavorable for the attacker.

The Balkans:  This theater developed rather late in the game with first Romania (Allies) and then Bulgaria (Central Powers) entering the war.  The Serbs (Allies) were in an unfavorable position when the game ended.

Other:  Tim opened up the possibility of a landing in Gallipoli, which achieved its purpose of drawing valuable Ottoman units West, instead of East – where most of the action took place.  He did land at Salonika, but had not advanced by game’s end.

Tim did an excellent job of maintaining pressure on the Turks, forcing me to spend Operation Points on reacting as opposed to proactive uses such as corps building and strategic movement.  The latter is very important for the Ottomans, given the distances to be traveled and poor infrastructure.  Their “interior lines” are more of a handicap than advantage.

At game’s end, Tim had a decided advantage, with the Ottomans just five victory points from defeat.

Here’s a quick pic of the board at session’s end.


Set-Up!…..Play?

Here’s a pic of the set-up for Empire Reborn.

The blank counters are divisions that may or may not remain loyal to the government.  My thoughts are whatever units do not remain loyal will have another die roll to determine if their opposition is active or passive.

I also need to work through the readiness/mobilization process.  The current set-up has the Yugoslavians and Bulgarians already mobilized as divisions (except for aforementioned “blank” counters), the Romanians as cadres and Hungarians without divisional units, just brigades etc.    My instinct for my first play thru (and path of least resistance) is to allow everyone to mobilize as well as form divisional units.   Just focus on the operational aspects.

I’ll have time to ponder these weighty questions.  Another road trip looms…….

Structure…..However Flimsy

The hypothetical 1938 Balkan conflict (Empire Reborn) now has some parameters.  Maybe not the best, but at least some structure.

My latest efforts focused on victory conditions that, in turn, involved identifying the regions and ethnicities involved.

Balkan Front addresses the latter consideration with a  map outlining the area’s regions.

Unfortunately, I cannot find Map 14A (as well as all my War In The Desert counters – a collateral discovery while searching for maps).  But, I did find a scan of 14A which helped me work with my old Marita-Merker maps.

Decided to simplify matters by using control of a city or cities (shown below in parentheses) as objectives for each country.

Bulgaria’s  territorial objectives are  Northern Macedonia (Skopje) and Southern Dobruja (Varna and Pleven).  The Hungarian objectives are Transylvania (Cluj and Timpsora) and the Backa region (Novi Sad). Both Romania and Yugoslavia must  maintain their current borders.

Late in this process I recognized the maps reflect 1941 national boundaries.  In 1940’s  Treaty of Craiova, Romania’s ceded Southern Dobruja to Bulgaria.  The initial placement of each nation’s forces has to be adjusted accordingly.

The initial placement of units, like the order of battle (OB), is speculative and uses multiple less-than-reliable sources.  The composition and size of each country’s military changed significantly from 1938 to the opening of Barbarossa campaign in 1941 -where reliable OB information can be found.  “Educated Guess Work” is giving the OB process the benefit of the doubt.

Since the whole project is hypothetical and speculative, I decided to flesh out each country’s forces with some specialized units.  The inclusion of limited air, anti-aircraft, armor and engineer assets provides an opportunity to work with a wider variety of the Barbarossa  Unleashed rules. These rules will also be used in the Operation Groza game with Tim.

Additional scenario considerations now include guerilla warfare by disaffected minorities, the use of Balkan Front’s Yugoslavian mobilization guidelines in which certain regions – and the units based there – openly oppose Yugoslavia, and a variable game length  based on the Macedonia War (which helped inspire this entire twisted process) scenario published in Europa Magazine.

Need to get this moving so I can start pushing cardboard.

Hypothetical Trend Continues – Empire Reborn

I’ve dredged up another hypothetical scenario, this time using the Europa system and New  Europa components.

I first started thrashing with this Central European/Balkan scenario several years ago.  Here’s a link to the post explaining this recurring bout of madness.

As emphasized in my earlier post, Europa purists should disregard anything with the “Empire Reborn” tag.

Over the past week I’ve revisited old resources, found (after a hunk and peck household search) the appropriate Europa maps,  and downloaded additional information including limited orders of battle.

Given what I have, it’s safe to say this is not going to be a simulation.

Regardless, it will be fun to push counters for countries that are either victims and/or after-thought cannon fodder allies of the major WW2 powers.

“Red” is the working name for a Bulgaria-Hungary alliance, aided and abetted by Germany, Italy, Albania and the Croat minority in Yugoslavia.

The “Blue” alliance will be Yugoslavia and Romania, with assistance (in some form) from France, Greece, Turkey, Poland and Czechoslovakia.

Where the Soviet Union fits into all of this is a damn good question.

The time frame is early 1938, with the assumption(s) that Germany, France, and Poland focused on Czechoslovakia , with German and Italian resources tied up in Spain.  The Austrian Anschluss has occurred, but the incorporation of Austrian forces into the Wehrmacht is still in progress.

One (and there are many) aspect that needs immediate attention is the victory conditions.  Each alliance had specific territorial ambitions.  The problem is to translate these regions/areas from sources and identify them on Europa maps.  Like the rest of this project, “vague” is an operating principle.