Category Archives: Solitaire

Destruction of Force Z – Overview

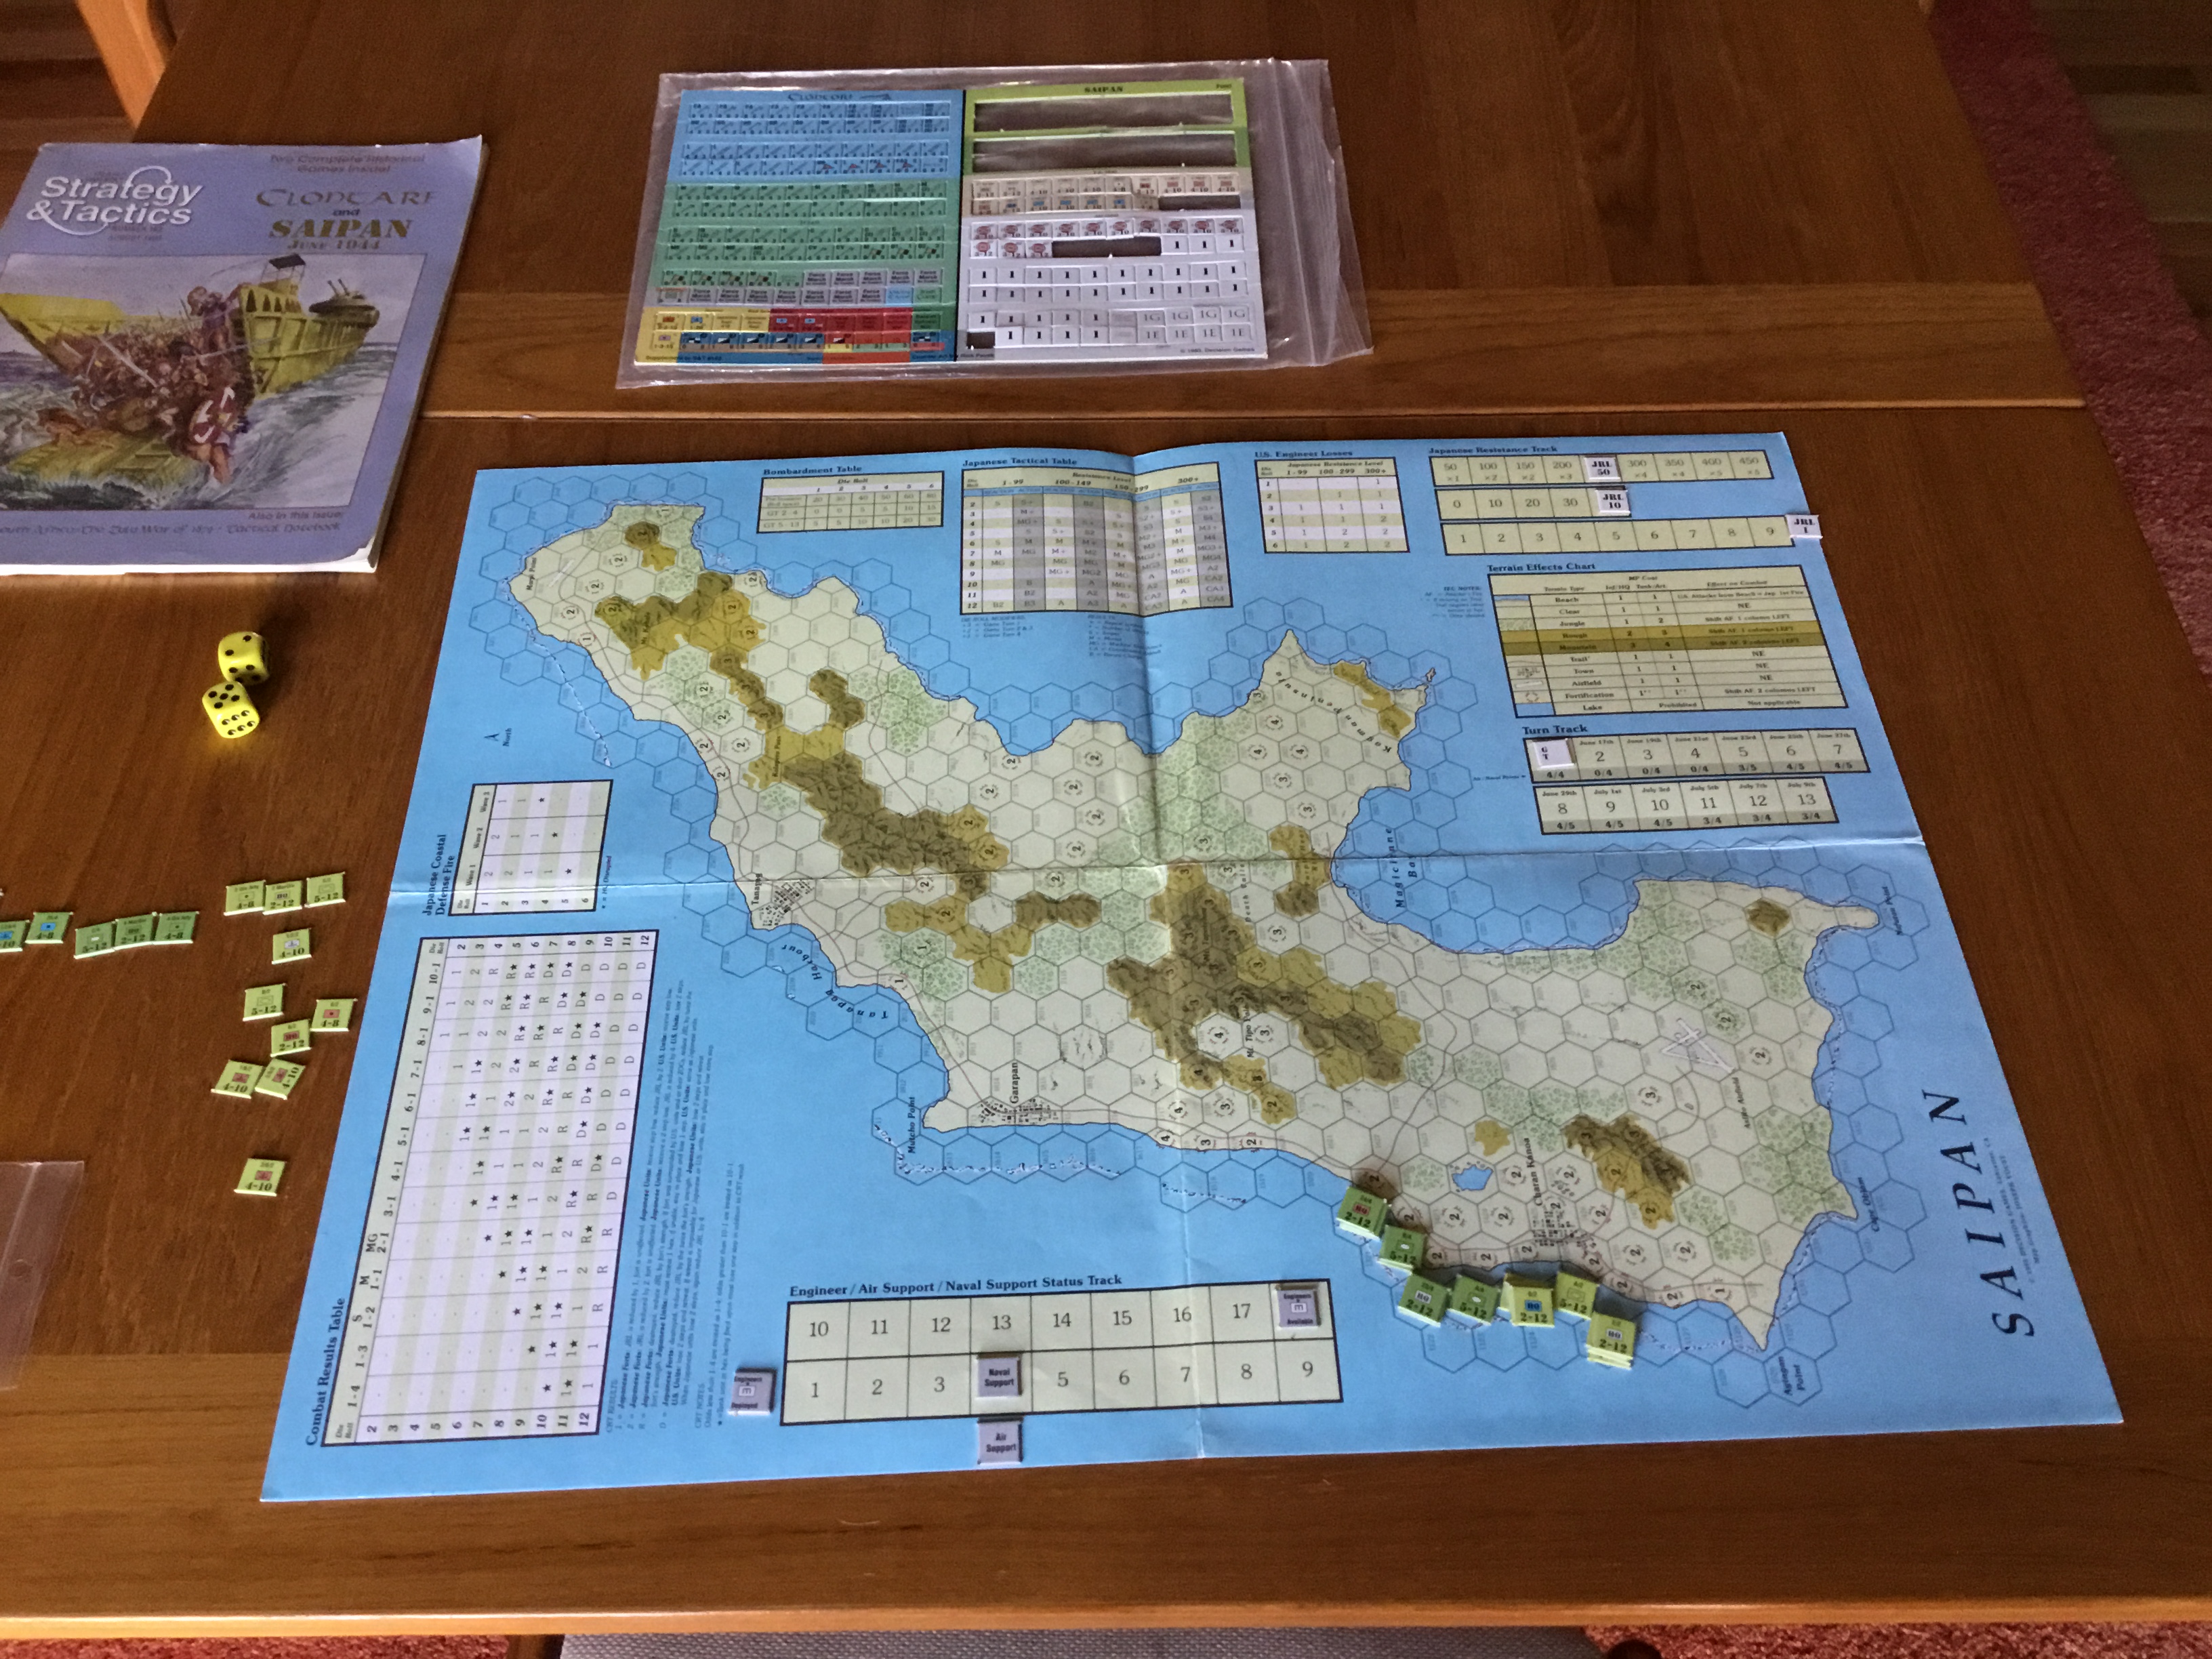
Downloaded this  awhile ago over at Wargame Vault, based on reviews at Boardgame Geek.  It’s a Minden Games solitaire offering  originally published in Panzerschreck Magazine #16.

As is the case with most solitaire games, there are  lots of charts and wristage.  I skimmed the rules and decided to just start playing.  The rules are laid out in turn phase sequence, so I just set up the IPad beside the game and went at it.

Each turn consists of up to eleven phases.  These are:

  1. Weather – Roll 1d6 for either clear or overcast conditions.  Overcast is a +1 modifier for Japanese Search.
  2. Radio – British player can break radio silence.  In doing so loses a -2 drm during Japanese Search.  But, gains possibility of Air Cover to help attrit attackers.
  3. British Ship Movement – Can move up to 4 squares (cannot move diagonally) three times a game, or one-three squares.  Damage reduces movement.  During movement British ships can be attacked by minefields and/or submarines if in same hex.
  4. Random Events – Dictates appearance of Japanese transports, cruiser or battleship units.  Can also effect movement of Japanese submarines, shore landings or allow “shadowing” which is a -1 drm for Japanese Search.
  5. Japanese Ship Movements – Ships on map roll 2d6 for random one to two square movement.
  6. Japanese Search – Rolls 1d6 (3 or less) to sight British ship(s).
  7. British Air Cover – If Radio silence is broken, presence of air cover over British ships determined by die roll.  If present, roll 3d6 for number of fighters.
  8. Japanese Bomber – Includes both level bombers and torpedo bombers.  Roll 1d6 for contact.  If contact make separate 1d6 roll for number of level and torpedo bombers.
  9. Combat Phase – Roll 1d6 for individual attacks by Air Cover, then 1d6 Anti-Aircraft fire to eliminate/abort/or effect aim of bombers.  Then roll 1d6 for success by individual level bombers and torpedo bombers.
  10. Surface Battle – Takes place when opposing force ships in same square.  Roll 2d6 for hits and then 2d6 for effect(s).
  11. Bombardment – British in same hex can shell Japanese landing sites, automatically gaining victory points.

There are 18 different situations where wristage and charts are involved,  in addition to  Air Cover attacks, Anti-Aircraft, and Bombing attacks handled on an individual aircraft basis.

Having Second Front air phase flashbacks and may need this to get through a session.

In A Rut

Opened up a box and it jumped right out at me!  “It” is an old S&T magaizine game, Saipan.

Why not?  It’s solitaire and is the first game I’ve ever played that has any of my old units in it (2/24 and HQ 24th Marines).

It’s another slog.  Wristage and more wristage; have to reduce 88 (yes 88!), Japanese fortifications, plus the chance of encountering Japanese troops every hex you move into (except destroyed fortifications).  Lots of rolling to do.  I can handle that, but what’s vexing is the step losses.  Yes, one has to use numbered chits to designate losses.  Ugh.

All that griping aside, the system seems viable, with NGF, Air support, Japanese coastal defenses, and reasonable command and control (called Lines Of Communication) rules for Division and Regimental HQs.  All in all, the game seems a reasonable representation of a meat grinder of a campaign.

I have Bloody Buna on the table and now this damn thing.  It is a rut!  Need to get an East Front game out (and not Stalingrad) next!

Mangled Turn 1, forgetting Japanese reactions to Marine movement.  But, it was an easy re-set.  Will try it again tonight.

Ready To Grind


Too Fun To Solo?

Really enjoying Supply Lines Of The American Revolution .

Bought it with some Christmas money after having read the excellent reviews and perusing the Hollandspiele website . That site is a  fun place with several intriguing titles .

It’s a real puzzler of the game and a departure from a card-driven or hex and counter game .

The  map is attractive with the counters more than serviceable.  I do like the wooden cubes.  The rules are well organized, but what really makes things work is the online example of play posted by the designer to the game’s Boardgamegeek page.   Invaluable.

However, by the time I was well into the first turn I started getting uncomfortable . A great game, but it’s solo playability, for me, is marginal . It’s a cat and mouse affair begging for two players, not one trying to outguess himself .

I’ll set it up again and try a scenario in which the British focus on a specific course of action ie. attack down the Hudson Valley…..just like Gentleman Johnny B.   We’ll see how that goes .


What Was I Thinking?

Fortify Montreal……Fortify Montreal.  The object of the game is to prevent Montreal from being captured…………

If you ever play this game, please, please, please fortify Montreal.  Here’s why…….

The British have the strategic advantage, with the ability to advance on five fronts simultaneously . However, the French have the operational advantage in that they can attack both during their phase and the British Advance phase . Tactically, it’s a push. Both sides have special tactical cards which influence not only tactical advantage but also the total number of battalions used in the battle.

Tactical advantage is critical . The side with this advantage toss their “bucket of dice” (one die per battalion in the fight) first with any enemy casualties (battalions) removed immediately . In many cases the side without tactical advantage is simply wiped out before being able to inflict casualties of their own. While this system has its shortcomings, it is appropriate in a game of this scope and size .

During my first real play thru the British were hampered by a lack of leaders, advancing on two fronts and making it easy for the French to use their action points not only to stop any advances, but also construct Forts and Trading Posts .

Trading Posts provide the French with valuable replacements each turn. While Forts prevent the use of light troops for tactical advantage and offer an advantage themselves.
Once there were British leaders for each of their five axes of advance towards Montréal, the French were hard-pressed.

Just as the British were ready to enter Montréal , and end the game, I drew the Montcalm Leader Card.

Montcalm has extraordinary capabilities , and almost turned the tide for the French. But the simultaneous advance of the British armies , combined with some less than favorable die rolls, resulted in the eventual removal of Montcalm and two other French leaders. This re-opened the door to Montréal. And, of course I made it just that much easier by not placing a fort there.

Game Play was relatively smooth . It took a while to figure out which cards to trash and which to discard, rather than place back in the recycle deck . It also took two turns to figure out that the recycle deck is shuffled into the active deck at the end of each turn , or in what is called the Housekeeping Phase.

This is fine addition to the States of Siege series . While the playing time is extended compared to other offering, this trade off is well worth it in terms of depth of play .

Getting It

Worked my way through several turns of Empires In America.  Getting the hang of it.

Once again, the only way to learn the rules is to play the rules.  Only way to see the method in the early-play-madness.

The French player is stretched thin, especially if the British can conjure up leaders for each theater and apply constant pressure from each of the tracks leading to Montreal.

Going to re-set and have another go.  This time I’ll get the play of fortresses and auxiliary troops right.

Back At It

Down south coaching baseball for the past month.  No chance to wargame.

Starting off new round of games with Empires in America by Victory Point Games.  Solo game for the American Revolution.

It’s very highly rated and considered more involved than the typical States of Siege game.  Have it set up and am grinding through the rules.

Rules……once again they’re a problem.  That old learning style condition, again.  Still, I find placing the  optional rules as sidebars and only limited examples of play to be problematic.

My other early complaint is that I had hoped to get another of those fun “jigsaw” maps.  No, a two piece card stock map.  Pretty, but hard to keep aligned.

Small complaints.  Nice components.  Here’s a picture of the set-up.


More Than It Seems/Change Up

Wolves 0ver, World Series over….Summer is over and Fall near done.

Finished up first “real game” of Chosin Few.  Made it through first operational order, but lost after only six cards during second operational order.

Sucked in and overwhelmed by hordes which aren’t pulled after an Operational Order is completed.  Another reason why first game was so easy

Really like this game.  A Puzzler that is far more than it seems to be to a Hex & Counter Gamer.

Cleaned off the table last night.  Set up Hof Gap and Thunder At Cassino.

Wrong First Impression?

Mine was, well, OK.  But, I’ve more than come to terms with The Chosin Few’s rules and appearance.

Really, really, really like the game system.  Situation fraught with peril all the time, especially with the shell-game of interdiction to stop ChiCom movement, or hoard for DRM on attacks.  Oh yes, you have to spend the chit before rolling…..took awhile to get that one right.

Well, the other thing I didn’t get right was ChiCom movement priorities.  This was a significant (in that bold and italics mood), error.

I was defaulting to white, as per rules.  Result was hordes of ChiComs stooging around South, far from the battle.  Figured it would get really bad during the Third (Breakout) Mission.  Hell, I made it easily through the first mission (despite not discarding cards!), and was hammering the Godless Red Hordes during the second (Retreat In Another Direction) mission.

Ahhhhhh… but for that buzzkill that is RAW.  Multiple routes out of a space, check the color of the arrows against US positions.  If they match, they will follow.  Default to white only occurs if there is no match.  Well, that changes everything……

Still really, really like this and it has given me some ideas about working on this thread.

Trying To Win

This post is more in the “notes to myself”category for the next time I pick up either Hapsburg Eclipse (HE) or Ottoman Sunset (OS).

  • Use actions to provide resources to other theaters.  Easier to do early in OS as there seems to be less pressure early.  You have to have those victories in other theaters for a chance.
  • Always keep the Hungarians happy.  The die roll for them much easier than Croats or Czechs. (HE only).
  • Husband your stop advance chits (Yilidrim (OS) and Radio Intercepts (HE) ) as long as you can.  This is especially true given the horrific effects of the -1 DRM for weakening of National Will.
  • Likewise with the Mackensen chits.  The higher of two roles should be saved for when disaster truly looms.  And disaster is always looming by the third deck.
  • Don’t close down the Polish front if it will cost you a loss in National Will.  Only try it when you have the luxury of spending the two actions.
  • Oh, yeah…..and roll either real high or real low whenever the occasion demands.


Hapsburg Eclipse

Have also able to get in a couple of games of Hapsburg Eclipse (HE), the “sister” game to Ottoman Sunset (OS).  Been trying to work up a stand-alone review, but these games are so similar physically and mechanically that I’ll just cover salient differences.  Must not be alone in this.  No reviews in BoardGameGeek, but plenty of comments.

The Austrian have to fight on the Carpathian, Romanian, Polish, Italian and Balkan fronts.   Three battles in Serbia are considered Out of Theatre and handled the same way as battles in Europe or the Near East, with defeats or victories effecting National Will.

The Hapsburg player receives three Radio Intercept tokens which can stop enemy advances.  German aide is more extensive in his game.  Besides providing staff DRMs, five Mackensen counters allow the player to take the higher of two dice rolls. Would you mess with him?

Another interesting aspect is  the Hapsburg player can literally “shut down” the Polish front by trading victories or actions to initiate the historical Russian “Great Retreat” from Poland.

The biggest difference is that Event cards have an additional “Trigger” section indicating which of three nationalities (Croat, Czech, Hungarian) must be checked (no pun) for loyalty.  On a roll lower than the loyalty rating, the nationality moves closer to revolt.  When a nationality is in revolt, there is a negative DRM for specified fronts.  If all three are in revolt at the same time…game over

I really like the addition of this aspect to the game.  It’s historically relevant and creates more a lot more tension.

Again, a fun and challenging game.  At some point I’ll link them up and try the campaign.  Here’s another trailer (trash) photo of the map.  This one is  a bad defeat.  I left too many Mackensen chits on the table, and those foreign defeats didn’t help either.