Monthly Archives: July 2015

Mission: Grenada (Pt 1)

Finally set up and played two turns. Used the alternative Cuban/Grenadian OB discussed in Seth Owen’s excellent review of the game. The link over at Boardgame Geek is:

http://www.boardgamegeek.com/thread/302464/mission-grenada-reviewed-and-revised.

He also posted up background information on the invasion. That link is:

http://www.boardgamegeek.com/thread/318194/grenadas-scrappy-little-army

Rather than try to improve on Seth’s fine work, I’ll simply comment on a few rules aspects that were interesting to me and then provide a general after-action report of the game’s introductory scenario which involves the first six hours of the invasion.

I’ve always been interested in this action, especially after listening to a Marine Captain describe how, as a very young Lieutenant, he landed armed with his personal weapon,  a 1911 Colt with a bad slide so capable of only one shot at a time.  Fortunately, the only resistance his platoon encountered was a couple of wild pigs, quickly subdued,  and used to supplement their MREs.

Rules Comments

This is the first time I have played a game that uses action points. Each unit counter has a designated number of action points to use for movement, combat or combat support during an Action Phase. Mechanized units have more action points than leg infantry. But, their action point costs are higher. One thing I missed in my early readings of the rules was that artillery/mortar units are considered mechanized, because of the number of action points printed on the counter. These points can be expended at any time during the owning player’s Action Phase. There are no set movement/combat sub-phases.   This gives each commander tactical flexibility, as units can typically perform two or more actions in a phase.

Another interesting aspect is the ability of units to make hasty or full attacks. The cost of a hasty attack is one-half that of a full attack. In many instances, this is the only way a unit can move and attack in the same Action Phase.

One aspect that is somewhat unusual is that supporting arms can only be used in the offense. A unit is on its own when attacked.

The map graphics could be much better. However, I do appreciate having many of the essential charts on the map. Unfortunately, the action point costs are only found in the rules.

If I was going to play the game again, at another time, I’d probably compare map and rules booklet for charts, and put together a “cut and paste” chart sheet to augment the map. This is nothing more than making copies of the appropriate charts, cutting them out, and using scotch tape to paste them on a blank sheet of paper, and copying that sheet. Crude, but it works.

After-Action Report

Turn 1 (Night)

US air assets attacked a mixed bag of units located on the high ground overlooking Salines Airfield as well as a motorized unit in close proximity to the Governor General. These night strikes were unsuccessful. Grenadian antiaircraft fire was ineffective.

The SEAL unit landed north of St Georges, and was able to locate and move the Governor General to a beach hex for extraction the following turn. However, before that could happen, the SEALs had to withstand a hasty attack by a motorized unit located in St. Georges. The result was a defender retreat, but the Grenadians lacked the action points to continue the assault.

Cuban/Grenadian units occupying the high ground north of the airfield edged south anticipating a US airdrop.

Turn 2 (Daylight)

The Rangers parachuted into Salines airfield later that morning. A daylight drop reduces the chance of scattering into the Caribbean. The drop was successful, and three Ranger companies, supported by a mortar platoon, took control of the airfield.

The drop was preceded by another series of airstrikes. However, this time antiaircraft fire was extremely effective, with five (!) of the US assets having their combat power halved. As a result, Grenadian units remained at full strength and ready to attack the invaders.

One Ranger company was attacked by Cuban/Grenadian units supported with mortars. At odds of 2-1, the attackers rolled high and forced the Ranger unit to retreat three hexes. The retreating Rangers were able to take advantage of their misfortune, and displaced back to a hex containing a group of students. The students are represented by four counters placed face down at designated hexes on the map. Two of the counters are dummies.

The US forces were well on their way to a decisive victory. At the end of two turns they had taken the airfield, and rescued the Governor General along with one group of students.

This was a lot of fun. I’ll reset the game, and play through several turns over the next couple of days.
East African Renaissance Campaign

Started working on my 15mm Turks last Friday.  Most of them are old Tabletop Miniatures.  These castings are deceiving.  At first glance, they are less than underwhelming, but they paint up really well.  Here’s a link   http://www.15mm.co.uk/collections/altuos-15mm-renaissance?page=3.

First started buying Tabletops when I lived in Iowa.  They had an outlet – with the molds – in an low density industrial complex just outside of Des Moines.  Used them for my Dark Ages Campaign.  There was a problem with relative scale, especially the European Renaissance figures.  Some seemed more like skinny 10mm than 15mm.  I still have some 12th century knights stashed in the shed.

I’m halfway through the 48  infantry figures.  I’ll finish up the mounted when I return home.  Just one step closer to the start of the East African Renaissance Campaign, now set for Thanksgiving.   More on that later.

I’ll try to set up Mission: Grenada, tomorrow.

War In The Aegean (Pt 2)

Played two turns over the weekend.  Unfortunately, the real action starts with the arrival of significant German reinforcements in Turn 3, and I’ve got to pick the game up because of my trip.

During the remaining impulses for Turn 1 and the four impulses of Turn 2, the Germans kept pounding British ground units, although their aircraft availability was horrible – I kept rolling 5s and 6s for flown aircraft.  The British infantry crept across Kos – only one hex movement per impulse, and their shipping huddled off-map to avoid the Luftwaffe.

Despite the slow pace so far, I like this game.  The impulse system, variable Luftwaffe availability and rolling for serviceable aircraft provide an uncertainty that is great for a solitaire game.  The RAF has some real challenges with their reduced combat strength when flying from off the map, and it will be interesting to see if the RN can intercept the German reinforcements.

I’m taking the game with me and hope to continue it over the next few weeks, if only to play out an invasion of Rhodes.  That should be interesting.


War In The Aegean (Pt 1.5)

Sidetracked by ESPN baseball, so only part way through the first impulse.

British had the high roll for initiative and established themselves on Leros and Kos, with no resistance by the Italians.  The RAF remained at their off-map bases.  British destroyers took station to the west of these islands in the hope of intercepting a German amphibious counterstroke.

The Luftwaffe opened the German part of the impulse by attacking the destroyer screen using all their JU-87 and JU-88 assets.  The results were only three hits spread among three destroyers.    And then Pittsburgh started their 10th inning rally…..

Another Army To Paint

Spent part of Sunday prepping 48 Ottomans for my East Africa Renaissance campaign game.  My plan is to paint them while I’m taking care of my Mother for the next few weeks.  I’ll still have some cavalry to paint when I return, as well as an Abyssinian force.

The campaign involves the Ottomans, Portuguese, Ethiopians (Abyssinians), Arab City States, Native Tribes, as well as Manchu Chinese.  The Manchus are  a quasi alternate history element, assuming that dynastic leadership encouraged, rather than forbid, further exploration.  I’ll rely on the Irregular Wars rules rather than DBR or DBA.  My initial one-off games using IW have gone fairly well.  But, more on that later….

War In The Aegean (Pt 1)

Finally set up this Against The Odds magazine game from December 2005(!).  The magazine includes an excellent article on the genesis of this historical campaign, as well as the actual fighting.  The mini-game Assault on Narvik is also included in this issue.  I mention this only because the rules for Narvik “wrap around” the Aegean rules. I often found myself referring to the Narvik rules, instead of those for War In The Aegean.  Disorienting.

This game features joint British and German operations (and technically combined operations since there is a limited US air presence) over a three month period in 1943.  The nature of the campaign requires rules for air, naval and ground forces, along with special rules to reflect the presence of Italian forces.  I’ve played Europa for a number of years, and Perry Moore’s rules are reminiscent of that operational system.  In fact, I’ve toyed with the idea of playing the game (and still might) using Europa rules.  In fact, a scenario was published for the Aegean.  I never played it because the scale just didn’t seem right, and Europa’s naval rules are, well, inadequate.

Moore uses a variable impulse system.  A die is rolled for the number of impulses in a turn.  The players then roll to see which side has the initiative and goes first during the impulse.  Air missions are flown, then naval operations and, finally, ground operations.   Naval forces enjoy hidden movement until spotted.  Stacking is unlimited, and units are always in supply.  Ground units have a movement allowance of one (1) hex per impulse.

The Allied forces are hindered by aircraft range limitations and overwhelming numbers of Ju-87 Stukas based in Rhodes that can fly anywhere on the map.  However, German off-map aerial are resources are limited, and are determined, by-turn, using a die roll.

Allied forces start the game with a number of task forces on the map, poised to land at Kos and Leros.  Additional task forces can be formed later in the game, or determined by a separate set of solitaire rules.  The invasion of Rhodes is possible beginning on Game Turn 5 and, again, is dictated by a die roll.  The Allied player can force an invasion, but at a significant cost in victory points.

The map’s dark blue sea makes reading hex numbers difficult.  The counters are just fine, but the cardboard “chads” have me thinking about buying a counter cutter.

Victory conditions for the Allied player are daunting.  The Allies must control literally every island on the map if the invasion of Rhodes does not occur, and Rhodes is strongly defended by German and “assimilated” Italian units.

I’m looking forward to starting the game later today!

B-17 Queen of the Skies

Last Winter I brought out Avalon Hill’s B-17 – Queen of the Skies. It had been awhile. When I opened the box, I found a mission sheet from October 1993 Needless to say, I would be starting from scratch, with the first order of business to get familiar with the rules.

After skimming the rules, I struggled through one mission. While the sequence of play is fairly intuitive and instructions well programmed, the chart sequence – with its alphanumeric designations and colors – was horrible to work with.

Frustrated, I copied all of the play aide sheets and literally cut-and-pasted them into a rough action sequence. The first sheet contained all the pre-mission events. The second sheet included the charts used to determine areas of damage, with third and fourth sheet reflecting actual damage. The final sheet contained charts used when over the target and if/when the crew needed to bail out or make an emergency landing. Any other information needed could be found on the map.

Although these edited sheets could be copied to cardstock, I left them on regular paper, stapled together. This way, I didn’t have sheets floating all over the gaming table.

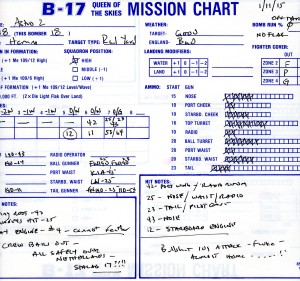
Another change was discarding the B-17 schematic. This took up space on the table, and any crew actions, wounds, or damage could (and can) be noted on the individual mission sheet.

My annotations to the Mission Charts evolved over the course of the campaign. I’ve included the mission chart for Astro II’s final mission. As you can see, the crew was able to safely bail out over the Netherlands, after a fluke hit to the Number 4 engine.


Fixed B17


This is fun and engrossing general simulation of the evolution of Pointblank, starting with limited and escorted missions over France and ending with the daunting long-range raids against strategic targets over Germany. It’s reputation as an outstanding game is well deserved.

The early missions are short, and can be played in about 15 minutes. The later missions can last over an hour, depending on how many waves of german fighters your aircraft encounters.

As with most (if not all) solitaire games there is a lot of wristage and charts involved, especially since one wave of fighters can return for additional attacks. On a long-distance mission, which would involve maybe 8 turns with the possibility of multiple waves of fighters, this can make for a long, grueling game.

I really can’t comment on the game as a simulation because my knowledge of Pointblank is macro and not micro. However, I do believe that the game has a great “feel” for what aircrews encountered from 1942 until the evolution of long range escorts such as the P-51 Mustang.

I was surprised at the number of superficial hits Astro II sustained. Whether this was a function of luck, or part of the game’s design I can’t tell. While the aircraft was able to shrug off hits, the crew was not. Over the course of 18 missions, four crew members were killed outright, or died of wounds; six crewmen were seriously wounded with four not returning to duty, in addition to 16 light wounds! Three crewmen suffered from frostbite when the heating system was hit.

Flak was typically not a factor over the target areas. Regardless, bombing accuracy was poor. Astro II failed to hit the target area seven times, and only once was accuracy as high as 75 percent. Twenty percent accuracy seemed to be the norm.

In my judgment, It is far more satisfying as a campaign game, trying to complete 25 missions, than a one game time filler. It really got tense on the longer missions where wave after wave of fighters attacked Astro II, with ammunition running low, crewmen injured, and damage effecting performance. Set-up time is minimal, and the game can be played on a small table or desk. I would typically play three shorter missions, and one or two longer missions, during one sitting.

Perhaps next winter a new Queen of The Skies will begin pounding the Third Reich.

A Work In Progress (Again)

Have been grappling with set-up the past several days. This is Mark II, the result of crashing the page’s first two posts while trying to add an unnecessary “child theme”. Quite a learning curve.

While I hope to post up reviews and after-action reports on a wide number of games, rules and periods, this journal will attempt to focus on the following game series. None of these lists reflect any type of priority or emphasis.

Great Battles of the American Civil War (GBACW) by Avalon Hill and GMT
Great Campaigns of the American Civil War (GCACW) by Avalon Hill and MMP
Great War At Sea (GWAS) by Avalanche Press
Second World War At Sea (SWWAS) by Avalanche Press
Musket and Pike Battle Series by GMT
Third World War Series by GDW
The Europa Series by GDW and HMS/GRD

Some solitaire games include –

The Hunters by Consimpress
Tokyo Express by Victory Games
Carrier by Victory Games
B-17 by Avalon Hill
Ranger by Omega Games
Thunderbolt Apache Leader by GMT

Miniature Rulesets and Periods will include –

De Bellis Antiquitatis
De Bellis Renationis
Irregular Wars
Red Actions!

And for random fun, games that have appeared in Against The Odds (ATO) and Strategy and Tactics (S&T) magazines.