Just Keep Trying

I’m  determined to get a solid grip on Empire Of The Sun.  So, dove back into it early this morning.

Decided to follow the GMT articles cited in my previous post.  Did so, and learned just how little I really know about the rules.

What did I learn?

  • Bombers (aircraft units with range six or greater)can establish, but don’t negate Zones of Influence (ZOI).  I’d used them to negate ZOIs
  • The Allies Central Pacific Headquarters (C Pac HQ, Range 25/Efficiency 8) is in play. Hadn’t used it at all.
  • A U.S Headquarters can not activate Commonwealth units.    I had allowed that.
  • HQ with different colors along a diagonal facing line are that way to indicate inter-     service rivalries are in effect, limiting a HQ’s ability to activating only Army or Navy units, and not both during an Offensive.  I’d followed the interservice rules, but thought the color division meant the HQ was a joint HQ.

It’s a little discouraging to find my rules comprehension still has such significant gaps.

Anyway, I used the Northampton to pin the Japanese Units in Rabaul (by declaring a Battle Hex) so they could not interfere with the Guadalcanal landing.  The ensuing fight cost me the Northampton, but the landings succeeded.  The invasion force dispersed, as per the GMT article, with the activated Japanese (having played the Battle Of Savo Island Reaction Card) using Post-Battle Movement to also sail to dispersed positions.

Here’s a shot after play of the US Turn 3 initial card.

Irony Not Intended

Sequestered upstairs as RGC is busy getting ready for the Holiday Open House.  Arizona State vs. Iowa State turned into a blow-out.  Why not start up another session of SOPAC?

Allies took the first turn by playing the Operation Watchtower card lying in the Future Offensive pile.  It’s a powerful card, enabling the Allies to activate up to seven (7) units.  Because Interservice Rivalries (ISR) are in play (for both sides), only Navy/USMC/Commonwealth units could be activated.  The Allies activated the North Carolina, Northampton, Wasp and Kent, as well as the 1st Marine Air Wing and 1st Marine Division.  Guadalcanal was designated as a Battle Hex.

The Japanese played the Japanese Counterattack Card At Savo Island Card.  Another powerful card allowing them to activate their four naval units at Rabaul.

The ensuing Naval/Air Battle involved 36 Allied points and 42 Japanese Points (each Japanese naval unit also received a +2 combat bonus).

The Japanese rolled an eight (8) and Allies rolled a nine (9).  Both sides were able to apply all of their combat power.  Lower rolls reduce the percentage of total combat power  applied to the battle.  A die roll of nine (9) also includes a critical hit, allowing the Allies to designate one enemy unit to be eliminated before other units are reduced.

So, Japan won the Naval/Air Battle (42-36).

Genius Boy did not remember that if you lose the Naval/Air  Battle any amphibious landing is called off.  A bad defeat for United States…..on Pearl Harbor Day!

Last week, I read each of these opening move articles over at the GMT Web Site (Part 1 and Part 2).  Nothing sank in (pun was not intended).  Here’s a photo of the debacle.

One More Time?

Made it through Turn 5 of the Six Turn South Pacific (SOPAC) scenario.

The rule concerning Progress of War had been a nagging bother.  It was referred to, but the scenario rule book did not provide any information.  Couldn’t take it anymore so actually broke out the big rule book.  Whoops…….

Beginning with Turn 4, the Allies have to secure at least three (3) or four (4) Japanese held islands (with airfield/port), resource points and/or towns or suffer a reduction in National Will.  The target number is determined by the lower of the number of Allied Amphibious Shipping Points or the Number Four.   Any reduction in National Will is the difference between the target number and the gains made.

National Will starts at four (4).  If I had been keeping track, my cautious Allied approach would have resulted in a National Will of Zero, which means Negotiations and an Allied loss.

Ignorance can be National Bliss.  Here’s a photo of the game at the end of Turn 5.

Sure.  Time to start another game!

ASLSK – Armor Rules

Finally summoned up the courage to play a scenario with armor.  Getting into ASLSK Starter Kit #3 was one of my goals for my Fall/Winter gaming.

As always, Jay Richardson’s tutorials are a tremendous resource.

“Monty’s Gamble” (ASL Scenario S23) is a good place to start.  It’s a one-half mapper with British paratroopers, supported by two (2) 57mm anti-tank guns, trying to stop three (3) German assault guns and troops from advancing through Oosterbeek towards the end of the fighting around Arnhem.  It’s manageable in terms of size and with a length of only four and one-half turns.  The German objective is to exit a mix of vehicles  and squads off the boardm moving from East to West.

The action became intense during Turn 2.  An assault gun eliminated the crew of one of the British guns and was, in turn, ambushed by a para squad in an adjacent building.  It was an excellent opportunity to muddle my way through the Close Combat sequence involving vehicles.

I think I got it right.  The British rolled badly and, as a result, were eliminated by the assault gun.  If not exactly correct, I was close and achieved what I believe was the intent of the sequence.  Good enough for me on a first try.

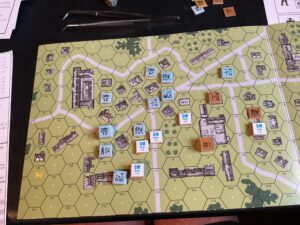
Here’s shot of the game at the start (German) of Turn 3.  North is to the top of the frame.  In the South, the lead assault gun is standing-off at maximum PIAT range in attempt to destroy the squad blocking their advance.  So far, two shots have failed to effect the British (squad and PIAT now under the -2 Acquired counter).

The second assault gun – with infantry – may attempt to flank the British position, or advance West in an attempt to get off the board.  That will involve dealing with the second British anti-tank gun positioned in the woods half-hex on the extreme West edge of the battlefield.

Grinding It Out – Part 4

The Pea Ridge game is progressing.  Not exactly as a model of the tactical art, but progressing.

I’m happy about my rules learning curve.  That will make the next games much easier.

I’m not happy about my tactics.  I’ve done of poor job of positioning artillery batteries for both sides.  Sure, the terrain is not the best for artillery, but still.

One problem is that I misread the terrain effects chart and thought that artillery movement in heavy woods was prohibited.  No, just very slow.  Even very slow would have helped both sides, especially the Confederates.  Their infantry has muskets, with a maximum range of two hexes, at one-half firepower.  It is only when adjacent to a Union regiment that the Confederates can fire at full strength.  On the other hand, the Union regiments fire a double strength at one hext range, full strength at two hexes and one-half at three.

The Confederates need to get their significant artillery assets into position sooner rather than later.   A “Pin” result will suppress the Union rifle fire and allow the Confederates to move adjacent, fire at full strength and, perhaps, pass the morale test they need to melee.  Better yet, artillery fire with a  “Rout” result or loss of fighting strength (with accompanying morale check).

Here’s an overview  of the battlefield.  The top of the photo is west.  It is the start of Turn 13, Confederate phase.

To the west, the Union forces have withdrawn across the open area, and  set up their artillery assets (finally) to sweep the open field to their front.  The one Union artillery unit outside their new defensive line failed to limber up (due to a form of withdrawal fire).  The Confederates now have to figure out how to cross the open ground.  Here’s a closeup.

A firefight has developed to the east.  Here, the Union forces’ longer rifle range is a significant advantage, with Union regiments starting to flank the Confederate right.  Again, most of the Confederate artillery has not deployed.  Sigh…..

Plan to get back on this after Thanksgiving dinner.  Can’t blame the turkey if I’m too drowsy…..just have to watch all the other stuff.

SOPAC – The Reason Why

One reason to play wargames is to gain historical insight.  I had one the other day.

Started Turn 4 of my SOPAC scenario.  Unlike Turn 3, several powerful units of the Japanese Combined Fleet are available for deployment from Truk.

I had held on to  Japan’s  Naval Battle For Guadalcanal card for a Future Offensive.  One of the historical criticisms of Japanese strategy was its husbanding of the Combined Fleet for a climatic fleet encounter, somewhere east (the general location changed as their defensive perimeter was pushed outward in 1942) of the Home Islands.

So, what the hell, let’s play it…NOW!

This is a powerful card.  The Japanese can activate seven (7) units.  A task force with two (2) battleships and two (2) carriers sailed south, augmented by surface and air units from Rabaul.  The battle hex was Guadalcanal.

Allied forces successfully rolled to intercept the Japanese fleet, dispatching two (2) battleships, three (3) carriers, a cruiser and air units.  A critical element in the fleet composition was that all three (3) carriers were at reduced offensive and defensive strengths.

The Allies should have stayed  home and let the Japanese pound the Marines and Henderson Field.

The Japanese had 69 strength points compared to 62 for the Allies.  I’d call that a straight-up fight.  But, in EOTS, you roll for Combat Effectiveness – or what percentage of the strength points deployed actually count for the combat.

The Japanese rolled high, so all of their strength points could be used.  The Allies rolled low, so only a quarter of their strength points counted.  On top of this, the Japanese rolled very high – a nine (9).  This result creates a “Critical Hit”.  In EOTS, all units in a combat have to be reduced before a unit can be eliminated.  A Critical Hit allows for units to be eliminated without others  reduced first.

The Allied fleet was, for all intents and purposes, destroyed.  All carriers  were lost.  A  catastrophic defeat.

So, one can see why, at this point (unlike the situation at Midway) both sides were reluctant to engage in a decisive fleet action.  The fear of catastrophic loss outweighed the possibility of decisive success.

Here’s a screenshot.

Groza’s Gaining Momentum

Tim finished up the heavy lifting.  He dug into the OBs and put together the ground combat counters for Operation Groza – the Soviet’s hypothetical pre-emptive 1941 offensive against Germany. My job was to create the air units.

With this work complete, I set up the initial Axis dispositions.  Since the scenario is set in June/July 1941, the deployments are for an offensive, not one anticipating an attack.

Tim had to return my work due to my inability to follow the map’s boundary adjustments reflecting the two Vienna Awards, which changed Hungary’s and Romania’s borders.  It took a few attempts, but I think (haven’t heard anything recently…..he might have given up in disgust) it is now OK.  I can’t vouch for it militarily, since it is the classic case of too much frontage and too few units (are there ever enough?).

We plan to use the new Barbarossa Unleashed (BU) rules drafted up by John Astell and posted out on the Europa forum.  There may be instances where we have to go back to the old Scorched Earth rule set.  This will probably involve air unit replacement and production guidelines.  We’re also ready to try BU’s new optional Combat Results Table (CRT) and variable overrun rules.

Here’s screenshot of my northern dispositions.  How I yearn for low counter density!

Picking Up The Pieces

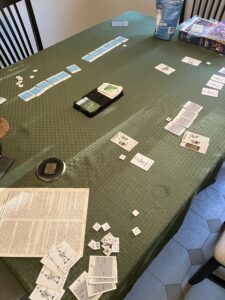
Former clients over for a visit, so the dining room table had to be cleared of my Brandywine Kriegsspiel.  Here’s a final look.

Well, not quite final.  I did move the British into melee and that’s where I started thinking about the importance of the Umpire in Kriegsspiel.  Not an original or deep thought, but with a twist.  Let the rambling begin…….

The Umpire is The Rules.  In other wargames you have a rulebook and units with attack, defense, morale and movement ratings.  In Kriegsspiel all of these factors are generic.  The Umpire decides and/or arbitrates unit capabilities.

For example:  How well will units fight in melee?  Yes, there are guidelines for the effect of losses, but how well will that unit fight today?  Is that simply a product of die rolls, or is there an intrinsic capability for this particular engagement?  The rules provide for differentiation in capabilities in certain situations – attacking uphill, across barricades, when tired – but not necessarily between units.

Sure, Continental or British Regular units will perform better than militia and/or irregulars, but how about each regular unit?  Are all Continental units inferior to the British in musketry and so use a different die to resolve fire combat?  How about melee, an across the board adjustment?  At Brandywine, Stephen’s and Stirling’s Continentals fought the British toe-to-toe, while Sullivan’s ran.  Yes, they were trying to adjust their position, but what happened?

On top of that, how much research is the player willing to put in to provide a kriegsspiel that takes into account differences that existed on that day?  I learned that is very hard work, even if the resources are available.

This leads to the idea that Kriegsspiel is best suited for the generic and scripted encounters.  Without an Umpire, the player(s) must decide army or unit capabilities and how they are expressed.  What you have is an “ImaginNations” game on a low level operational and tactical scale.  Trying for a historical simulation is just too hard.

After all, Kriegsspiel was developed as a teaching tool, incorporating basic concepts/precepts but then crafted to meet, as we used to say, specific “learning objectives”.

So, the next time I pull my Kriegsspiel maps and counters out, I’ll use them to pursue a theoretical situation or, maybe, a historical one, but be satisfied with broad precepts, especially concerning a fighting force’s intangibles.


SOPAC So Far – Reboot

Made it through the first turn of the SOPAC scenario (which is Turn 3 of the campaign game).

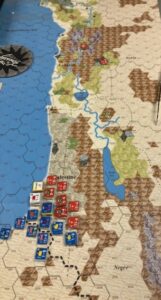
I’m pretty good with the Offensives Phase of the Sequence of Play.  Did have a major revelation, though.  Apparently any movement of a unit is considered an Offensive, and the destination is declared a Battle Hex.  So, my movement of two air units to a different base in Australia (see map screenshot below) results in that destination being declared a Battle Hex, with the possibility of the opponent making a Reaction Move if opposing units are within range.

Will have to do some research over at Boardgamegeek to confirm/deny this interpretation.

In any event, the Allies have landed at Guadalcanal, reinforced the initial landing, as well as moving units to New Guinea in preparation for an offensive out of Port Moresby.  The Japanese attempt to defeat the initial Guadalcanal landings with air and naval forces out of Rabaul was turned back with losses on both sides.

Any Japanese efforts during this initial turn are limited as the bulk of the Combined Fleet is in home waters, and not available until the following turn.  The Allies will also receive significant naval reinforcements during Turn 4.  Should be interesting.

Here’s a Vassal screen shot for the end of Turn 3.  The Area of Operations (AO) is outlined in the bottom right corner.

No Big Deal

Late Fall, back on Standard Time, with accompanying gloom.  No baseball, sitting outside or other congenial weather pursuits.  More time to fill up…..now I have to build the day around multiple projects.  Can’t just sit in front of the television for the next (gulp) five months.

So, back to some paper soldier/building/terrain modeling.

Built a Peter’s Paperboys Tembe, or fortified African house, for my Men Who Would Be Kings games.  A useful accessory.

Construction was, as usual, a ham-fisted and gruesome experience.  No way I will post a step-by-step photo depiction.  Embarrassing.

However, I think it did turn out OK, at least from the exterior.   The innards are a shambles, but nobody will see them now.  Just couldn’t figure out how to do a better job with the front and back roof sections.  And yes, the outlying fence is not supposed to be symmetrical (thank goodness).

You can just make out my replacement computer.  Cheap, and it works!  Lesson learned.