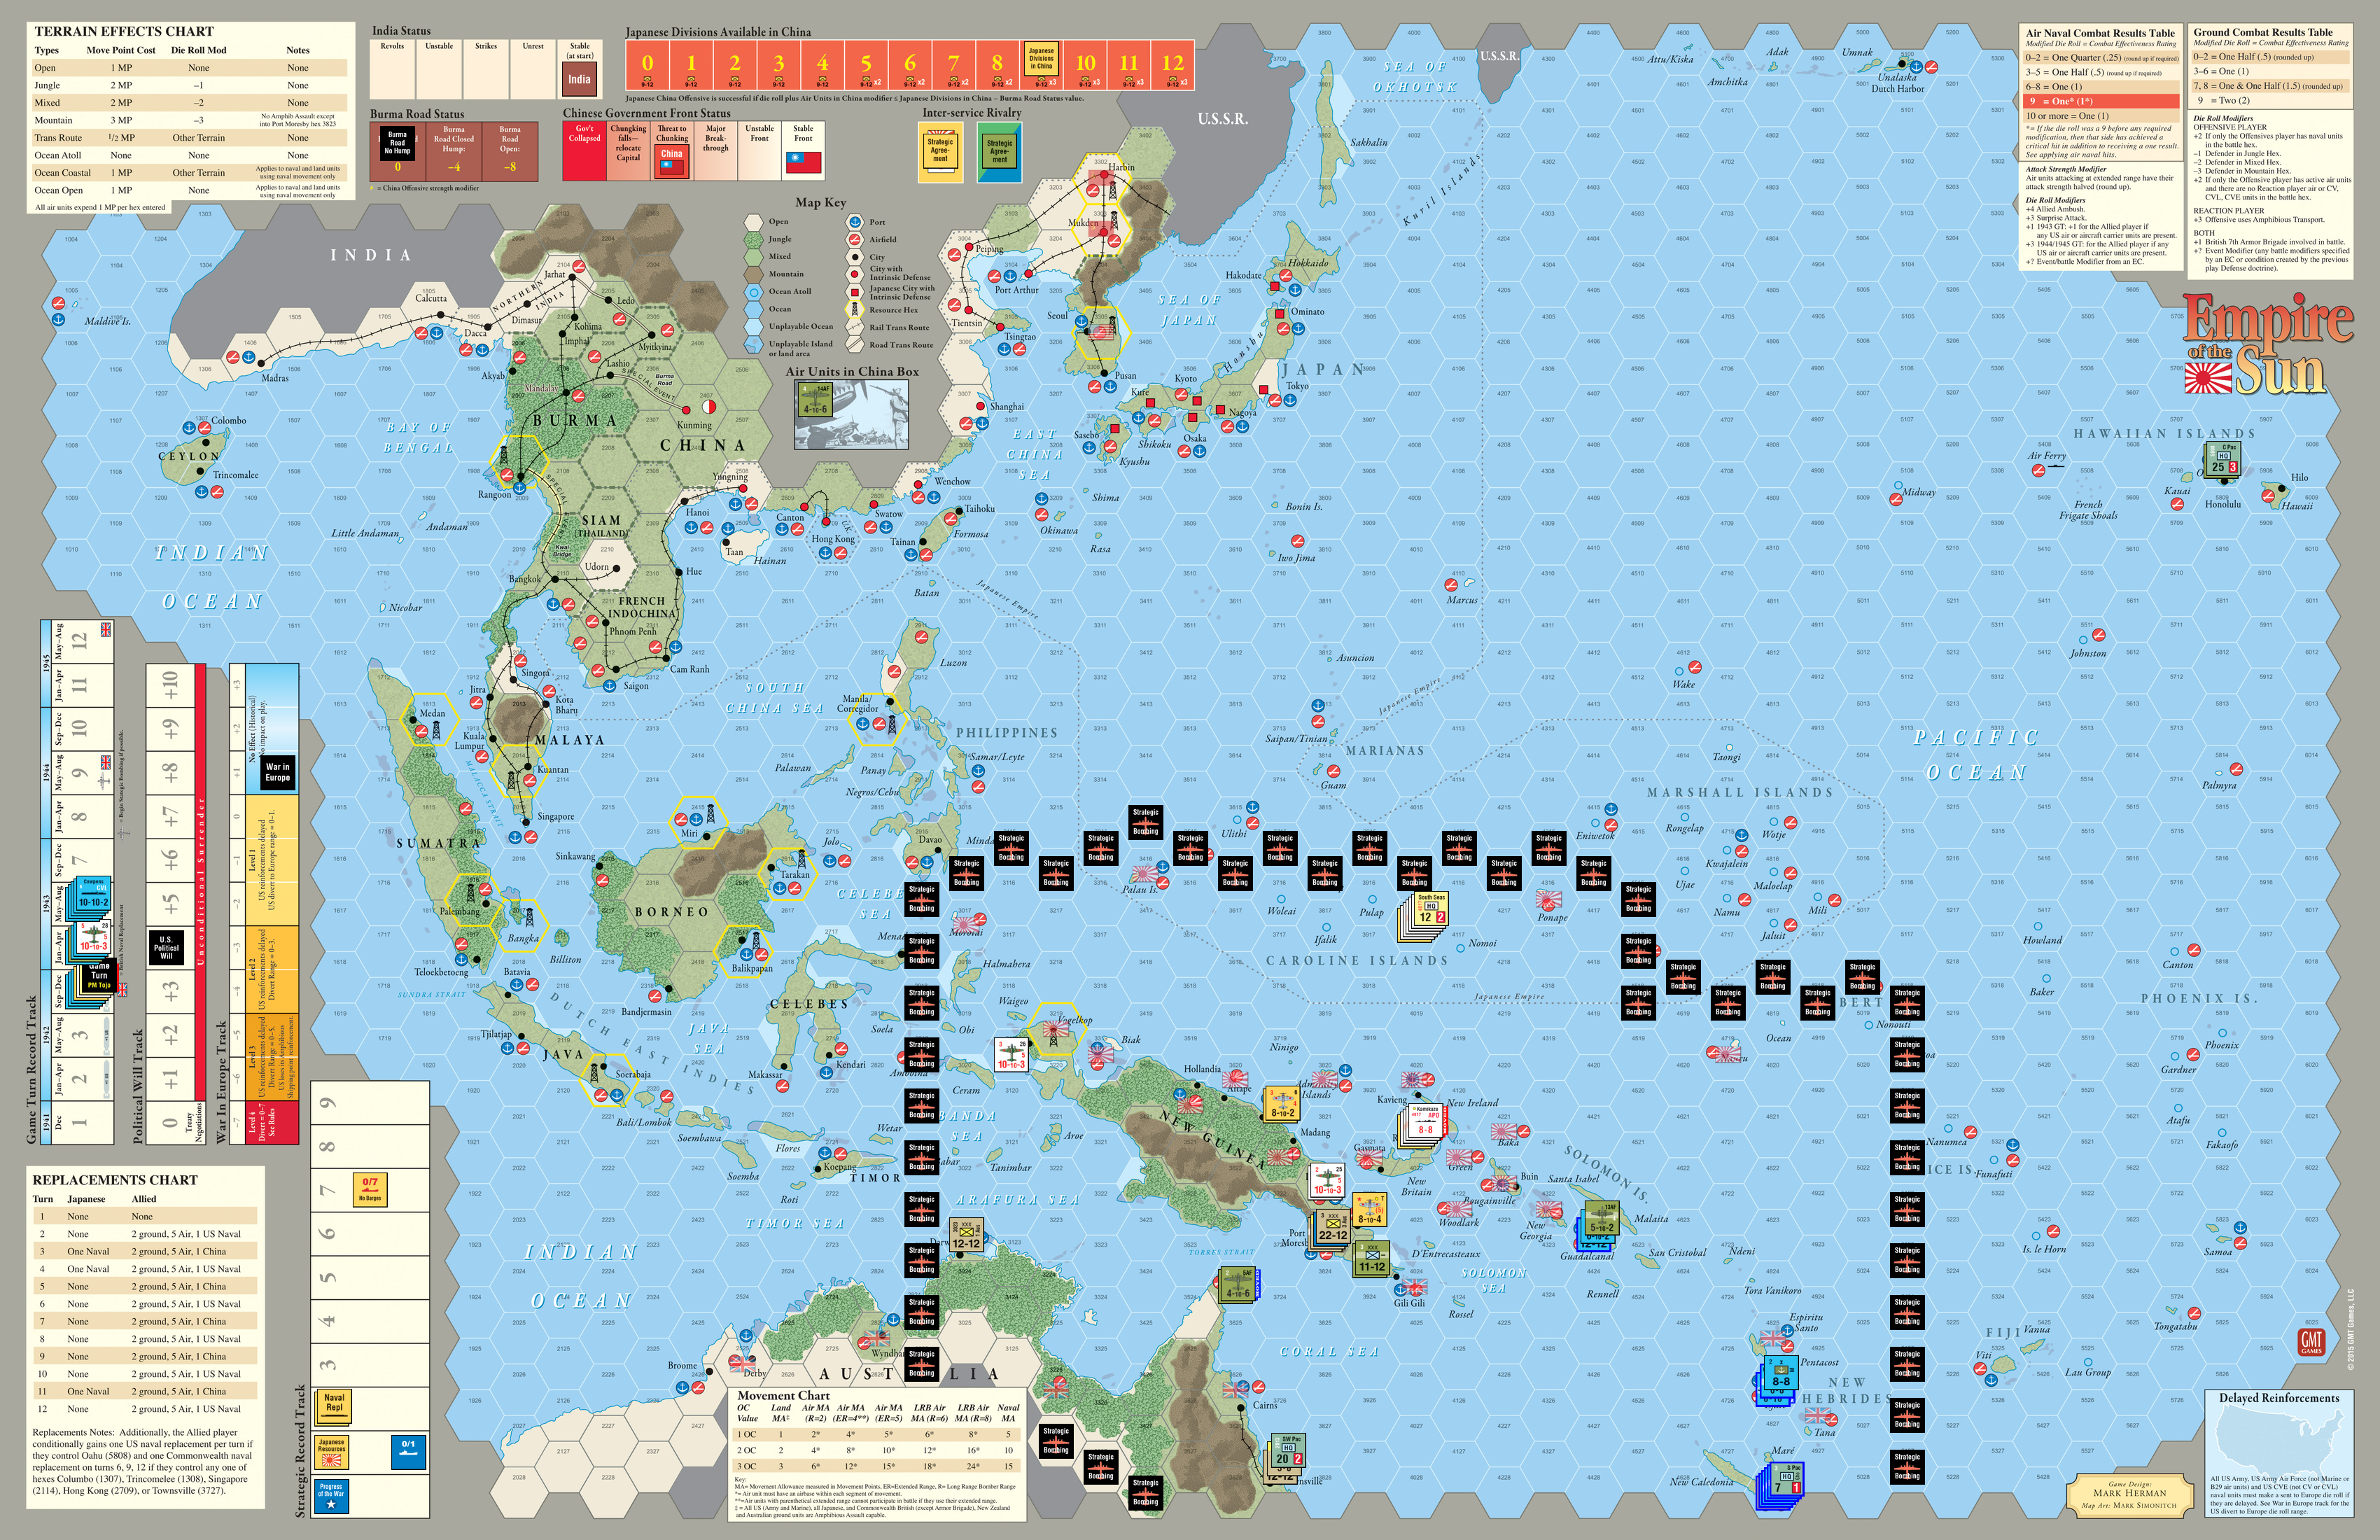
Category Archives: Sessions

Grinding It Out – Part 2

The Pea Ridge game is developing some action as both flanks are  in contact.

To the South, both sides are deploying, with the Confederates moving into contact.  Van Dorn’s force has managed to unlimber artillery to support this advance against the Union right.  Little room to maneuver, so Van Dorn’s brigadiers are moving right down road, with supports moving into the adjacent woods.

A different story to the North, where McCulloch’s wing is deploying in the woods in order to flank the Union position.  The Confederates have been able to unlimber two artillery units for support but, again, the terrain is masking fields of fire`

Room For One More

I’m Home Alone, so the Dining Room Table is available.

Haven’t played Kriegsspiel for a while, and that beautiful Command Post Games Brandywine map has been just sitting in the garage……Why Not?  Use all available horizontal surfaces!

Cycled through any number of Internet sites as well as my West Point Atlas Of American Wars to put together Order of Battle, general dispositions, and background on the battle.  The process was time consuming, but interesting and fun work.

Decided to use Kriegsspiel’s standard scale of one block represents 450-500 men.   Since most of the brigades involved had 1,500-2,000 men, this works just fine.  However, the respective forces were organized in (divisions) groups of two (2) brigades.  I’ll have to ignore this lack of symmetry as my table-top groupings will have three (3) blocks, not  four (4)……just grit my teeth and suppress those compulsive instincts.

Here’s a viable map of the initial dispositions that I will use (North at top).  The Continentals were initially positioned along Brandywine Creek, but have reacted  to Howe’s flanking march from the north by pulling brigades off the line.  The remaining Continental brigades are facing Knyphausen’s force  moving east towards Chad’s Ford.

My map’s scale is roughly 1/16,000, while Kriegsspiel uses 1/8,000 scale maps.  Ranges and rates of movement are reduced by one-half.  Fortunately, the weapons used in 1777 are the same as those used in the 1824 Kriegsspiel rules, so no adjustments for effectiveness needed.

Another set of rules to read and become (semi) fluent with.  Also, I get to re-learn working with Kriegsspiel Dice.  That process is interesting in and of itself.

SOPAC – So Far

As threatened, I’ve plunged into  VASSAL to play Empire Of The Sun’s (EOTS) “South Pacific” scenario.

Turned out to be double learning curve.  First curve is working with VASSAL.  Have  made a couple of half-hearted attempts in the past, without any sustained or focused play.  As to the scenario, I was surprised how quickly I’d forgotten the rules since my last play with Tim back in July.

In retrospect, I should have read that post.  Repeated a couple mistakes I had noted.

This is a great learning scenario that allows you to focus on card draw mechanics, activation, movement and both air/naval, as well as ground battle phases in just one area of the map.  While the scenario allows for play (and the significant rules overhead involved) in the  China/Burma theaters, those regions are not critical for achieving victory.

VASSAL’s Log function is handy for “What the Hell have I done” references as it  records everything you do.  It also documents but  your “back button” adventures when the player decides to “un-do” a previous decision.  Vacillation can be amusing.

You can quickly change sides, which makes solitaire play a breeze.

I also like the screen shot option, which I intend to use for this blog as soon as I reset my first game.

More later…Game One of the World Series is starting……

Grinding It Out – Part 1

You can only read the rules and stare at the setup for so long.  At some point, you have to play the game.

Started my Great Battles Of The American Civil War (GBACW) game the other day.  Pea Ridge is a classic meeting engagement, with only one unit on the map before Turn 1. Then both sides start moving troops onto the map, with each side’s respective forces entering through two hexes.

During movement I maintained brigade integrity for the most part, attaching artillery to brigades to maximize unit density and minimize the length of the “column of columns” moving on roads through heavy forest.  Here’s an overall shot of the game map during Turn 5,  when contact first occurred.

One of the problems I’m having working with the game system is the rules.  There are a number of iterations, which is not surprising since the initial game (Terrible Swift Sword – a true Monster Game) was introduced close to fifty years (!) ago.  The rules changed as publishers changed;  first SPI, then TSR , SDI, and then GMT.  These changes were in both additional detail as well as scope.  In fact, from what I’ve read, the earlier editions of the game are not playable with the new – GMT – rules.  Fortunately, for those just getting into the system, GMT has reissued the main games, and has added others.

Since I had the earlier games, I decided to work with the earlier rules and sold off my GMT GBACW collection.  But the question remained, “Which set?”.  I’m not the only one with this  quandary.

Another rules problem is that many of charts are printed on the individual game maps,  not in the game specific rules packets so they can be copied, consolidated and stapled.  One possible  reason is that the scales of the games vary.  The best I can tell is between 150 and 120 yards per hex.

Ugh!

My current approach will be to use the Standard Rules V.1 (with the included charts), individual map charts,  Quick Reference Card and Consolidated Errata.  The latter two are available over at Russ Gifford’s great SPI site.

Enough of this.  I’ll get to the game in the next post.


ASLSK – Rules Maintenance

Set up another scenario.  Need to keep hammering the rules into my brain.

This one is S16, Legio Nostra Patria.  It’s a one-mapper, with Free French Legionnaires assaulting a German held town.

Here’s my initial set-up.  Top of the photo is East.

And here’s my plan.

The French need to occupy three of the multi- hex building highlighted in yellow.  They already occupy the building at bottom center  of the photo.

The red-circled German units will be suppressed, and with that accomplished, the squads will move towards the occupied multi-hex building and, from there move Northeast.

As I worked with my cheap photo markup app, I realized this is not a good initial deployment or  plan.  However, I’ll give it a try.  My own little “Defense of Duffer’s Drift”.

This Should Be Fun

Finally developing momentum getting Operation Groza, a Europa variant published way-too-long-ago in The Europa Magazine 23, to the virtual table.

Tim’s doing the heavy lifting, providing the JET module, Scorched Earth rules, and scans of the appropriate magazine pages with orders of battles, deployments, and special rules.

JET was/is an interesting creature.  Developed by Europa enthusiasts in Finland, it has fallen by the wayside (as has Europa) over the past couple of decades (gulp!  that long!).  Graphics are very crude by Vassal standards, but it is a good, intuitive, platform.  Tim and I used it in our Fall Of France game.

I’m heading out to The Sunfish Capital Of The World next week, so this will be an excellent off-site wargaming endeavor.

No Nuance

Grinding away at Galacia: The Forgotten Cauldron.

Taking a “historical” approach, with both sides aggressively attacking, with little finesse.  At this point, the Russians are the most successful aggressors.  Their successes were helped by the requirement that Austro-Hungarian units must attack early in the game.  These attacks had limited success, but with heavy loss.

One tactic has emerged in this session.  The Der Weltkrieg rule set calls for mandatory retreats if losses represent one-half of a combat force.  In this particular scenario, the threshold is reduced to one-third.

The operational area has a wide frontage, so most stacks are in the 12-16 (3-4 divisions) factor range, with 8 factor stacks often used to plug gaps.  A two hex attack can typically generate a 3-4 factor loss, which not only attrits the defenders, but also forces a retreat.  The Russians have been very successful at this, albeit aided by some favorable d6 rolls.

In attempt to avoid the odd angle/glare influenced photo in my recent game report, I tried shooting these in half-light.  Further explanation is senseless.

This is the  Austro-Hungarian (white counters, with some Germans in gray) left flank.  Russian progress is limited.

Not so on the center/ right flank, where the A-H right  (bottom right of photo) is under some real pressure.

Interesting game, and I’m now fairly fluent with the rules.

ASLSK Fun

Really enjoying my latest dive into ASLSK.

Set up another scenario and had quite the time.

“Over Open Sights” (S12) uses the same board and orientation as my previous game, but what a difference!

German avenues of approach have more cover and concealment, and the US has fewer units to cover these approaches.  However, the US artillery is lethal in a direct fire mode….if the gun can score a hit.

I’m loathe to put together detailed session reports as they will pale in comparison to others out there.  Grumble Jones is my favorite.  But, this game was so exciting I had to take a few photos.

This first one involves my initial attempt to use a cheap graphics app along with a cheap iPad pencil to mark up a photo.  It attempts to convey the initial positions of the Germans and their assaults, since I was already well into the game.  The initial US positions can be inferred by the MG counter on the right (east) , and routed unit on the left (left).

The German advance from the southeast stalled due to effective artillery fire, but the advance from the east ( really a sprint across the open ground – the scenario takes place in December so the fields are barren) was made possible by some remarkable shooting from the 50mm mortar.  Usually derided, this light mortar eliminated the machine gun crew as well as routed one artillery crew, thanks to low rolls which maintained its rate of fire, as well as abysmal morale check rolls for the US.

It was all but over by Turn 3…..or was it Turn 4?  I  started to pick the game up but then  remembered the US received reinforcements in Turn 4.  Unfortunately, I had grabbed the turn marker and couldn’t recall the turn.  So, I brought in the reinforcements anyway.  Things got interesting quick, because this plucky band checked the German advance.  This  change in fortunes was short-lived because, once again, good German shooting routed the newcomers.  The following shot shows the climatic assault on the artillery (used Melee marker to emphasize).

When the smoke had cleared, the Germans had attained their objective of capturing all three artillery positions.

Fun game.  Still struggling with some rules.  Need to remember ELRs and that casualty reduction is to half-squads, not reduced strength squads.

Let Me Count The Ways

Started play on Galacia: The Forgotten Cauldron.

Turn One featured both sides maneuvering towards their scenario objectives.  There was even a bit of screening cavalry skirmishes.

Thought I had finally figured things out.  No.

While flipping through the scenario booklet anticipating reinforcements, I found that each Army had a specific mobilization turn, and that very few units could move initially.

Massive reset and just another in a seemingly endless number of ways of fouling up the rules.

New game is now (literally) moving forward.  There will be Army level contact next turn.

And yes, the perspective for the picture is strange, to say the least.  Map is covered with a plexiglass advertised as “non-glare”.  No.  Well, unless the garage fluorescent fixtures have superpowers.  Best I could do.  And, I can’t just turn the lights off.  Motion activated.

Austro-Hungarians in white, Russians brown.

Where was I? Why worry? – Part II

Reached a stopping point at Serbia The Defiant.   And yes, I made a hash the rules.

The new combat results table (CRT) worked just fine. Once again, operator error. Well, the new CRT is based on column shifts, as opposed to die roll modifiers.  But, the die roll modifier for attacking across  rivers still holds. Well, I didn’t grasp that pesky detail, and since the Austrian avenues of approach to Belgrade cross rivers, their attritional successes are now suspect.

Rather than the classic re-do,  I’ll pick it up and continue playing the series.  This is a topic I’ve brought  in the past:  Play a game/system and then move on to another game/system, or focus on getting better at one particular series of games.

In this case I’m not going to be an omnivore, but focus on Der Weltkrieg.  So, it’s time to set-up Galicia:  The Forgotten Cauldron.