Category Archives: Solitaire

Playing

Started playing Battle of the Atlantic last night.  The active player controls German U-Boats, Condor aircraft, surface raiders and resupply submarines.

British air and surface ASW asset dispositions in each sea zone are determined by a card draw.  Cards also determine German U-Boat production and British technological advances, as well as designating certain combat modifiers for the turn in which they are drawn.

Initial Setup

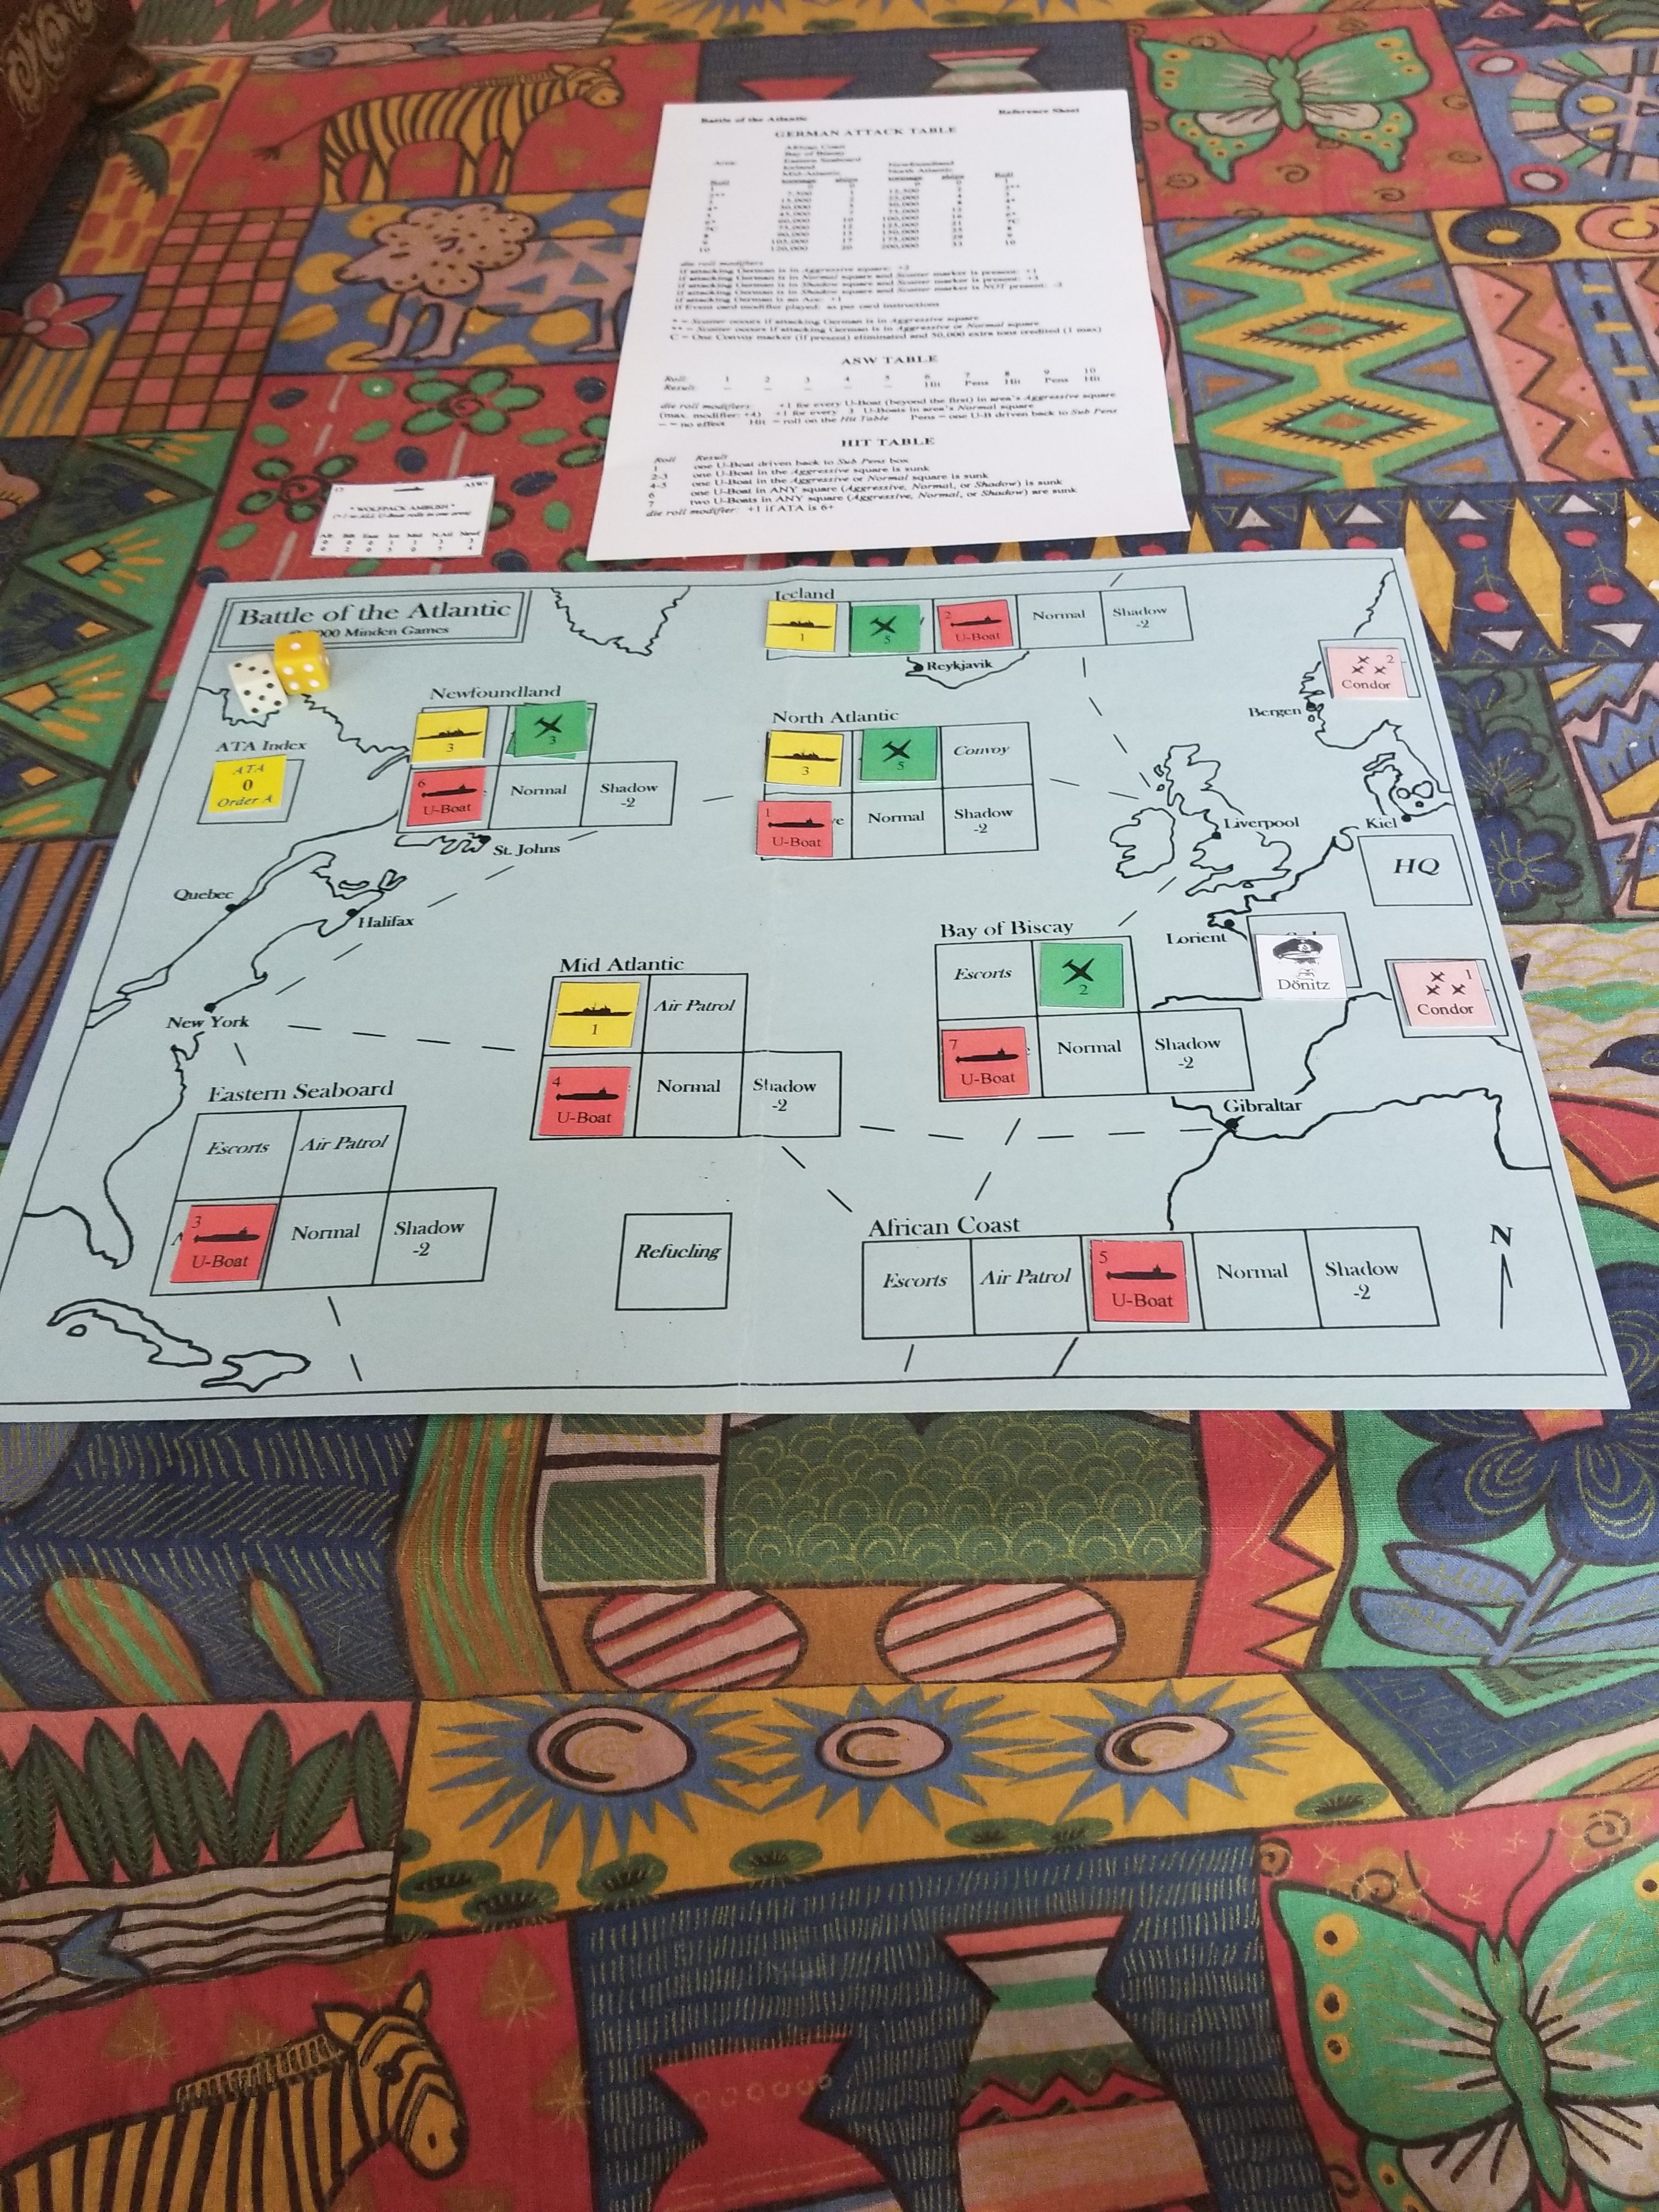
Technological advances effect the order in which Allied ASW assets, U-Boats and Condor aircraft are placed, as well as which side resolves their combats first.  Technological advances (Ultra, HF/DF, Radar) are cumulative, pushing the initiative towards the Allied player.  This is critical, since losses are taken immediately.

German objectives are to a) sink as much tonnage as possible, b) maintain at least half their U-Boat fleet at the end of any one turn, and c) prevent the Allies from forming and deploying convoys.

The German commander must determine which sea zones to deploy attack assets, and what posture (aggressive, normal or shadow) they take.  Aggressive subs can sink more tonnage, but are easier to destroy.

Play is quick, with straightforward CRT tables for each combatant and asset type.

After my usual stupid misplay during the first turn (roll one die, not two on the German Attack table), the first two “real” turns found the Germans falling short of their victory objectives, but suffering light losses.  I’ll find out more this evening.

Another Mission

Completed another Ranger reconnaissance mission (Card #3) yesterday afternoon.

Preparation time drastically reduced to about 15 minutes.  Kept my same roster and equipment from the last mission.  Plotting ingress and egress from the objective was straightforward.  I remembered to seal off the objective and PZ with supporting fires, as well as providing some contingency support at the LZ.

Managed to survive without incident.  Now I’m ready to move on to a combat mission.  Fun little game, small footprint.

Ranger

Took Ranger off the shelf the other day.  Had messed around with it about a year ago, after picking up the latest edition for practically nothing on E-Bay (bad box).

Each game consists of a mission.  The mission has two parts, planning and execution.  United States Army small unit doctrine for squad or platoon sized missions is used.  If you have had any exposure to this, learning the game is simple.  If  not, there is a very informative booklet included to help you learn the basics.

What’s fascinating is the few number of rules.  The platoon leader has to act like a platoon leader during the planning, briefing and rehearsal stages of the mission.  Determine your unit’s load, work out the route from your insertion point to the objective and then back to your pick-up point, plan for supporting fires, and manage your rehearsals.

Mission execution is accomplished using the programmed text.  While movement to the objective can be a little tedious, you can’t make a mistake, or something bad might happen.  Make sure your unit is in an appropriate tactical formation, call halts every 750-1,000 meters, and don’t get in a hurry.

One aspect of the programmed text that confused me at first was how to stop moving once my squad had reached the objective rally point.  Well, the answer was simple….call a security halt, and go to that paragraph.  The text options provide the prompts to start your actions at the objective.

To be successful, actions at the objective must comply with doctrine.  If you start free-lancing, bad things do happen.

This game has a very quick set-up, but preparation before the mission is lengthy, but an integral part of the game.  However, after a couple of missions, SOPs can be established, reducing planning time and increasing effectiveness.

Playing time for my first mission was about 1.5 hours, all-in.  This squad-size reconnaissance  mission is an excellent introduction to the game.  I look forward to moving on to Mission Two in the very near future.


Campaign Game – Battlefield at Katlego Faragh

The wadi option for the battlefield was too difficult to put together, so I just elevated things and instead of the river/wadi, set up an east to west gap between impassable sand ridges.  “Faragh” is the English translation of the Arabic word for gap (or so I’m told by the internet, and I have no clue as to how to pronounce it).

dsc01594

Not exactly stunning eye candy, but it will serve.

The die roll  for the defender’s programmed deployment resulted in the Zanj force being evenly split on each side of the ridges.  Once that takes place, I’ll roll for the Portuguese order of march.

CAMPAIGN GAME – SETTING THE STAGE FOR THE PORTUGUESE ADVANCE ON BEHEFE

With Lord Renaldo moving north, it was time to set up a battle scenario.

The first step was to establish the traits of the garrison commander at Behefe and his army.  The commander is Bey Imen Mahir.  He is inexperienced (-1 unit for command range) and battle shy (-1 when his unit melees).  His army is not pious (so cannot have a pious unit), but is attended by a skilled physician (reduces impact of disease die rolls).

Step two was to determine the composition of Bey Mahir’s army.  I arbitrarily selected one unit of Persian Mercenaries (for fun), then rolled a D6 for six Tribe and six Civic Guard companies.  The resolve of each Civic Guard and Mercenary company  will be determined at time of first enemy contact (shooting or melee) by rolling a D4.  The Tribe resolve is per RAW at three.

Up next was determining the effects of Renaldo’s victory on his little army.  Rolling a D10, the morale of four units  increased one step. These increases were allocated to the shot and crossbow units, which now have a resolve of four.  He was unable to recruit new units.

The next step was the scenario itself.  I relied on Charles Grant’s “Programmed Wargame Scenarios”.  It’s a great book, as you can read here at the interesting Lone Warrior website.

The book has eighteen scenarios.  I rolled two D10 (re-roll 00 or 19).  The result was Scenario No. 7, “Two Sides of a River”.  I modified this to “Two Sides of a Wadi”, and followed the programmed instructions for setting the defense and offense.

Will get this set-up in the next day or so.

Campaign Set Up Moves Forward

Rolled for leader qualities and other parameters.  Rather than insult you with another scan of scribbled fragments of index card, I’ll post up a “clean” copy of the tables/charts used.  Tried to link the variables to the Irregular Wars Chance Cards, with outstanding aspects allowing for good DRMs, and poor aspects leading to bad DRMs.  Normal is just normal, with no DRMs.  Card use has been difficult to implement solitaire and I hope this is a viable alternative.

Ming Chinese:

Lei Qiu:  An inexperienced leader, but bold.  Staff includes a skilled logistician and physician.

Portuguese:

Eduardo Nicolau Rolando:  Experienced and inspiring leader.  Staff also includes skilled logistican and physician.  Also, the Portuguese have good local knowledge, which negates many effects of unfavorable terrain.

The Portuguese, facing hostility from the Coastal Arabs, have to decided to invade before the Ming can establish a military presence.  At this time, only Chinese traders are allowed in the area, and the Coastal Arabs will resist any attack by the Portuguese.

Zanj:

Relations with natives are bad.  They will fight if attacked.  There is internal dissent, and government support is weak.  This weak support limits their army to 10 elements.

Their leader, Jabir Efe, is inexperienced but bold.  Being the home team, they have good local knowledge.

Neither side was able to recruit any natives to augment their forces.

The respective armies are based on both Irregular Wars and DBR lists, given what I have available.  Oh My!  I’m not following an army list.  After years and years of therapy I’ve finally made the jump of just putting something together that has some historical basis and works.  Thank Goodness for that.


Raid on St. Nazaire – Turns 6-12

Decided to stop at Turn 12.  British ships that had been standing off the port waiting to evacuate commandos had been destroyed, the demolition teams had, for the most part, expended all their charges, and the German reaction forces were sealing off any other VP targets.  So, I blew up the Campbeltown and called it quits.

The tempo of the game really picked up with fewer targets and lower to hit DR for Harbor Defensive Fire.

Took turn-by-turn photos, but all they depict is the pummeling of MTBs by Harbor Defensive Fire, and gunfights between reaction forces and commandos.  The highlight was the Turn 8 destruction of the Northern Caisson by Purdon’s commando using their last charge, after being attacked.  They needed a D6 roll of “1” to do it, and they did.  That was 12 VPs!   On the other hand, Woodcock’s commando couldn’t destroy even one of the three storage tanks in Sector 1.  Each tank was 3 VPs, and would have put me in range of a decisive victory.

I’m going to play it again.  Here’s an overview of lessons learned and rules I need to pay more attention to.

  1.  Destroy searchlights and guns, or at least, hit the Power Station.  The illumination effects make the already murderous Harbor Defensive Fire even worse.    Grenade attacks on guns/searchlights are an excellent use of assault teams.
  2.  Do a better job of getting demolition teams to their historical targets.  I just whiffed on this one and if they attack their assigned target, it’s a +1 DRM for demolition attacks.
  3.  Pay attention to the rules on ammunition depletion when a commando loses a strength point.  This effects grenade/demolition capabilities.
  4. Try to get the Wynn to accomplish its historical mission of destroying lock gates.  I had to use other boats for this.
  5. Don’t assume that the German reaction will be as slow and weak as the last game.  Lots of D6  rolls of “6” really restricted reaction movement, and low rolls for activation reduced the number of German units.

Raid on St. Nazaire – Turns 3-5

Rather than grind through the move-by-move, here’s a few overall comments about the game play using the rules as a guide.

German Harbor Defense:  Has been effective, especially during Turn 3, when 9 targets were hit using D6 to hit roll of 5 or less.  The maximum possible is 12.  Change to less/equal D6 of 4, literally saved the British.

Covering Fire:  Useless for the British. Need a 2D6 of 8 or less, and I’ve been rolling 8+.  Also, the mods due to loss of flotilla gun strength has not helped my rolls.

Dockside Defensive Fire:  A mixed bag for the Germans.  Some successes, but limited.  Not the weapon that Harbor Defense is.

Open Sea Combat:  So far, one British ship has escaped without contact.  More to follow.

Scuttling:  I scuttled the Campbeltown on Turn 4 and took off the surviving crew.  While this will help with VIPs, it severely reduced the flotilla firepower (see Covering Fire, above).  BTW, the Campbeltown took very little punishment before ramming the Southern Caisson.

Torpedo Attacks:  Despite low probabilities (1-2 on D6), torpedo boats knocked out two swinging gates, for 8 total VIPs.

German Activation/Movement:  Started slowly, but more and more Germans are available.  Unfortunately for them, I’ve been rolling D6 6s, so only those units with a strength of 6 can move.   This has severely hampered the reaction forces.

British Land Movement:  Managed to foul up the objectives for some units, so some moves have been counterproductive, and have effected the ability of units to quickly get to lucrative targets – especially the 12 VIP Southern Caisson.  I’ve not done a good job of mixing and matching assault (small arms and grenades) with demolition units, especially when attacking flak positions.

Grenade Attacks:  Once I figured out that assault units can do these, they’ve been fairly successful taking out flak positions.

Demolition Attacks:  Success on first try has been 50-50, with the key being to have the demolition unit end their move at the target and not take the +2 modification for entering the area during the turn.

German Ships:  Haven’t messed with them.

End Turn 3 Western Half of AO
End Turn 3
Western Half of AO
End Turn 3 Eastern Half of AO
End Turn 3
Eastern Half of AO

Started landing during Turn 3.  Sent two MTBs into the Avant Port (Zone Z) to attack gates.  Plenty of carnage from Harbor Defensive Fires.

Turn 4 West Half of AO
End Turn 4
West Half of AO
Turn 4 East Half of AO
End Turn 4
East Half of AO

Carnage in Zone B and C, but most Commandos ashore with attacks developing with some successes. Effects of German reaction are minimal.

End Turn 5 West Half of AO
End Turn 5
West Half of AO
End of Turn 5 East Half of AO
End of Turn 5
East Half of AO

Started evacuating troops back to England, moving back to Zone A.   Commando attacks spreading out, more targets destroyed, but German reaction is becoming a problem, with more troops flowing towards the assault and demolition teams and, especially, those moving towards the South Caisson.  I have a few boats lurking at the embarkation points anticipating debarkation there.