Started the campaign game, which didn’t last long. An 88mm anti-tank gun blew “Ripper” up on the second day of combat. All unspotted AT guns are treated as 88s until spotted. This one wasn’t, I didn’t use smoke and get the hell out of there, so (in Tim’s words) “Blammo”!
Definitely hooked on the game. Fairly comfortable with the rules and sequence of play. It’s heading back to Central Oregon, and will be set up on return.
Patton’s Best (PB) lies somewhere near the other end of the solo spectrum from In Magnificent Style. I would characterize it as “accessibly granular”. An excellent review can be found here.
I received this game as a gift in the late 90s. It has languished since then, even exiled to The Lake. However, the continuing bad weather was enough motivation to get it on the table and start punching counters.
The rules are organized, but lack a play-thru to help synthesize an understanding of the many steps involved. While an outline of the daily sequence is printed on the mounted map (along with several charts and Battle Board), one has to jump around between three other charts and brief explanations in the rules to gain a rudimentary understanding of game flow. It took several hesitant steps to get semi-comfortable with how to proceed.
Like its cousin, B-17, PB is best played as a mini or full campaign and not a one-off, although the rules allow for interesting daily missions. The elusive (it’s appended to the back of the After Action Report Pad, and took an internet search to locate) Combat Calendar breaks the Northwest European Campaign down into operational segments with differing tempos of operations, weather and missions.
PB has a great deal of replay value. The wide variety of German weapons, areas for combat, and types of Shermans (18!!!), make for any number of trials and tribulations for the crew. The After Action Report allows for good narrative and character development. A fine example of this is the “Spring Chicken” saga over at Web Grognards.
I’ll be digging into this one over the next several days. Might even bring it back to Central Oregon.
Never been much of a video game player. However, a long time ago I developed a serious addiction to Space Invaders. After school I’d head home, fire up the Atari, and hammer away at those lock-stepping aliens. After a month or so, I was slaughtering them at the cyclic rate.
Now the shoe’s on the other foot….I’ve been playing “In Magnificent Style”, Victory Games’ treatment of Pickett’s Charge. And, the slaughter has been immense.
This is a well received game, as indicated by the reviews Boardgamegeek. And, rightly so. But, to play it, one needs to be a glutton for punishment.
Confederate fortunes can change in an instant. A once orderly advance will deteriorate into a tactical shambles if the die rolls go wrong, or there is a series of unfortunate chit pulls. And, those instances will happen. The best considered prudent, or wild and audacious, advance will crumble given the time, distance and firepower challenges facing Longstreet’s Corps.
Still, the game has as strange allure. Part of it is the easy set-up, nice components, quick playing time, uncertainty, and need for only one chart sheet. And, as stated earlier, it is an elegant design.
I think it would make a great tournament game. Get about six players, and have them play three games each. Have plenty of beer available, and watch the players implode and explode when things start “going south”. It would be theatre.
Tim arrived early Friday evening, just in time for the Stanford football game. I had the table set up and ready to go. We agreed to start playing early Saturday morning. Tim took the British (Allies) and I had the Italians (Axis) forces. The plan was an ambitious one. To play the entire scenario, and watch as many of the headline college football games as possible. Oh yes….and consume many Henry’s. This was a job for professionals.
The Italians face some serious operational challenges. They are considered Out of Supply (Status 4) from the beginning of the game. Attack strength is quartered, defense and movement halved, with reduced Zones of Control (ZOC). They have no General Supply sources, and must rely on a limited number of Attack Supply factors to create either General Supply Points, or use for attacks. Italian Colonial troops (which form the bulk of their forces) can have air support only if it involves ten regiments (REs). Air units must role on the Success Table to fly a mission, unless they are in General Supply. If not, they can be aborted, or fail to fly. To top it off, Italian movement is limited until the British enter Italian East Africa.
The British commander has his own problems involving time and space. Time is critical because the Order of Battle (OB) requires two divisions have to be withdrawn by early summer. The distances in the game are significant, and by Spring, the possibility exists that roads and terrain key areas will be reduced to muddy morasses, limiting movement and effecting combat.
Play started at 0830 with Game Day as background ambiance. Here’s a summary of play.
Dec I 1940 – Clear
Allies: South Africans advance from Kenya in the south, with air units destroying a SM-79 I had unwisely deployed at a forward air field. Advances from Khartoum in the north southwards towards Kassala-Bascia-Massaula.
Axis: Consolidate scattered units in the vicinity of Kassala using HQs.
Dec II – Clear
Allies: Continue Kenya advance. Defeat Italian force at Kassala.
Axis: Retreat from Kassala to Bascia.
Jan I 1941 – Clear
Allies: Continue advance from Kenya in the south. Defeat Axis regiments holding vicinity of Bascia in the north, using motorized machine gun battalions to envelope for ZOC kill. Indian 4th Division advances south along coast from Port Saud.
Axis: Counter-attacks and destroys motorized machine gun battalions. Retreats east to mountains near Massaula.
Jan II – Clear
Allies: Advance along coast from Kenya, takes Mogadishu with amphibious assault. In the North, 4th Division continues advance shrugging off (over running) delaying Italian regiments.
Axis: Withdraws southern and eastern forces north towards Addis Ababa. Forms hasty defensive positions around Massaula. Air strike against British airfields unsuccessful.
Feb I – Clear
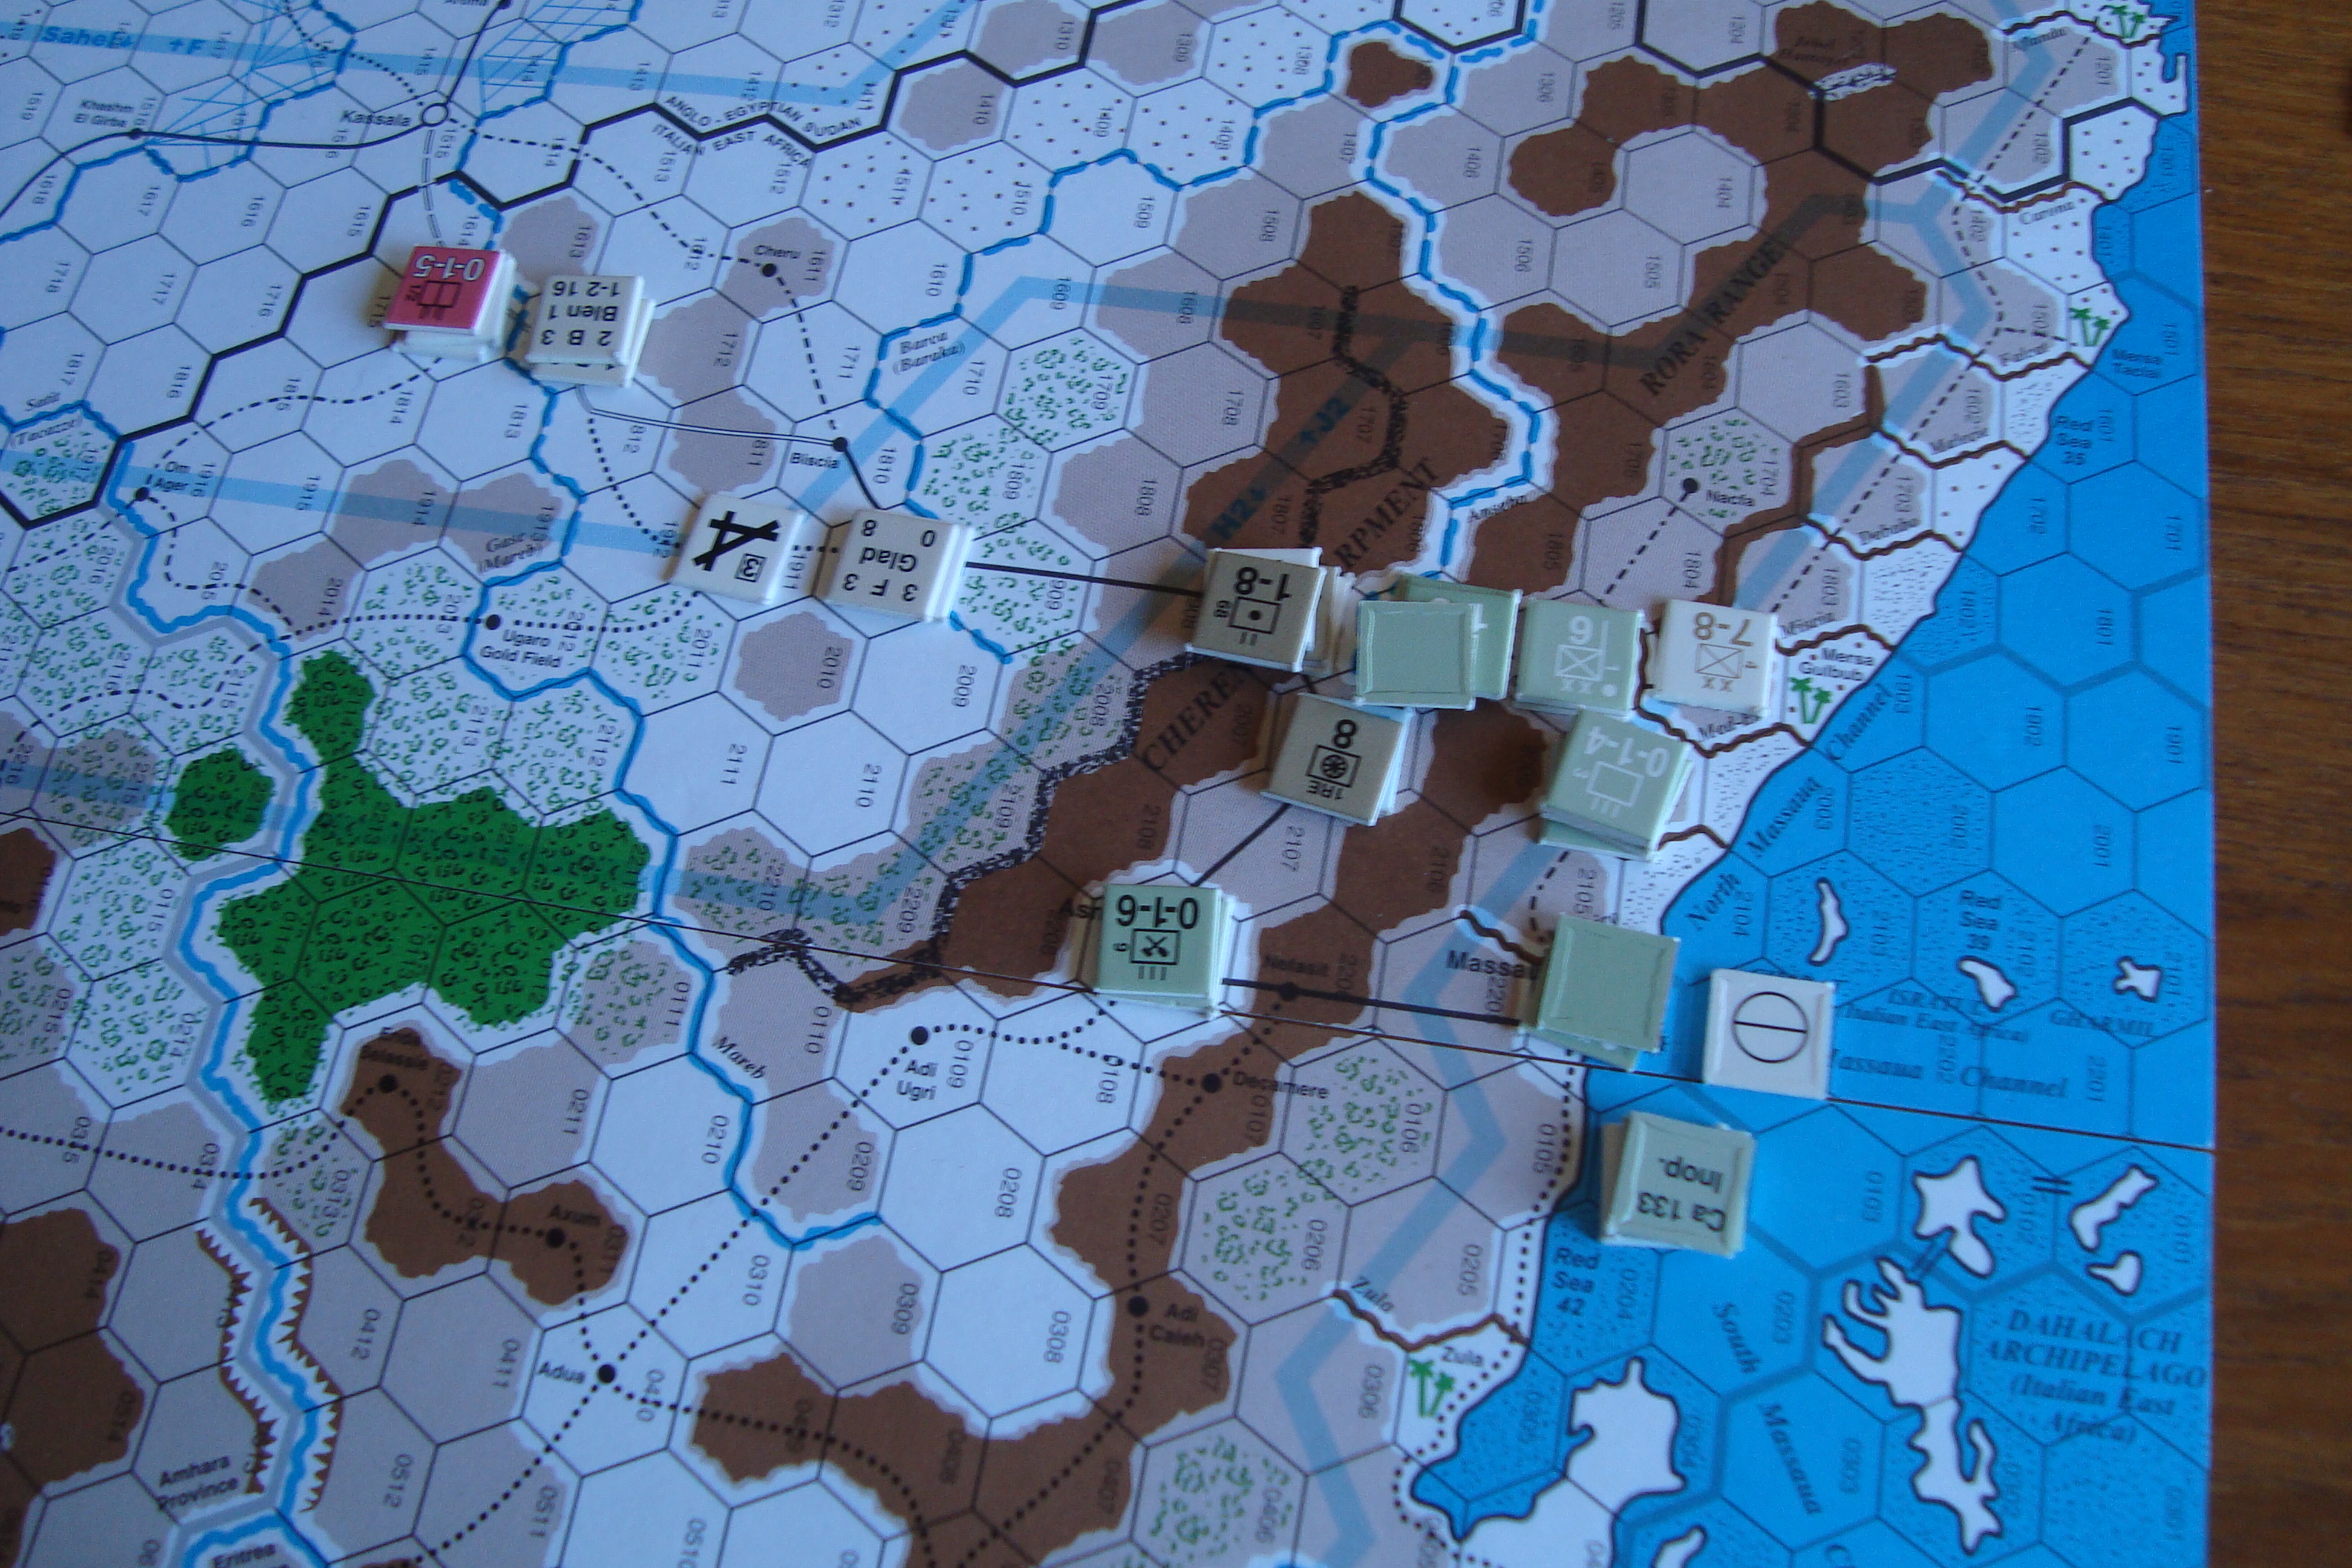
Allies: Takes Keren (key to breaching mountain defenses outside Massaula) on a half-exchange. Advances towards Addis Ababa.
Axis: Continues to withdraw towards Massaula, but hampered by British ZOCs.
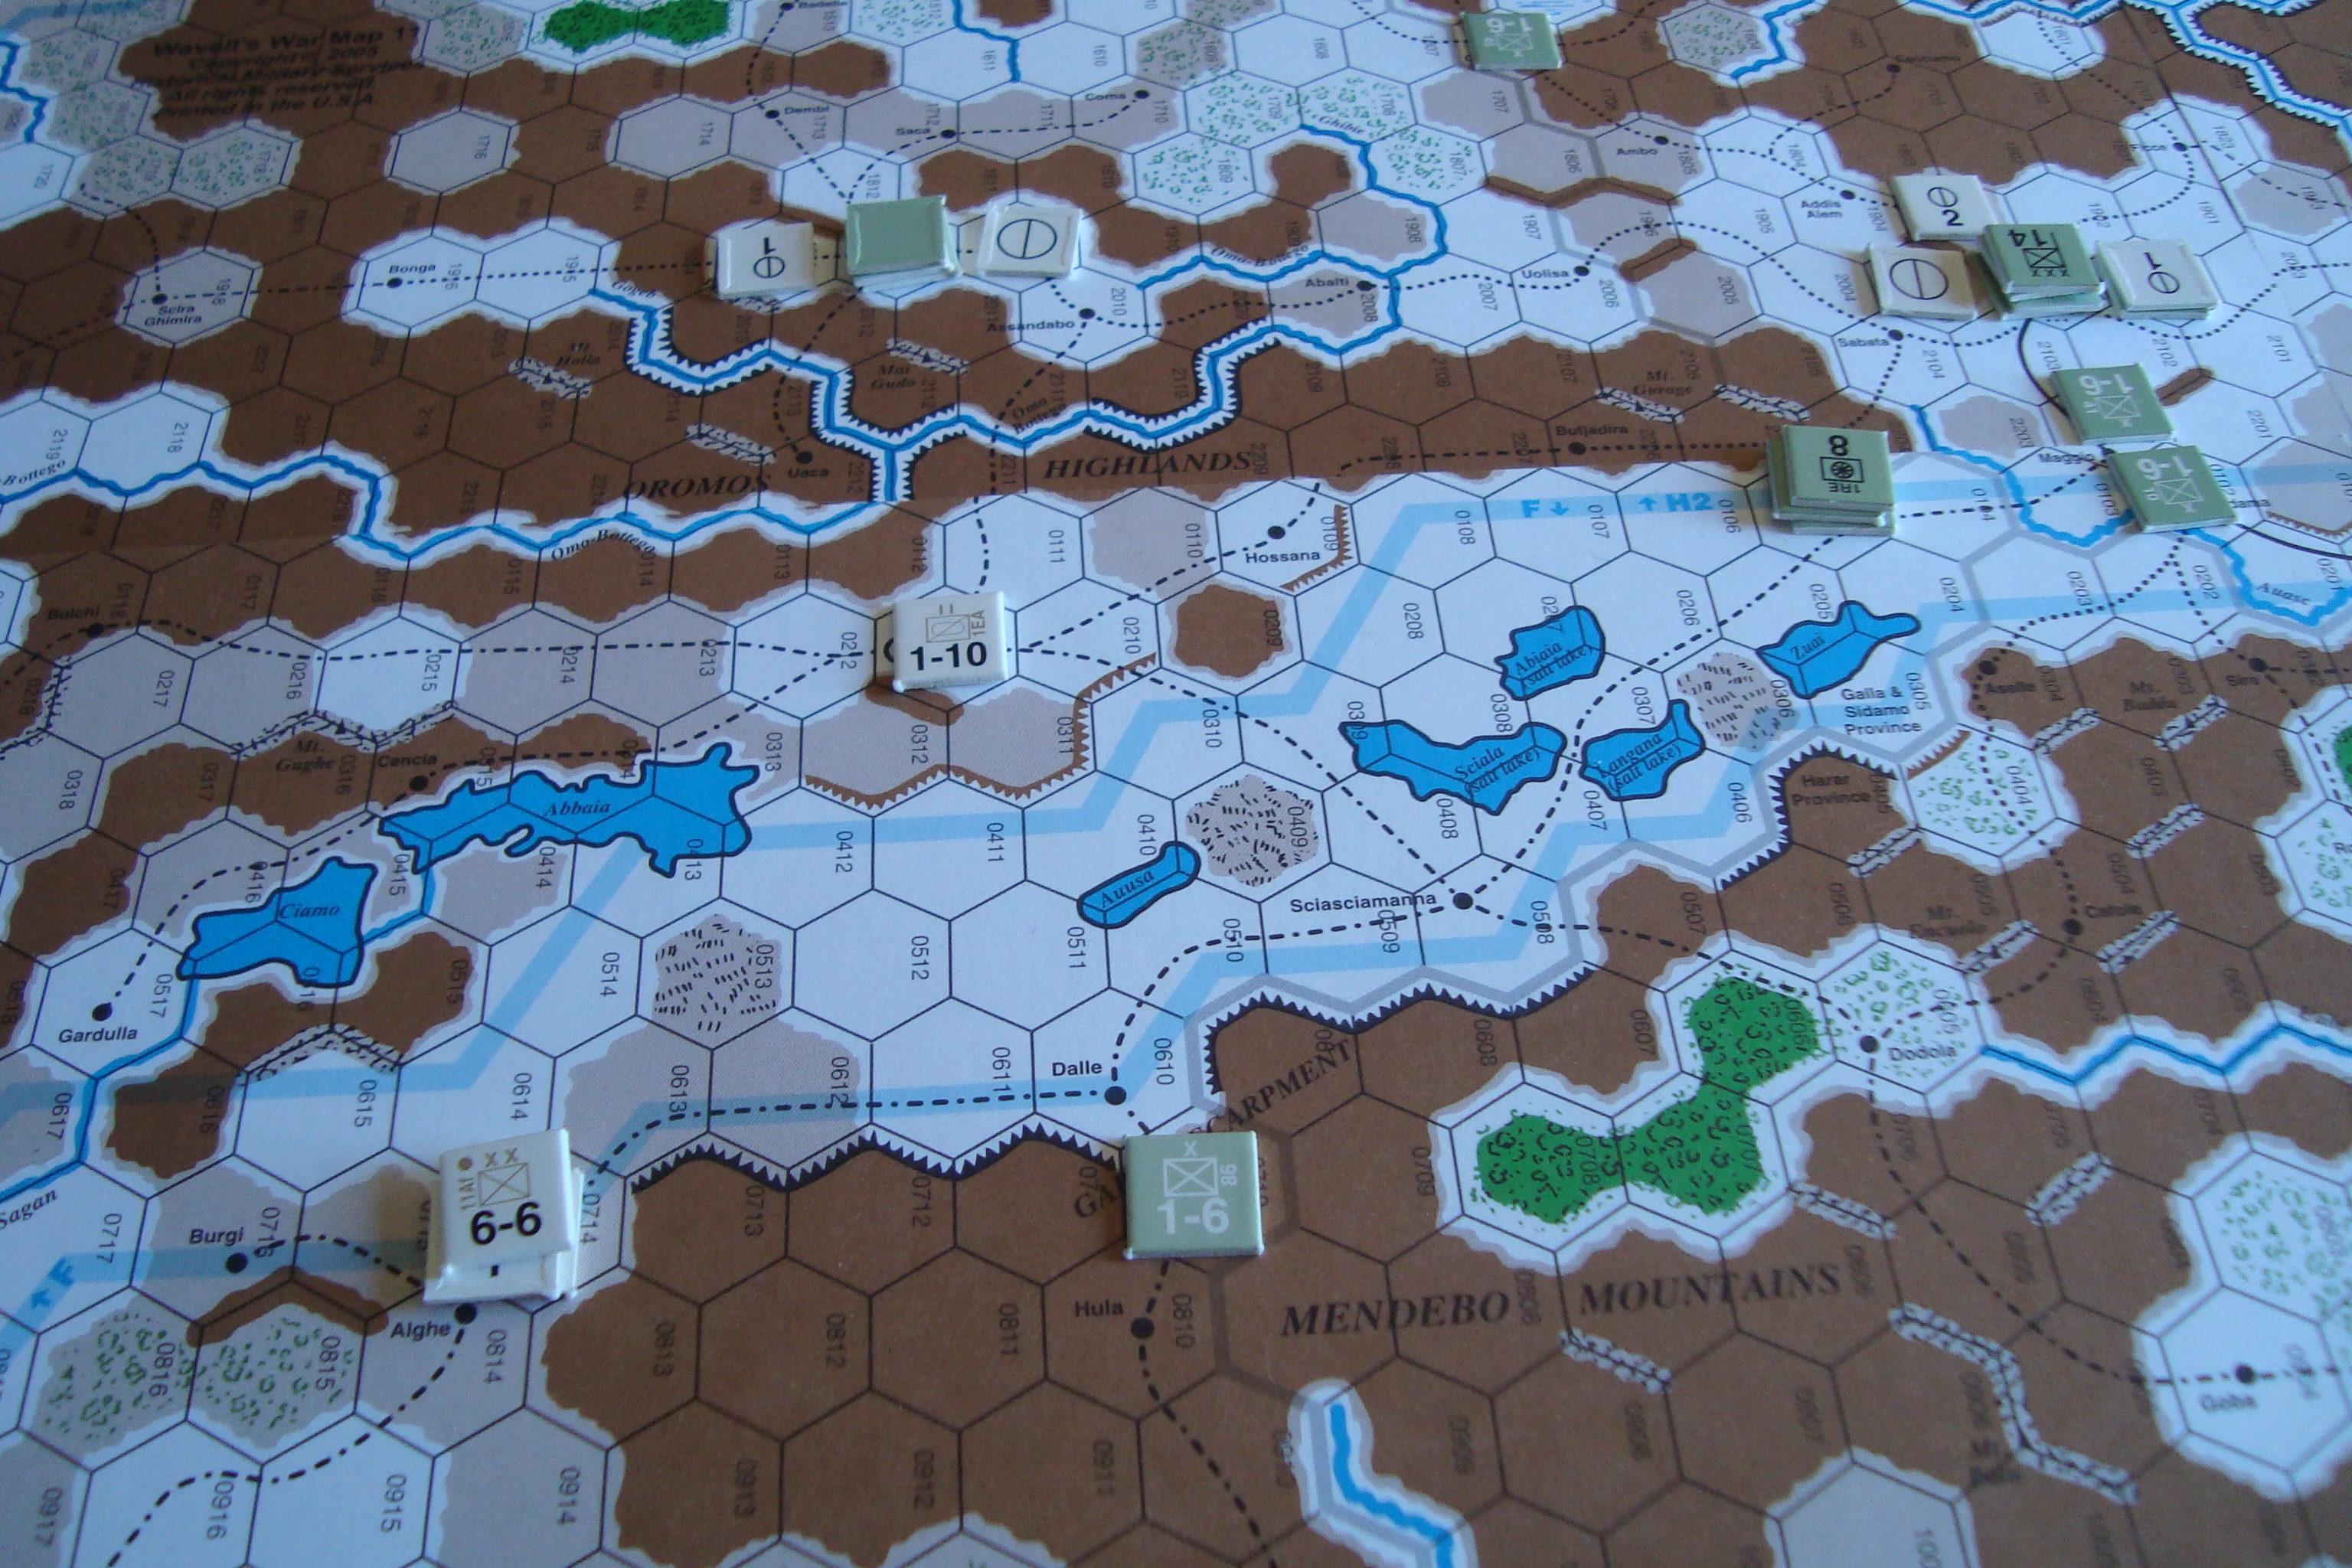
South Africans Advance Towards Addis Ababa (Upper Right).
Feb II – Mud
Allies: Consolidate near Keren. South Africans now slog in mud towards Addis Ababa.
Axis: Establish defense around Massaula, continues to move/consolidate units near Addis Ababa.
British Begin Assault On Massalua Defenders After Capturing Keren. Flipped Italian Units Are Out Of Supply.
At this point , VIPs were tallied, with each side having two (2).
March I – Mud
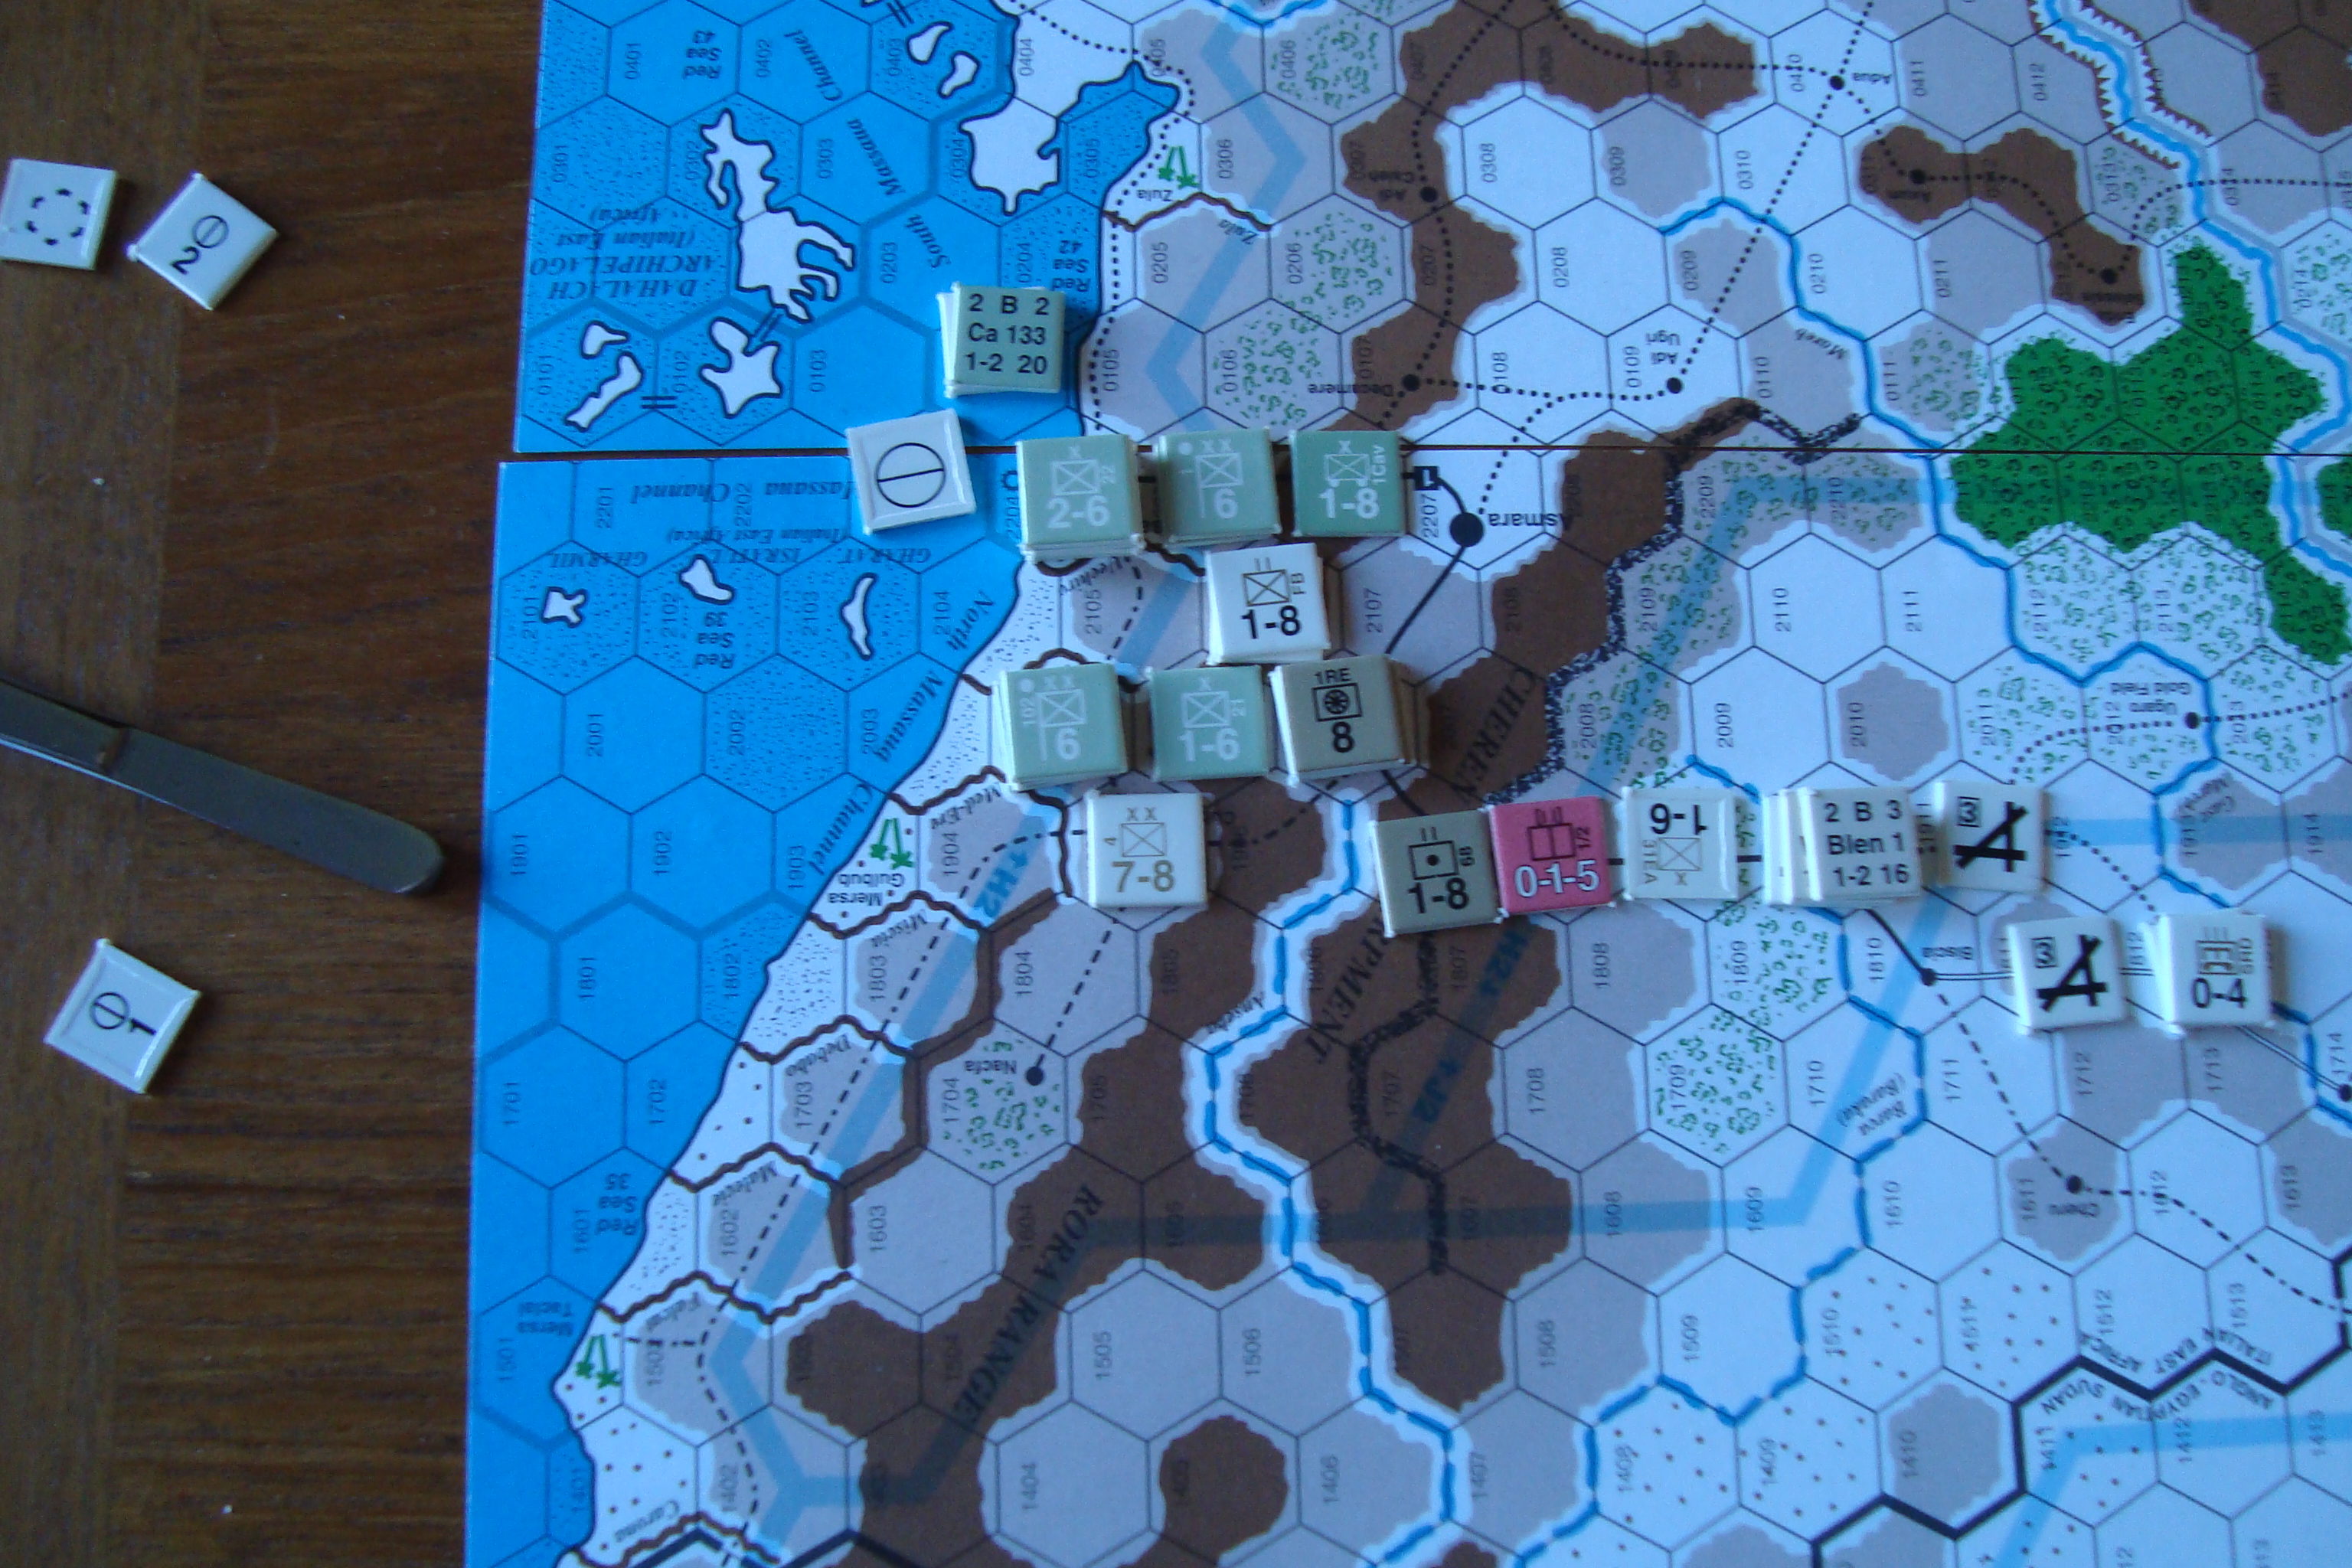
Allies: Launch assaults on Massaula perimeter defenses. Slog in south continues.
Axis: Now defending Massaula proper.
Final Defensive Perimeter For Massaula
March II – Mud
Allies: Capture Massaula (This will give them one (1) VIP), begin advance southwest towards Addis Abada. South Africans continue slog.
Axis: Forces in Addis Ababa deploy to forward defensive positions awaiting Allied advance.
April I – Mud (At this point Tim became understandably irritated by my uncanny ability to throw sixes. I pointed out to him that this was better for him with a weather role than a combat roll).
Allies and Axis: Same as March II.
At this point play stopped. We were engrossed in the Notre Dame-Texas game, and it appeared that the game would continue for more turns than time remaining to play.
You were much more aggressive in the second game. In prior games, you would use either the Bavarians or the Imperials, but not usually them both at the same time. Once you did, you were able to pick up a lot of territory. Either one of those forces are pretty strong and together they are a lot for the Protestants to handle.
I don’t know if you saw it or not, but there is a rule that if all of the cities in an area are at level 2 devastation, the VP for that area drop by one. It seems like a rule that wouldn’t come into play much, but both Saxony and Brandenburg might have lost VIPs in the last game. We rolled poorly for recovery and by the end of the game, central Germany was a howling wasteland.
I was a little gun shy with the Swedes. I had lost pretty much all of my other armies and leaders, so I didn’t want to get Gustavus killed in battle….Man, if I’d only had one more turn!
I probably should have been more aggressive against the Spanish and tried to attrit them down a little bit, so they couldn’t clobber the French. I thought about moving the army in the Netherlands out, but events always worked against it.
It occurs to me that I didn’t make particularly good use of my fortresses (it didn’t help that you rolled very well on your siege combats). I wonder if garrisoning them would force you to leave armies in place, rather than moving back to base areas at the end of the turn. Anything that slows down the Imperials in the early part of the game is worth trying…
Note: This was drafted last Friday morning, but due to sloth not posted until today.
Finally back from a month of travel.
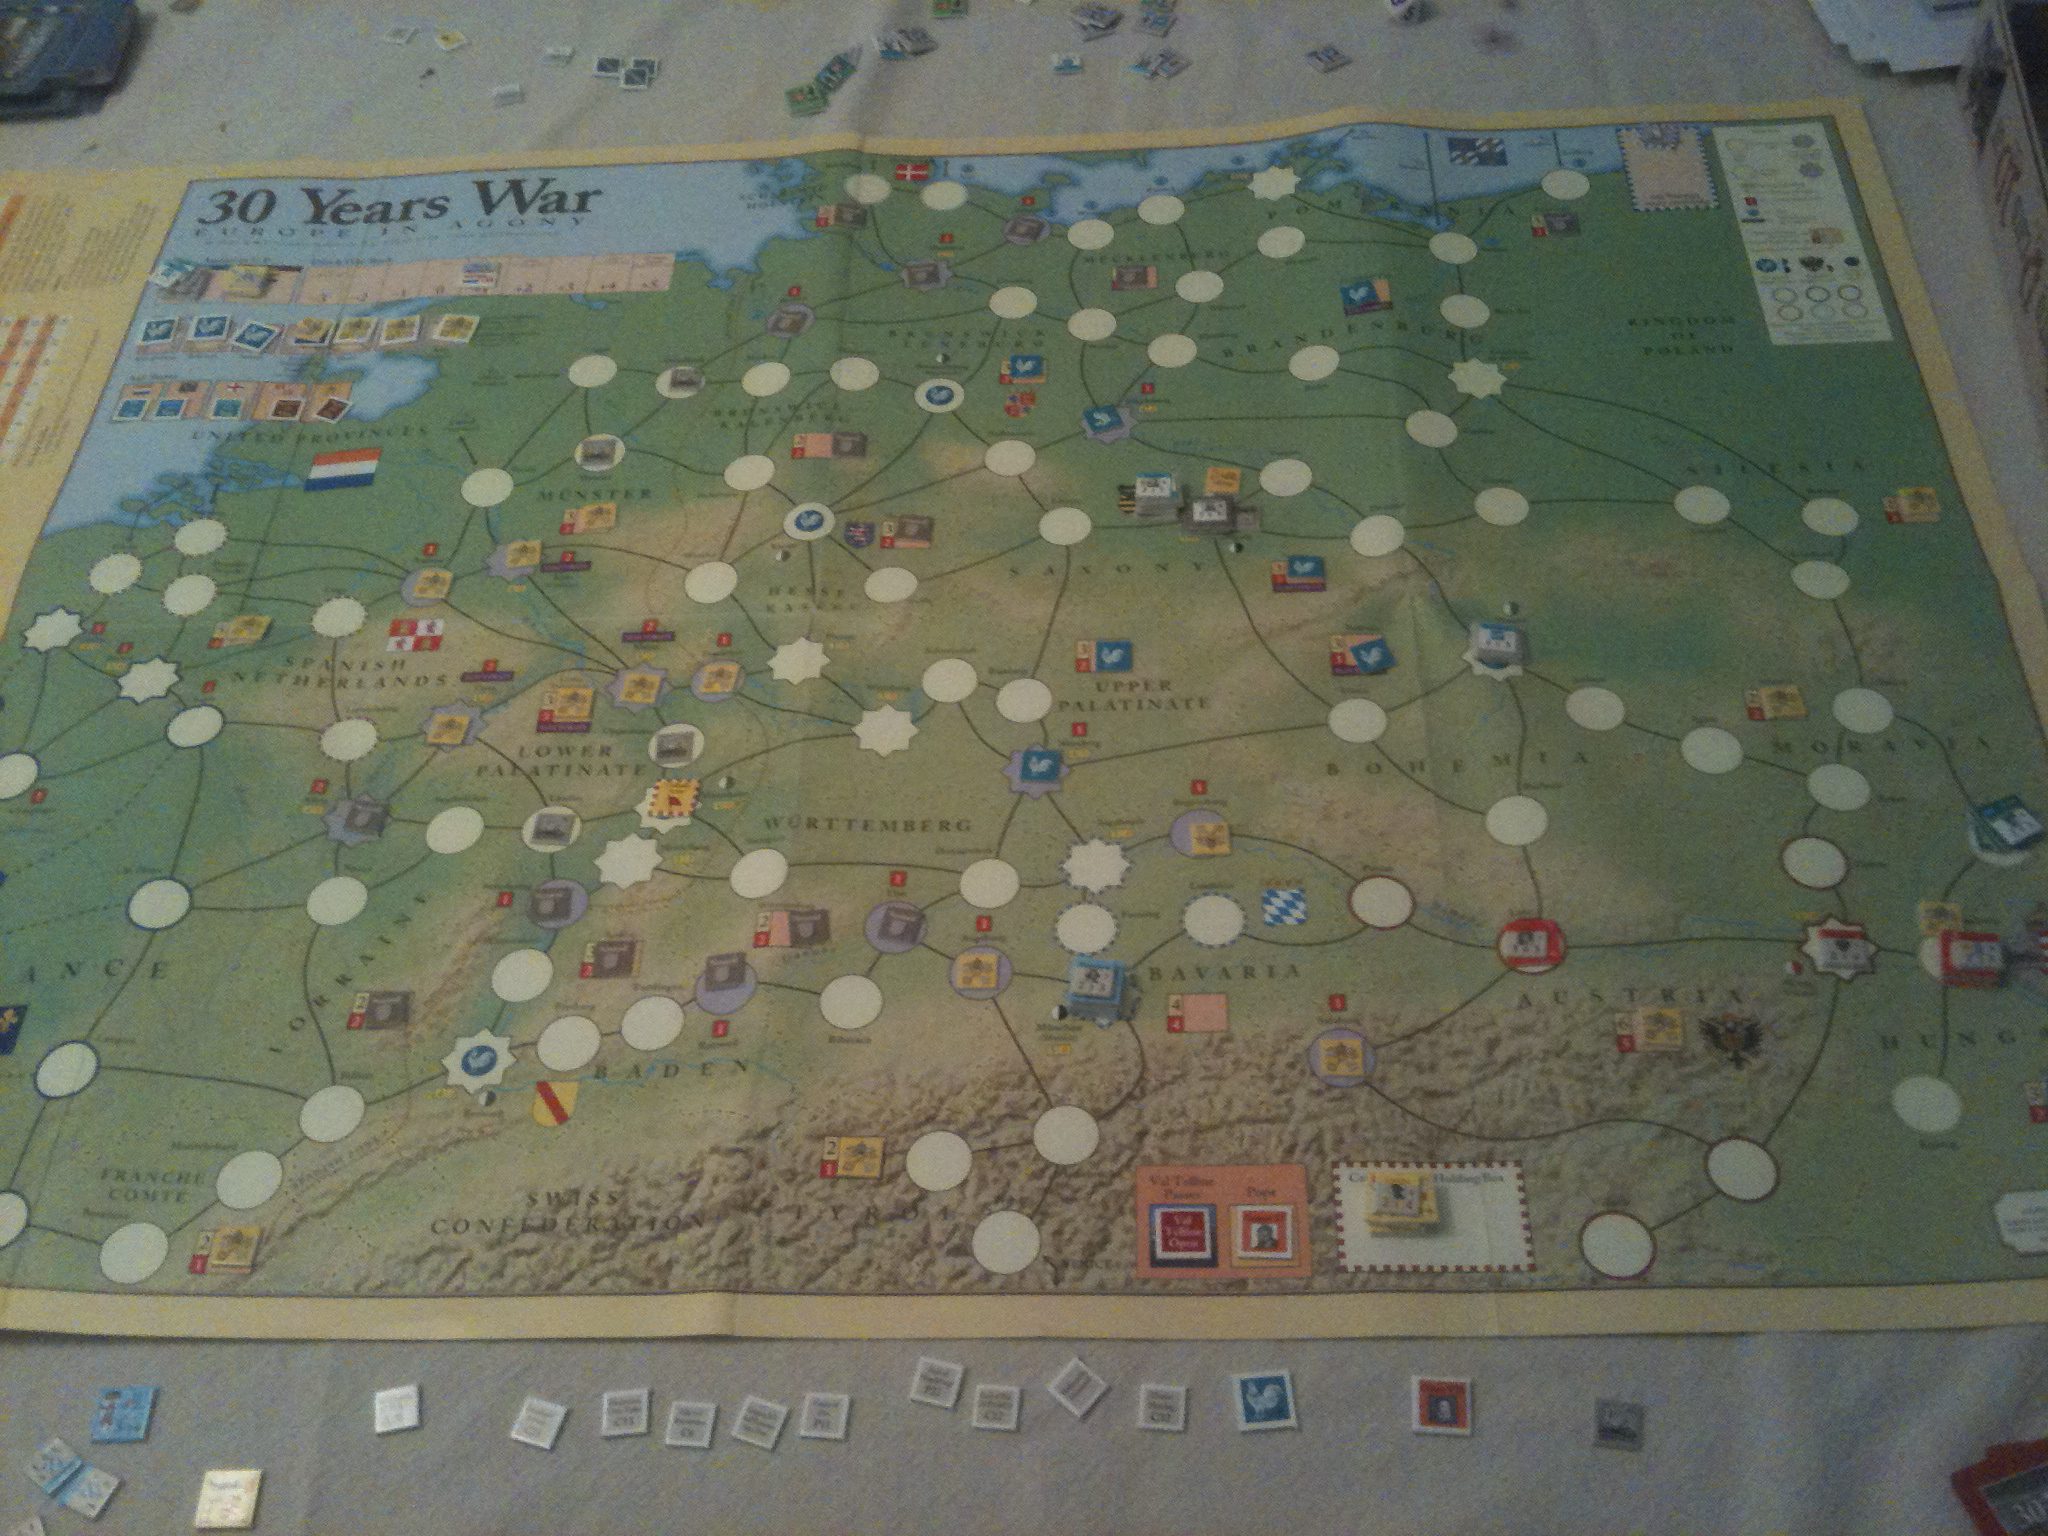
With Tim arriving later today for a game of Wavell’s War East African Campaign, I need to post up about our mid-August 30 Years War game. Tim took the Protestants, and I had the Catholics.
We played a few turns Friday afternoon/evening to re-familiarize ourselves. Lucky for me, we reset for a Saturday game. My play on Friday can best be described as cautious and inadequate.
Friday’s experience reinforced the lessons from our previous game. These were 1) Secure electorates for VIPs, 2) Recruit whenever possible 3) Try to pay as many of your forces as possible, rather than rolling for desertion, 4) Larger stacks of units are very effective and 5) The pillaging effects of movement can render large parts of the playing area almost untenable.
Both Lessons 2 and 3 involve the use of at least two cards per turn, leaving a maximum of four cards for operations. The Early War card deck has a large number of event cards, so the operational options are limited.
Play on Saturday had a good pace and tempo. Both of us adhered to the lessons learned.
By Turn Three I had been able to use my Spaniards (west of map, yellow counters) to secure the regions within their permitted area of operations.
By Turn 6, I had pushed Tim out of Hungary and advanced into the Palantine regions. France entered the war by Turn 8, pinning down my Spanish forces, with Tim’s Danes representing a threat from the North. Some electorates changed hands, but neither side could control the number required (all of them) to score significant VIPs.
I was very active with the Bavarian Forces (Blue counters in South). They took a beating, being wiped out and reconstituted twice. I was less aggressive with my Imperial veteran troops, taking losses from mercenaries. I rarely recruited militia.
Both sides used large stacks. Tim was especially adept at moving rapidly to destroy isolated units.
By game’s end Lesson 5 held true. Literally every province was devastated. Unfortunately, I did not take a photo of this.
The game’s last turn ended with a climatic battle between Imperial troops and Gustavus’ Swedes. Tim scored a tactical victory, but both sides were substantially reduced in size.
This is a good game that requires more than one playing to appreciate. Not as involved and mind numbing as Pursuit of Glory, but with far more nuance than Paths of Glory. We’ll put it on the table again.
Too much time on my hands, so I started working on some variant rules for a Habbinaya campaign. Here’s a general outline. Overarching idea is to add a bombing option without layering on too many additional rules, chrome, or charts.
Aircraft Pool – Similar to BoB. Iraq pool includes German/Italian after “x” number of rounds (role for intervention each “turn”?).
Morale Points – Each side receives points which are reduced by successful bombing attacks. British morale roughly 2 times that of Iraq.
Bombing – Targets are either Iraq ground units, Habbinaya, or either side’s aircraft. Bombing resolved on fire combat table’s one resolution line using six-sided die. For aircraft hit role die for type destroyed. Ground unit/installation hit, reduce morale by “x” point(s). If bombing at Diamond altitude, get +1 on die roll.
Flak – Role six sided die on fire combat table’s one resolution line. If target at Diamond altitude get +1 on die roll. If hit, role on fire combat table’s eight resolution line.
Air Combat Rounds – This is where it gets real sketchy….critical to keep track of ammo use/short burst optional rule.,
Mission lasts “x” card plays.
Determine if mission is escorted or not escorted.
Determine if mission is intercepted or not intercepted.
Defender must disengage from escort in order to attack bomber.
Bomber must survive “y” of “x” mission card plays in order to bomb.
I’ll keep fooling around with this until I return home and can do some research on OB.
Still playing Minden Games’ Battle Over Britain. After several solo plays, decided that a campaign is the best way to enjoy the game. Similar to B-17, where the “one-of” games are fun, but a couple in a row get boring.
Along those lines, I put together aircraft ratings for the 1941 air campaign over Habbinaya, Iraq for those aircraft not available in the Battle Over Britain series. I’ve always been fascinated by that campaign and the use of antiquated aircraft to defend the RAF base.
I don’t have access to a word processing program that constructs a grid, so the ratings will be linear in the following sequence. Speed, Agility, Fire/Fire Rear, Performance and Damage.
These ratings are based on aircraft data from various sources, and comparisons of ratings in both the Minden game and Perry Moore’s Sonderkommando, an interesting simulation of the campaign.
Been messing around with Minden Games‘ Battle Over Britain (BoB) the last few days. This “Tactical Plane vs Plane Air Combat Game” is designed by Gary Grabner, who also owns Minden Games, and publishes both Panzerschreck and Panzer Digest.
I’ve always liked Gary’s games, and the BoB series is no exception. First published in Panzer Digest as Faith, Hope & Charity – Air Battles Over Malta, 1940-41, the series now includes Battle Over Britain, Flying Tigers and a Solitaire Module.
What attracted to me to the series is its use of a wide variety of early war aircraft. These include CR-42s, Gladiators, a Polish P-11c, a Dutch Fokker D.XX1, and a German HS-123.
As with many Minden Games, the action is generated by the use of a deck of playing cards. These cards are used to establish each aircraft’s altitude and firing position on a Dogfight Display. This display is a simple grid using card suit and value.
Each aircraft counter has a top-down view of the aircraft, along with its Speed, Agility, Fire Modifier, Performance, and Durability Ratings. Speed indicates the number of cards in the player’s hand, Agility determines how many new cards can be drawn if the player “Yanks The Stick”, Performance rating differentials allow players to disengage from combat, and Durability is the number of hits an aircraft can take before being destroyed.
He’s incorporated a lot of chrome in both the basic and optional rules. These include ammunition, rear fire, a tailing bonus, ace status, and bailing out. The latter can be used in a campaign game. Several ideas (which Gary refers to as “abstracted”) are included in the rules.
The components are basic, but get the job done. I can see using a small terrain map with the grid superimposed, along with Tumbling Dice 1/600 aircraft to create a nice visual effect.
Gary designed this as a “fast and furious” card game with high replayability. He achieved these goals. It’s a lot of fun!
Picked these up the other day. Looking forward to incorporating them into my HON collection. But, these gazettes also show why this game is not loved in the (USA) Grognard Community.
The caricatures of historical figures, creation of personalities & inclusion of (caricatures, again) Hollywood war movie actors, combined with typographical errors and, what I assume are flights of Gallic fantasy (yes the publisher, Devil Pig Games, is in France), can make a serious gamer have real reservations about the product.
Despite this sometimes colloquial and sophomoric perspective on World War II, the issues (and the base game) are well worth the relatively low cost.
Issue #4 includes counters and scenarios for Brandenburgers. How fun is that! Issue #5 focuses on the Arnhem Bridge, and while it requires the use of counters from the Pegasus Bridge Expansion, includes two large unmounted maps of the (now John Frost) bridge. Plus, there are counters and scenarios to include the Poles. Even more fun!
I haven’t played the scenarios, but the additions to the inventory create even more options for the gamer with the imagination to DIY any number of small unit actions.
As always, the components are fantastic and a real option for the miniature wargamer lacking the time or patience to start painting up Bolt Action platoons.
As I’ve posted up before, the game system is fast moving, intuitive and a source of enjoyment. Hardcore simulation? No. Fun option to the drudgery of other tactical systems? Yes!