Category Archives: Review + Session Report

Chosin Few

Set up Chosin Few for a change of pace from my State of Siege games (yeah, the Hapsburg Eclipse post is coming soon…baseball is in the way).

Had read several positive reviews about this game but hadn’t spent any time looking at the graphics on Boardgame Geek .

Opening the box was a real revelation, and not a good one . While the topographic map is nice , the troop disposition graphics are not to my taste . The order and event cards with their faux typewriter fonts seem just a little too precious.

The overall look is that of a Euro Game that can’t quite make up its mind

The rulebook is only a few pages long, but does an adequate jobof explaining the game’s mechanics. However, the abbreviated discussion of the campaign , with plenty of space still available, is very disappointing .

Despite this bad first impression, my first few turns of a playthru was good . While highly abstract, the mechanics seem to give a good sense of the challenges facing the US forces.

I’ll bring this one with me when I’m back TAD later this week. Speaking of week, here’s a  photo.

Ottoman Sunset

Playing a lot….Posting not so much….

No shortage of reviews or comments about this game, so I’ll stick with a general overview.  It is one of the States of Siege series by Victory Point Games.  The first game was Soviet Dawn.

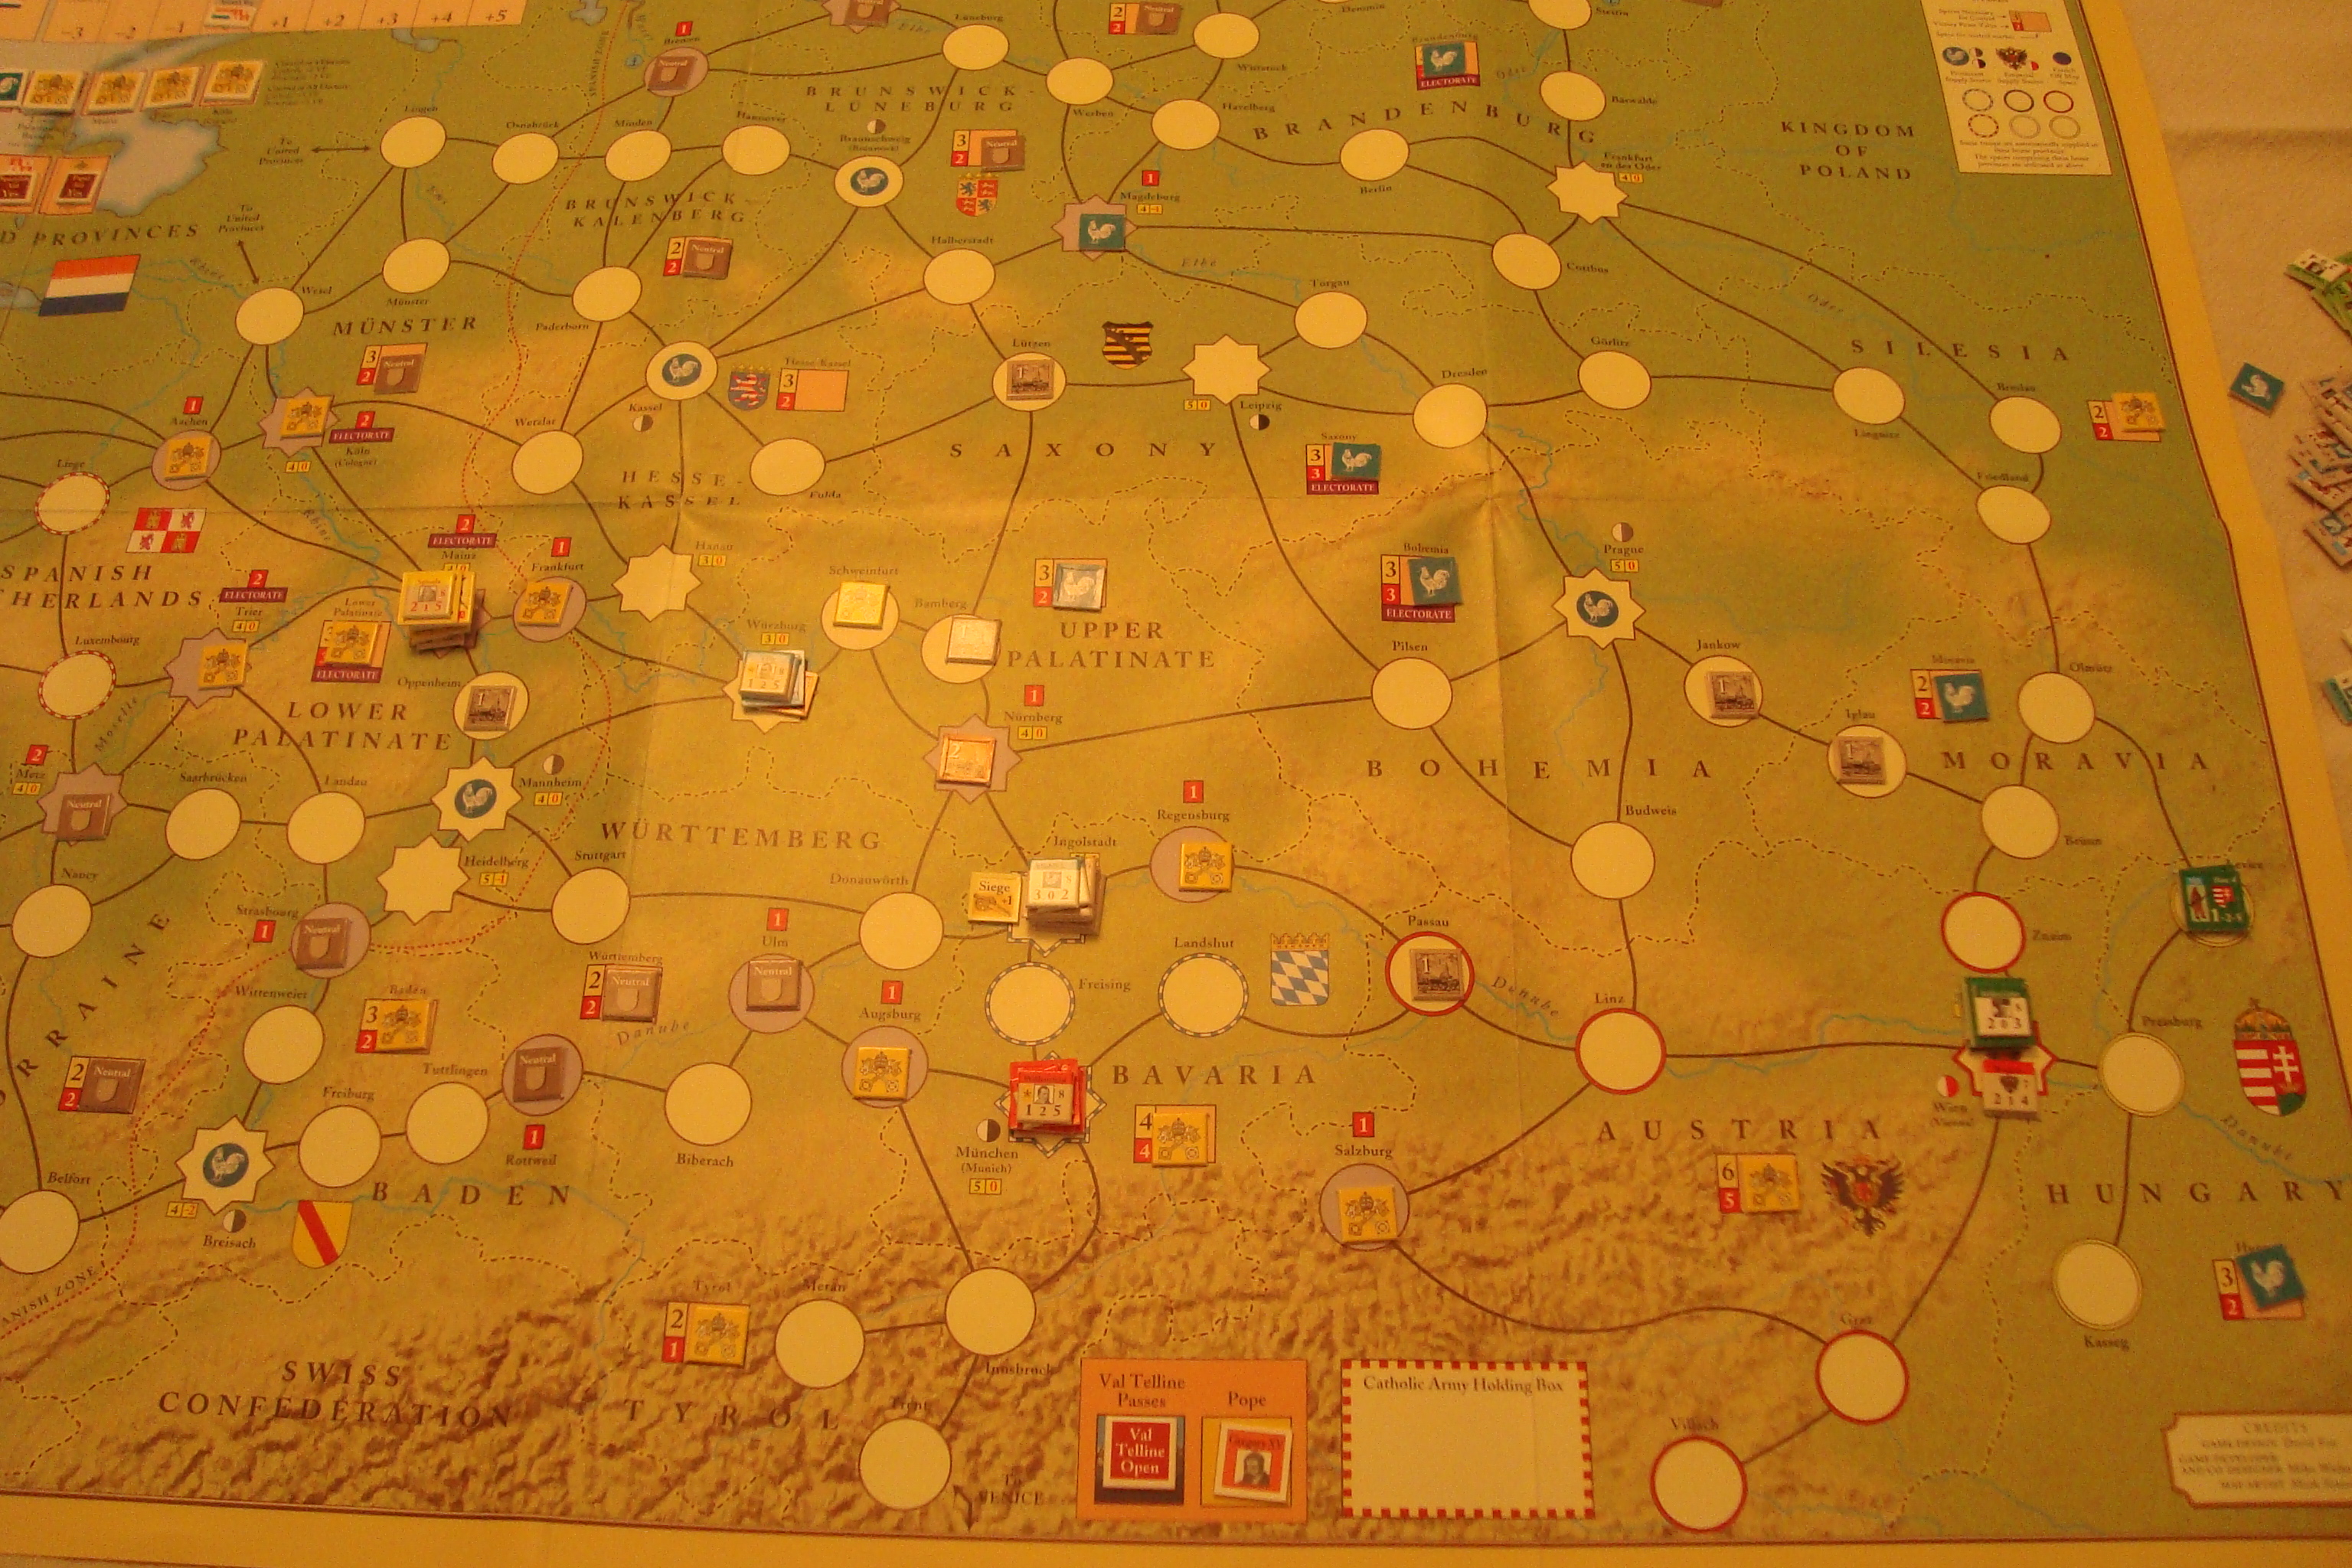
Nice quality components. The interlocking “puzzle” map is great, but the paper map tends to show crease wear after a few playings. That’s the only negative thing I can say about this game.

 This is a fun game and an intriguing examination of the same topic as the more complex, involved and time-consuming Pursuit of Glory.  

As with the GMT product, the player must juggle the demands of several active fronts and react to out of theater events. These pressures only increase as the game, and introduction of new card decks, moves along.  

The Ottoman Player is tasked with defending Constantinople while maintaining National Will until all Event Cards are exhausted. Initial set-up is so simple the information is contained in a separate event card.

The core of the game is the card deck, which is divided into three sub-decks, representing three phases of the war. Each card has Event, Advance and Action sections, along with historical commentary concerning the Event. Events can be in-theater or out-of-theater, requiring the resolution or introduction of an element into the game. Advances dictate which enemy force or forces advance towards Constantinople, and the number of actions dictate the limits of what the Ottoman player can do: roll to stop an advance (by a die roll greater than the invading army’s strength), allocate resources to off-map theaters or foment rebellion in Persia, India or Afghanistan.

The on-map theaters are the Sinai, Arab, Mesopotamia, Caucasus, and Gallipoli fronts.  In addition the Aegean narrows leading towards Constantinople must be defended against British naval attack. British success here will immediately end the game.

While the initial three fronts are manageable, the addition of a fourth or fifth can overwhelm the Ottomans.

I played four games and have had different outcomes each time. These have ranged from total defeat to a marginal victory. It is very hard to gain a decisive victory.

In three of the four games, I was fortunate to have success in the off-map battles/events. These events directly effect National Will. A victory increases National Will, while defeats reduce it. Roll poorly, and your game will be a short and/or disastrous one.

For this reason, I devoted early actions (before other on-board theaters come into play) funneling resources to the three off map theaters in order to gain die roll modifiers for these off-map events.

The Ottoman player also receives German aid or elite units to modify combat rolls.  These help avoid the loss of cities that have a negative impact on National Will. 

One disastrous event that cannot be avoided is the War Weariness event.  This leads to a -1 die roll modifier on all combats for the rest of the game.  This event usually occurs just when the Ottoman player is assailed on all fronts, with every roll being critical.

Replayability is excellent because the inclusion of a new card deck is driven by a specific drawn card.  Draw this card early, and the deck expands.  This is not a good thing for the Ottoman player because the three decks are composed in historical chronological sequence and, historically, the further the war progressed, more adverse situations developed.  Again, not historical, but dynamic in terms of game play.

Great Game, Great Fun.

Here is photo taken of my marginal in the bizarre lighting and bizarre gravitational camera pull of the Airstream.

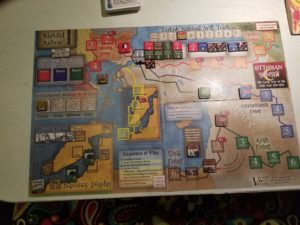
Note the high number of Off-Map Theater victories, defeat of British at Gallipoli, and defeat of Russians in Caucauses.  However, it was a near-run thing given proximity of French in Salonika and Arabs (!) to Constantinople.


Leningrad – Again

Good game, and as advertised in reviews.

Quick play, small footprint.  Unknown strength Soviet units help make it solitaire friendly and increase replayability.

The Germans have to be good and lucky to win.  I didn’t make low odds attacks or try aggressive overruns, and wound up losing.  Sums up the whole historical proposition.

Now, the Soviets have to play their part, too.  Can’t just lay back on Leningrad.  Some level of forward defense is needed and, necessary.

It’s nice for a game to live up to one’s memories.


Next Up – Leningrad

Decided to go with another small and quick game.  Can remember several enjoyable solo sessions many years ago.

The full title of the game is Leningrad:  The Advance of Army Group North Summer 1941.  An excellent review of the newest edition can be found here.  I’m playing the original 1979 game.

As the author points out, it’s a beginner’s version of the very successful Panzergroup Guderian series of games.  These were a mainstay of late 70’s and early 80’s board gaming.

Will set it up tonight and get on it tomorrow.

Shredding

Felt rather bloody minded yesterday, so I set up Cold Harbor II. This is the folio update of a game originally published in Panzerschrek magazine.

Just like the real battle, the Union attack has little chance of success. The game mechanics are simple, but simulate the entrenched Confederates’ devastating cannon and rifle fire. Each turn, the attackers are subjected to separate cannon and rifle attacks before they even have a chance to move. There are no step losses. Units are straight eliminated. Yikes! Movement rates are slow, and can be slowed even more by random events.

To win, the Union troops have to capture just one of the designated entrenchment hexes. The problem is getting there, and if they get lucky, holding it during an (almost) inevitable counterattack.

The big variable in the game is the Confederate artillery. There are a number of “dummy” cannon counters. The real and dummy counters are pooled face down, and then randomly selected and one each is placed in an entrenchment hex. If, for some reason, one section of the line has a few dummy counters, then the Union has a chance. If not……..My try didn’t even make it to the entrenchment.

Here’s a photo of the map and initial setup. Rhonda did a great job of coloring the black and white map that came with the game.

Ready To Pick And Place Artillery Counters

Will I play this again in the near future? No. Sometime?  Probably when I get in that bloody minded mood again.

Swordfish at Taranto

Back in Sunfish Capital of The World. The 1942 game is on hold for the next week or so.

Set up and played Swordfish at Taranto. This is another of Gary Grabner’s solitaire designs published by Minden Games.

The game mechanics are straightforward and, as with most/all solitaire games, involves significant wristage. The player commands the 21 Swordfish torpedo bombers that took part in the mission. Playing time is 30-45 minutes, with much of it allocated to the preliminary Mission Planning and Harbor Readiness steps.

In the Planning step, the player uses a pre-printed log to assign which of the two attack waves each plane is in, its payload (bomb/flare or torpedo), its approach towards the ships anchored at Taranto, and target (anchorage, shore facilities) to be attacked. This log has each pilot and plane’s identification number already filled in.

Next, the player rolls to determine the harbor’s alert, anti-torpedo net and barrage balloon status. These can create DRMs during the Approach step.

Each of the two attack waves follows a series of steps, with each aircraft rolling a six sided die for outcomes.

The Take Off and Outward Flight step determines if any of the aircraft suffers mechanical or navigation issues, which may abort their mission or cause problems later.

Flares are deployed in the next step. The failure to deploy flares effects attack results.

The next phase is the Approach step, followed by Target Acquisition and, finally, Attack step. A series of tables determines any damage to each aircraft, which ship it attacks, and results of the attack.

The Homeward Flight and Landing step determines which of the surviving aircraft land safely. Damage incurred during take off, approach or attack can effect this outcome.

Victory points are awarded for minor damage, major damage or sinking a capital ship, as well as damage to smaller craft and land installations.

Despite the laundry list of actions required for each aircraft, the game plays quickly. The charts are embedded in the rules (as is the Log), but are not spread out and organized sequentially by phase. You can literally work through the rules/charts while playing.

The map is small, with rudimentary graphics. I would recommend using a copier to increase its size to allow more room to place individual aircraft counters.

First Wave Approaches.  Aircraft/Mission Roster in Background.


I lost two planes during the attack, and one on landing. The two waves sank three battleships and inflicted other damage. This resulted in a win exceeding the historical result. I was lucky, just like the actual attack force. I decided to quit winners.

Swordfish is a fun little game, worth a play or two when time and space is tight.


Back

Been back at the Pine Cone Lodge for a week.  Moved from one work farm to another.

Finally back to wargaming last night with Custer’s Luck.  Purchased and wrote about this a few months ago, and was happy to finally get it on the table.  Fitting, because I started setting up on the anniversary of the Battle of the Little Bighorn.

This is a solitaire game, with garish map and utilitarian counters.  The rules are…..well, let’s just say they provide a framework for playing the game.  Lots of minor problems, but they can be pushed through with a little common sense.  It’s a magazine game, right?  Well, that’s harsh.  Always liked The Wargamer, with interesting topics and, at times, interesting take on things.

The game covers the 1876 summer campaign.  The Army’s objective is to kill as many Sioux as possible (shocking!).  There are three cavalry commands; Terry/Gibbon, Custer, and Crook/Merritt.  While it can be played multi-player, the mechanics are oriented for solitaire play.  Sequence of play is Custer (move & combat), Terry/Gibbon (m&c), Crook/Merritt (m&c), “Hostiles” (m&c).

The Sioux initially set up face down with each stack having a leader, village and combat unit drawn at random.  Rules say 12 stacks, I could only muster up 8.  Hostile movement is dictated by a compass chart.  They move on a  2D roll of 7 or less, and  remain stationary on a roll of 8-12.

Army Scouts can be used to identify a hostile stack.  Wagons and Mules are used for supply, with combat reducing supply capabilities.  The Far West steamboat stooges around as per the whims/attention span of the US commander.

Combat is straightforward, with leadership, terrain, surprise, envelopment, and supply modifiers effecting column shifts, not unit strengths.

Decided to play the historical scenario.  Crook/Merritt command does not move.

Initial Setup. Handwritten Player Aide To Your Left. Rules On Right With Insane Letter To Editor….Zoom In….

Decided to let Gibbon/Terry move south to pin Hostiles.  Custer was ordered to exercise restraint….OK, this is not the (real) historical scenario.

Plodding Forward In The Relentless Summer Glare, Gibbon/Terry Advances (left). Custer Shows Restraint And Is Attacked By Gall.

Hostiles begin random movement.  Gall heads straight for Custer.  This time, it’s Gall’s Luck.  His negative odds attack only results in a retreat.  Again, Custer shows ahistorical restrain and does not pursue.

Stay Tuned…….


Das BOAT (?)

Played a few more turns night before last.

Despite using an “aggressive” posture for all submarines, the Germans had a very difficult time attaining the tonnage sunk figures needed to attain victory.   And, this is a period when Allied AWS capabilities are relatively low.

Well, maybe that’s just fine.  Maybe it would have taken quite a bit of good fortune to win the Battle of the Atlantic (BOAT), just like Barbarossa.  Do you want play balance, or something akin to historical conditions?   Or, is it playability?

I think Grabner’s BOAT does a nice job of providing solitaire playability with abstract historical conditions.  Is it a simulation?  No, but it is an interesting way to spend an evening or two.

Playing

Started playing Battle of the Atlantic last night.  The active player controls German U-Boats, Condor aircraft, surface raiders and resupply submarines.

British air and surface ASW asset dispositions in each sea zone are determined by a card draw.  Cards also determine German U-Boat production and British technological advances, as well as designating certain combat modifiers for the turn in which they are drawn.

Initial Setup

Technological advances effect the order in which Allied ASW assets, U-Boats and Condor aircraft are placed, as well as which side resolves their combats first.  Technological advances (Ultra, HF/DF, Radar) are cumulative, pushing the initiative towards the Allied player.  This is critical, since losses are taken immediately.

German objectives are to a) sink as much tonnage as possible, b) maintain at least half their U-Boat fleet at the end of any one turn, and c) prevent the Allies from forming and deploying convoys.

The German commander must determine which sea zones to deploy attack assets, and what posture (aggressive, normal or shadow) they take.  Aggressive subs can sink more tonnage, but are easier to destroy.

Play is quick, with straightforward CRT tables for each combatant and asset type.

After my usual stupid misplay during the first turn (roll one die, not two on the German Attack table), the first two “real” turns found the Germans falling short of their victory objectives, but suffering light losses.  I’ll find out more this evening.

Thirty Years War

Had a couple of sessions this GMT game with Tim over the weekend.

It’s been awhile since we played it, so there was some fumbling and stumbling at first, as though that has never happened before.  We had agreed to play a few turns, then reset for a second go-through.

Both sessions were different.

This is a card-driven game, with point-to-point movement, and like its GMT siblings, cards can be used for a number of purposes including triggering events, activating leaders so units can move and fight and receiving funds to pay units.

The turn sequence involves alternating play (rounds) of six of the seven cards in your hand (and subsequent movement/combat), paying units and then determining what attrition occurs to those units you cannot pay.  Units are either veterans, mercenaries and militia, each of which have slightly different capabilities and costs to pay.  When larger armies move, they reduce the ability of a selected point to support subsequent moves.  The effects of this pillaging can be reduced in a subsequent “recovery” phase, which is actually the first phase of a game turn.

There are only a few charts, all of which are printed on one side of the map.  I was able to really improve my ability to read charts upside down during both sessions.  This is a skill I would have preferred not to have developed.

In the first session, cards were played for their event, not as much to activate leaders, get foreign aid to pay troops, or recruit.  In the second session, both of us focused on the operational aspects of the cards.

This can be attributed to card flow.  In some cases you must play one event in order to trigger other events.   And, it is in your best interest to play them successively, not wait a turn or two before playing the second or third card in a sequence.

On the other hand this can be attributed to not really knowing what the hell you’re doing.  Between sessions I asked Tim, “What’s the strategy for this game?”

Since troops weren’t being recruited in the first session, the opposing forces were rather small and the effects of looting (when not paid) were minimized.  These effects not only ravage the countryside, reducing the chance of living off the land without pay, but also ravage your units.  In the second game, my victorious Bavarian contingent was decimated because they were without pay, and in an area that had been previously looted and couldn’t support them.

We agreed that the Catholic  forces had better leaders (fewer points to activate), but that the funding for the Protestants allowed them to avoid having to roll as many times for attrition of units.

The second game featured  far more action.  The Upper and Lower Palatinate was the scene of most of the fighting, but with the Protestants coming very close to taking Vienna.  We shut it down to have dinner and, after celebrating Tim’s birthday at Gustav’s (fitting given the game), we returned in no condition to continue.

In conclusion, a very good game with – once you get it – accessible mechanics, excellent game flow, and plenty of strange twists due to the effects of attrition.

The Map Illuminated in the Soothing  Glow of Tim's Dining Room
The Map Illuminated in the Soothing Glow of Tim’s Dining Room
Spanish Veterans Cower In Their Area of Operations
Action In Palatinate & Hungarians Threaten Vienna
The Other Dog of War